How to Paint Baseboards – Easy Skirting Painting Guide
Painting baseboards is often an afterthought, but the reality is that it can make a tremendous difference to the general aesthetic of your home. We are here to take you through the entire process of baseboard painting, while also giving you the necessary tips and tricks to ensure that you do a great job. So, let’s find out how you can enhance the look of your home with a simple paint job!
Key Takeaways
- Properly preparing the baseboard for paint is the best way to ensure that you can get the job done quickly.
- You will need at least two coats of paint as they are prone to scuffs and chips.
- When painting baseboards, you will need to familiarize yourself with the cutting in technique.
- Avoid removing the baseboards if you live in an older house as this could cause damage to the wall.
- It is best to use a paintbrush across the entire baseboard instead of switching to a roller.
How to Paint Baseboards
Considering how close they are to the ground and the fact that we frequently cover them with high gloss paint – a finish renowned for exposing even the smallest drip lines as well as paintbrush strokes – baseboards are among the more problematic places to paint in a room. Professionals guarantee that it just takes five basic stages, from cleaning and sanding to finishing minor sections later.

It should also be noted that painting the trim before tackling the walls also helps. However, this is not always an option. Painting baseboards is not as difficult as you may think, since it only requires a few basic tools, including primer and paint. It can be a bit time-consuming, requiring several coats of paint and perhaps taking up to two days to fully dry. Before you can begin, you will need to ensure that you have the following materials:
- Painter’s tape
- Oil-based paint
- Primer
- Fine-grit sandpaper
- Trisodium phosphate
- Wood putty
- Angled paintbrush
- Putty knife
- Bucket
- Drop cloth
- Sponge
- Gloves and goggles
Step One: Cleaning
It is especially important to clean previously painted baseboards before repainting. Keep in mind that cleaning open-pore baseboards should never be done with water. Dirt and filth accumulate along the base of the walls, leaving this as one of the filthiest areas in the house. To ensure that the floor is protected from paint, cover it with a drop cloth. In a bucket, combine trisodium phosphate (TSP) as well as water according to package directions. Using a sponge and the solution, thoroughly clean the baseboards.

Dust naturally builds on horizontal surfaces, so be sure to wipe the tops of your baseboard as well.
It is important to remember that TSP is a very strong chemical that can burn your eyes and skin. It also discolors and damages a variety of materials such as aluminum and a variety of floor finishes. Always exercise extreme caution when using this chemical.
Step Two: Repairing the Surface
It can be tempting to start sanding and then painting once the surface has been cleaned, but this is not how to paint baseboards. Patch and fix major dents and holes that have formed over time with wood filler done with a putty knife before you start removing the paint. Large nail recesses should be filled, while smaller, pinpoint recesses can be left untouched.
If you used a brad nailer and the sink level was precisely measured, you might find it easier to merely paint over the little divots. However, if the baseboards were hammered manually with finish nails, the holes would need to be filled with wood filler.
Step Three: Sanding
If you used wood putty or filler to repair the baseboards, or if they are old, flatten and smooth them down using fine-grit sandpaper prior to adding a coat of primer. Sanding by hand with sandpaper or a malleable sanding sponge is generally sufficient.

Sanding is especially important for older baseboards that might have numerous coats of paint on them. You do not need to sand the wood down until you remove all of the older paint. The goal is to get the surface as smooth as possible.
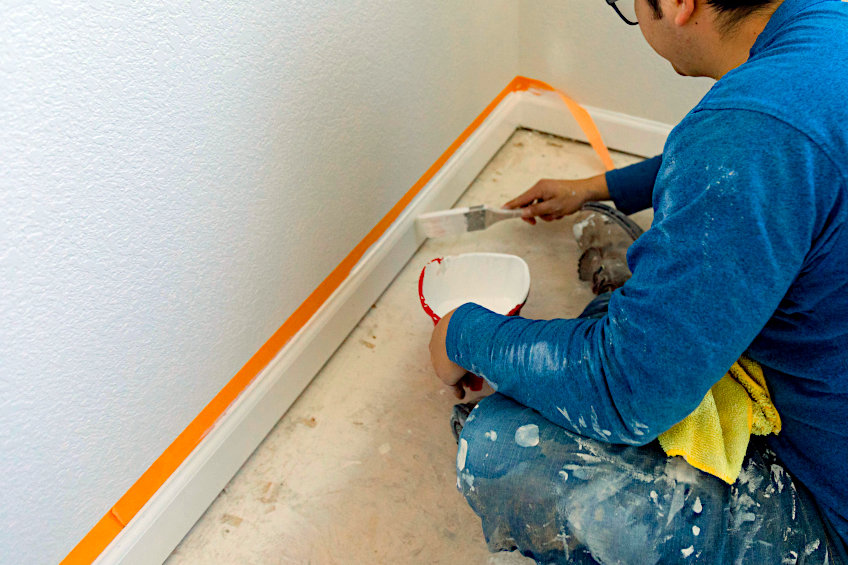
Step Four: Taping the Floor and Walls
Mask the bottom edge of the wall, just above the baseboards, and the intersection between the baseboards and the floor. It would be best to use low-stick painter’s tape. Even while masking takes time, it results in a quicker and neater paint finish. If you are a cautious painter, just placing a line of painter’s tape down the baseboard may be enough to safeguard it.
Masking cannot ensure flawless results; you must still be careful while applying the paint since excessive splatter on the flooring side of the masking tape can make it harder to remove when the paint has dried.
Use masking film to guarantee that the baseboard paint cannot spatter on the wall in that baseboard-to-wall section for further protection. Spread the film upward after running the masking tape edge along the wall-to-baseboard juncture. Static electricity causes the film to stick to the surface on its own.
Step Five: Adding a Coat of Primer
Baseboards with no factory primer or those that feature a raw wood surface should be primed before you start painting. A single coat of primer can help previously primed or baseboards that have been painted. However, it is not always essential if the cleaned area is in excellent shape.
Thoroughly combine the primer and dip the brush in the compound, being careful not to overdo it. This can result in drips and runs and then distribute the primer to the baseboards in smooth horizontal brushstrokes. Once the primer has dried, you will need to allow it to dry before proceeding.
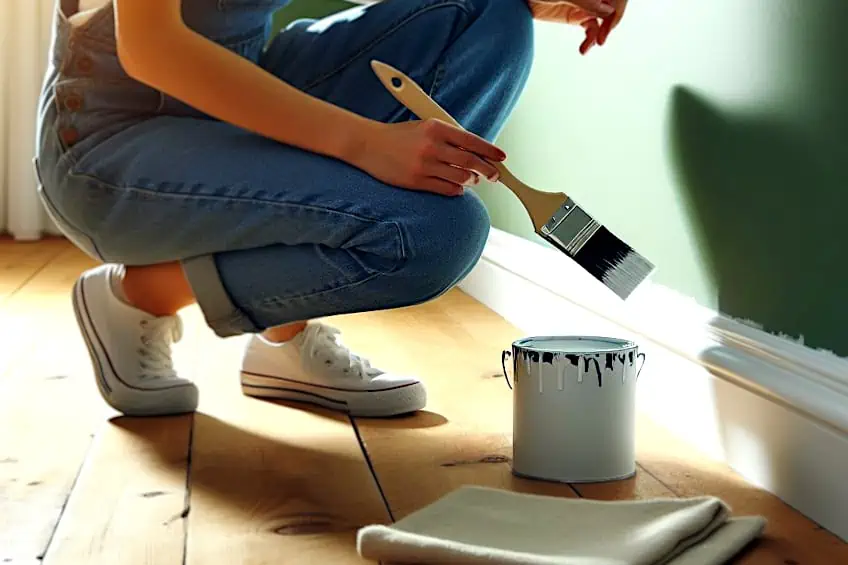
Step Six: Painting
If your sealed can of paint was left sitting for a few days, you should take it to a nearby paint or hardware store to have it thoroughly shaken. Alternatively, after opening the can, thoroughly stir it. Keep the can’s lid away from your workspace when you are painting as this could result in an unwanted mess.
As with priming, avoid over-painting the brush by dipping it no more than one-third of the length of the brush’s bristles.
Use as little paint as you think you will need for the first layer. Draw large strokes with the paintbrush along the entire length of the wooden baseboards. To avoid lap marks, aim to preserve a moist edge as you overlap the strokes.

It is a good idea to wrap your paintbrush in a plastic food wrapper or an old plastic bag and secure it over the metal ring of the paintbrush with a rubber band between coats to keep it from drying out. Store the brush in a secure and isolated portion of the refrigerator or in a cold, dark spot until you are prepared for the next application.
Allow the baseboards to air-dry for a minimum of one full day following the first application.
Apply a second layer when the paint has dried. Before applying the second layer of high-gloss paint, certain professionals like to gently scuff the painted surface using fine sandpaper. This gives the lustrous surface a “tooth” that aids in the adhesion of the second coat. Once the paint has dried, you can slowly remove the painter’s tape.
Step Seven: Cleaning After Painting
Clean your paintbrush, rollers, as well as any other painting equipment or containers you intend to preserve with soap and warm water. With careful maintenance, a high-quality brush may endure for years. It is a good habit to ensure that you clean all of your equipment after you have finished painting.

Removing Baseboards vs. Leaving Them On
Sometimes baseboards are painted while they are on the wall, but this is not the best way to paint baseboards. Most painters would prefer to remove them before painting, which is easier, but it is not always the most ideal method. Instead, there are certain scenarios that would call for the removal of the baseboards and those that require them to be left in place.
Leaving Baseboards On
In older homes with several layers of paint coating the wall-to-baseboard junction, removing the wooden baseboards may result in wall damage that is incredibly difficult to fix.
The baseboard paint will start to peel upward, carrying wall paint as well as possible drywall paper and plaster with it.
Removing Baseboards
Removal may be as simple as pulling the baseboards off with a narrow pry bar and your fingers in newly constructed homes or homes that have not been significantly altered throughout the years. In reality, companies that sand wood flooring frequently remove and substitute baseboards as an act of routine. In many circumstances, it is a simple task with a better-looking outcome.

If the baseboards are yet to be installed, they should always be painted before they are fitted. Minor damage occurring to the paint is to be expected during installation. With the majority of the painting completed, you will just need to make minor touch-ups after fitting the wooden baseboards.
The Best Paint to Use on Baseboards
While either latex or oil-based paint can be used for wooden baseboards, latex (water-based) paint is considerably simpler to clean. There are numerous gloss levels available for latex or oil-based paints, but a somewhat glossy finish is often suggested for baseboards as it is less susceptible to scratching and is easier to clean than a flat finish paint. For baseboards, semi-gloss and high-gloss paint is typically the best option.

If you pick a high-gloss or semi-gloss latex paint, one layer of primer is usually required. This should be followed by two to three layers of paint. If you use oil paint, you will only need a single coat. If you are wondering what paint to use for baseboards, we would recommend any oil-based paint as it is much more durable.
Tips and Tricks
When learning how to paint baseboards, there are a variety of tips and tricks that you can use to ensure that you can get the best results. Below are some of our favorites, and not only are they incredibly simple, but they will also allow you to develop good habits with other paint jobs.
Properly Prepare the Area
Similar to how you would prepare the walls for painting, properly cleaning and drying the baseboards, in addition to sanding them down using fine-grit sandpaper, is the key to a flawless application. They will most likely be filthy, so start by scrubbing them using warm water and soap. Complete your preparations by vacuuming out any remaining dust, wiping down the baseboards, and using painter’s tape to tape off the surface of the wall over the baseboards and flooring.

When painting trim with carpet, apply a few lines of tape to secure the fibers and keep them out of the way. You should also pull the carpet back as far as possible, or try using a sticky floor guard.
Choose Durable Paint
There are several different paint choices for trim, but choosing one that is durable and high-quality is preferable when tackling an area that is prone to regular damage like scuffs and knocks.
We always use semi-gloss or even high-gloss paint. These paints are simpler to clean and more resistant to scratches and scuffs than matte or flat finishes.
It is also advisable to use a good grade primer beforehand for added durability. Furthermore, glossy paint gives a wonderful contrast to the walls, highlighting the baseboards.
Use Several Thin Coats
To achieve the best finish, employ multiple thinner layers over fewer thick ones. Avoiding drips as well as brush strokes is especially crucial when dealing with gloss paints. Begin by painting the top border of the baseboard and working your way down.
Avoid painting over the same spot too many times with long, steady strokes.
Allow the first layer of paint to completely dry before applying the second. It is required to follow the manufacturer’s suggestions for drying time. This will vary based on the type of paint used. Simply do not hurry through the drying process or you will end up with a sticky finish.
You Can Use a Paint Roller
As with painting ceilings and walls, begin your painting project by cutting in at the top and bottom of the baseboard. This is where a standard foam roller may scrape the wall or floor. We suggest using an angled paint brush containing natural bristles for oil-based gloss paints and one with synthetic fibers for latex-based paints.
A small foam roller of the type used by crafters can also be useful for applying paint onto the flat surfaces of the baseboards after you have finished cutting in.
This is because the foam roller creates a smooth, uniform finish free of brush lines. These tools may be used to apply primer and paint, but be sure to thoroughly clean paint brushes between applications.

Use a Razor Knife to Score Your Tape
It is equally important to remove the painter’s tape as it is to apply it. As the trim paint dries, it creates a connection to the taped surface. If you do not start by scoring the baseboard paint with a razor, the tape will come off with it.
When removing tape from a newly painted wall, the very same thing could happen. Paint peeling off with tape removal is more common with low-quality paints and less often with high-quality paints, although it can happen when you are least expecting it.
One of the last things you need to do is undo all of your hard work when cleaning up. Simply peel off the tape when the paint is wet, or delicately slice the painted tape edge using a utility knife prior to peeling it off once dry.
Use Caulk for Perfectly Straight Lines
To get completely straight lines around baseboard borders, the caulk needs to be flat rather than bumpy. Old caulk dissolves from gaps and causes fractures over time. This is triggered by either wood expansion or weak caulk. Uneven paint lines arise from taping over a shoddy or faulty caulk application. Caulk the space between the quarter round as well as the baseboard if you are painting it as well.

Arguably the most crucial baseboard painting recommendation is to use high-quality, paintable caulk. Ensure that the caulk is completely dry before painting over it. Cheap caulk tubes from the paint shop are less malleable and they fracture faster than quality caulk.
Painter’s Tape Is Not Always Necessary
Inserting a taping knife, or even an old piece of thin cardboard, into the area that separates the baseboard and the floor allows you to cut in effortlessly without leaving a mess makes it one of the best baseboard painting tricks.
Simply paint while moving the tape knife down the bottom of the baseboard. This can be problematic if the baseboard is too close to the floor, but it does work when there is a large enough separation between both of them.
This painting technique eliminates the need to tape the floors and it works well when painting with an angled brush. If you need to buy multiple rolls of painter’s tape to paint the trim around the house, in addition to the tedious work of applying the tape, it may get very expensive.
Ensure That the Painter’s Tape Is Flush With the Surface
This might seem like common sense but a lot of people often assume that painter’s tape automatically sticks well to the surface. You need to ensure that there is no space or any loose edges when using the tape. By pressing down the tape, you will avoid any paint leaks and you will also end up with sharper lines.
Learning how to paint baseboards might seem like a tedious job, but it will make a huge difference to the aesthetic of your home. While there are certain things that you need to remember, such as which paint is best and how and when to remove the baseboards, this is a job that can be finished in a day. We hope that this advice points you in the right direction. Good luck!
Frequently Asked Questions
How Can I Decide on What Paint to Use for Baseboards?
When learning how to paint baseboards, the paint that you choose is very important. Think about where the baseboards are located and how susceptible they are to taking damage. For this reason alone, it would be best to use oil-based paint, as latex/water-based paints will easily lift from the surface after being scuffed.
What Is Considered to Be the Best Way to Paint Baseboards?
There are a variety of factors that need to be considered before starting the baseboard painting process. However, one of our best tips for painting baseboards is to remove them before painting. While this isn’t always possible, it would make the painting process significantly easier without worrying about taping.
What Lesser-Known Tips for Painting Baseboards Can Easily Be Used?
Most people do not understand the importance of painting on a clean surface, and this should be the first thing that you do. Trying to paint over dirt will leave your paint with ugly streaks and if you are using a light color, you will more than likely end up ruining the color as it mixes with the dirt.

Robert Thompson has worked as a self-employed carpenter for over 15 years. He lives with his family in Billings, Montana, where he also successfully operates his business as a woodworker. His main business is the complete interior construction of buildings. He is also passionate about creating high-quality wood furniture with epoxy and other items made from burl wood. Besides the woodwork, Robert is also a skilled DIY professional for all kinds of materials. He always has a solution ready for every craft and construction challenge. Originally, Robert studied civil engineering and has advanced degrees in carpentry and business management. Robert has been working for Craft Art since 2020 and enriches the blog with his immense knowledge and skills in the field of woodworking and home improvement. He writes the articles about DIY and Repair.
Learn more about Robert Thompson and about us.


