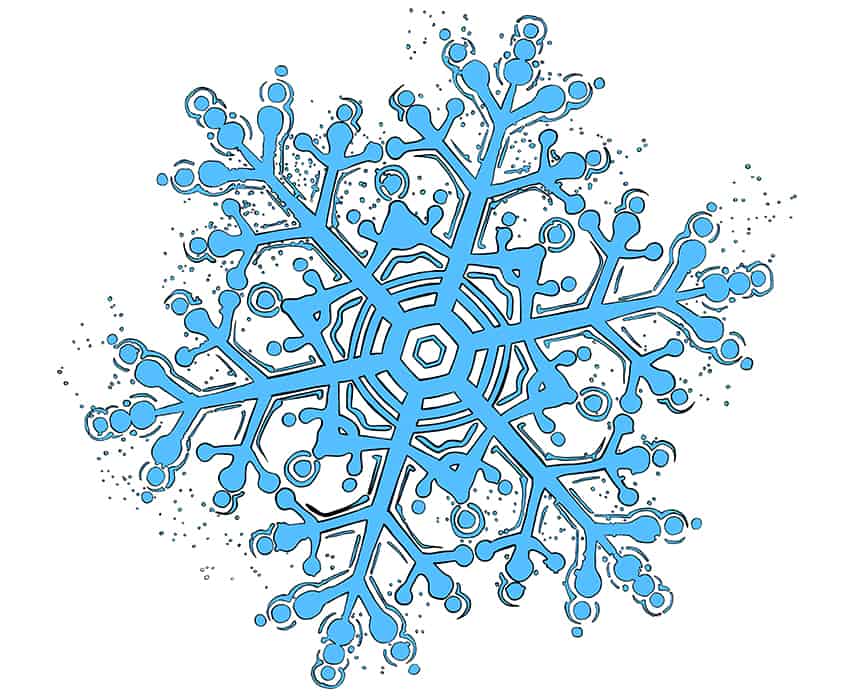
How to Draw a Snowflake – Our Simplified Snowflake Design Formula
Snowflakes are all unique. Similar to us people, no two are alike, each is individually special. These wonders of nature form as they fall to earth, resembling tears from heaven. A series of perfect crystalline geometric shapes collectively make up a snowflake. This is today’s inspiration for our drawing tutorial. We will guide you through a step-by-step process of how to draw a snowflake. Feel free to express yourself as we go through the basic formula of creating a snowflake, and remember to be unique.
How to Draw a Snowflake: A Step-by-Step Drawing Tutorial
Snowflakes are geometrical and have specific symmetrical lines that join together and overlap creating the snowflake pattern. We begin the steps of creating a snowflake by drawing an arrangement of layered circles and straight lines. The snowflake will evolve, but first, we will start by constructing a base shape of a simple snowflake drawing, and then we add intricate details, color, and shading. Please see below for the tutorial outline.

Like any masterpiece, the color happens at the final stage, and in our case, in step five. We use a light blue color to imitate the icicles. The style of shading and coloring is completely up to you. This snowflake drawing tutorial is designed for a painting medium, with either an oil or acrylic base, but you are welcome to use whatever medium you fancy. Grab your coloring pencils, drawing tablet, or favorite paint pot and let us start to draw a snowflake.
Step 1: Creating the First Circle for Your Snowflake Drawing
The snowflake pattern begins with a series of circles rippling outwards from the middle. The first thing to do is draw a small circle in the center of the page. Be sure to make this circle small, as the rest need to fit on the page as you progress, you can always erase and re-draw. Try to keep it neat and tidy.

Step 2: Creating the Second Circle for Your Snowflake Drawing
This step is simple; you need to add the second circle ripple effect to your snowflake drawing by adding a bigger circle to the first circle. Make sure it is equal in shape and remember that you will have more circles to follow. Leave enough room on your page. At this point your snowflake drawing should resemble a doughnut.

Step 3: Building the Circles for Your Easy Snowflake Drawing
Now you will place a third circle on the page. This one is a little bigger than the second, so make sure there is an equal distance in the space between the circles. Now your snowflake drawing should look like the example below.

Step 4: Repeating the Circle
Simply repeat the same as step two and step three. You can draw the circle larger than the previous two, except, this time, the space between the circles can be slightly smaller than the other two, creating an expanding image.

Step 5: Completing the Rings
Repeat the same as the previous steps. This time, the final circle you must make the space between the fourth and fifth circles a little wider. This will finalize the ripple effect for the foundation of the snowflake drawing.

Step 6: Creating a Six-Pointed Star Shape
You have completed the circle stage. Now, we will start creating the snowflakes foundation by drawing six triangles around the fifth circle. Be sure to draw the pyramid-style triangles equal distances apart. The snowflake drawing should now look like a full-bodied round star.

Step 7: Drawing the Line Through Your Star
Next, we want to start drawing the foundation of the snowflake’s points. You will draw this over your layered circles. We recommend using a ruler if you want to be exact. Ideally, you want the line to be longer than the circles; this is because at a later stage you will add on extra lines, so you will need the extra space. Place your line in the gap between the triangle and be mindful of keeping it all equal and geometric. Then, slice the circle in half. For those who are pedantic about keeping everything aligned, you are welcome to measure everything with a ruler and keep it all equal.

Step 8: Drawing a Second Line Through Your Star
Here you will be repeating step seven but at the opposite angle. Now, the snowflake will have four quarters in place and the lines should resemble an X.

Step 9: Drawing the Final Line
You will repeat the same steps seven and eight. Draw the third line over the other two, and add this one in the remaining gaps between the pyramid tringles. See the image below for guidance. Make sure the crosses overlap in the center of the inner circle. This phase is now complete. You now just need to add more details and your snowflake drawing should start to resemble an actual snowflake.

Step 10: Adding More Detail to Your Easy Snowflake Drawing
Our snowflake is beginning to take shape! Now it is time to add the trademark snowflake arms to our foundation lines. Place your pencil a centimeter from the end of your line, draw two short lines, and then again further down your foundation line. This time, the short line can be slightly longer than the lines above it. Then add small arms onto the second line. Now your snowflake is beginning to form. First, study the image below to get an idea and then replicate that on your page.

Step 11: Repeating and Completing Your Snowflake Drawing
We will be repeating step 10 to complete this phase, and as you progress, your snowflake drawing should be beginning to take shape. Try to make your snowflake’s arms reasonably equal in length and place them closely in the same place on each foundation line. However, don’t worry if it isn’t exact. It is a snowflake after all! For those more creative or experienced artists following this tutorial, in this phase, you are welcome to add more detail to your snowflake.

Step 12: Detailing the Center of the Snowflake Drawing
The foundation lines and rings are now in place. The snowflake is now evolving, and it’s time to begin creating the crystal structures. We will start with the center ring, instead of drawing a circle, you will draw a small hexagon shape. Then do that again, but slightly bigger. Do this once more, this time making the hexagon shape larger than the center hexagons in the middle circle. From there, you must draw two rectangles in the inner circle going outward. Draw them to be bigger as they expand. Finish it off with little lines on the circumference of the inner circle. Please see the drawing below for inspiration.

Step 13: Building Your Snowflake’s Star Shape
Now that the foundations are in place, it is time to let your snowflake grow into something that is uniquely yours. Bear in mind that a snowflake is made of icicles and it’s time to start making your drawing resemble this. Outline the star shapes with the resemblance of frozen particles and the rectangle center. One thing to remember is to keep the patterns symmetrical.

Step 14: Adding More Detail to Your Snowflake Drawing
Now your drawing should be taking shape, as it is no longer just circles and lines. It is now time to add more details to the inner “arms” of your snowflake drawing. Use rounded lines and add little ice particles to the arms.

Step 15: Adding the Finishing Touches to Your Easy Snowflake Drawing
Please repeat the action of step 14. Continue drawing the patterns around the foundation lines and arms. Make the patterns symmetrical and equal, then complete this phase with additional fine lines and particles. Once you are content with the snowflake, you can begin erasing the foundation lines.

Step 16: Adding Color to Your Easy Snowflake Drawing
Well done, the hard part is over! Your snowflake structure is ready for the color phase. We recommend using colored pencils or paint. Take a light blue color; it’s best to start light and add to it, as this way, we can shade the colors and build it. Add color to the entire snowflake shape and all the tiny particles. This is your base coat, so make it even.
Step 17: Applying the Second Coat of Color
Now you must add a new color. Take a light gray shade and color the rounds of your particles and the inner lines, thus creating a shaded effect. Make sure that the blue is still visible.

Step 18: Adding Highlights to Your Snowflake Drawing
This easy snowflake drawing is now in its final color stage. Add some white color to create highlights where the snowflake would catch the light. Shadows and highlights create depth and a three-dimensional perspective. So, take care in this phase and go slowly. Try not to overpower the white color and diminish the blue or gray. If you are painting, use a shading paintbrush for the best effect.

Step 19: Finishing off Your Realistic Snowflake Drawing
To complete your snowflake drawing, you can remove the strong outlines with an eraser. If you are using a drawing tablet, you can remove the outline layer. If you are painting or using crayons, you can define the outlines and color over them to blend them into the snowflake.

Well done! You have reached the end of our how-to-draw-a-snowflake tutorial. With that, you should have successfully drawn a snowflake. We hope that you are happy with your creation and that you had a blast drawing it! You now have the knowledge and understanding of the foundations of the snowflake shape, and you are all set to get creative and continue drawing more snowflakes, so enjoy!
Frequently Asked Questions
How Do I Draw a Simple Snowflake?
Snowflakes are detailed and unique. You can easily imitate a snowflake by following nature’s geometry. This easy step-by-step tutorial on how to draw a snowflake will show you how to use lines and shapes to build a beautiful and unique snowflake.
What Colors Should I Be Using for My Easy Snowflake Drawing?
Snowflakes are seen as white, fluffy icicles, but it can be challenging to draw with white and gray only. We suggest using shades of blue and grays and adding in white to create a shimmer and that ice look. Ideally, you want to create a three-dimensional effect with your shading.

Learn more about Israel Benloulou and about us.