
How to Draw a Bee – Create your own Bee Drawing
When you think of bees, do you think of their painful little stingers? Or do they remind you of those lazy hot summer days, lounging in the sun with a cool soda to quench your thirst, and the only possible nearby bother is trying to set a boundary between yourself and this bee who is trying to share your drink? However you feel about bees, there are many reasons why you might want to draw a bee sketch. This tutorial is going to show you how to draw a bee. If the idea of this is intimidating, you can be assured this will be an easy bee drawing. We shall take you through each step descriptively, adding the benefit of a picture reference so you can draw your bee drawing along with ours. If it is a sunny day, go outside and enjoy the sunlight, as the bee would do, if you want to complete a bee drawing easily, you have to become the bee.
Step-by-Step Guide on How to Draw a Bee
The idea of how to draw a bee can be a daunting thought for many, and most would assume we were talking about the most difficult art form. It may appear that way before we begin this tutorial, but we are here to show you how easy bee drawing can be. Using any type of medium is fine when it comes to bee drawing, so you can take your pick of the medium you prefer, be it in digital art form, or the traditional pencils and paints.
In our art tutorials, we like to make use of construction lines and shapes. This helps make them suitable for people of all skill levels! So, if you are a beginner, then you will be more than capable. Construction lines and shapes are the foundation of the drawing, they help to keep the proportions and angles in check. Keep reading for the first step in your tutorial for a bee drawing.

Step 1: Constructing your Bee’s Abdomen
The first construction shape will be an oval, to represent the larger abdomen. Ensure that it is situated on the page with enough space around the oval for the additional construction lines and details. In order to draw the rest of the bee, we’re going to draw this on the left side of the abdomen, so the oval should be diagonally angled and slightly off-centered on the canvas.

Step 2: Your Bee’s Thorax
The middle part of the bee’s abdomen is called the thorax, and the construction shape we will add in there is a circle. Make sure that the bottom of the circle sits slightly higher than where the oval ends, and allow the right-hand side of the circle to cross over the left-hand side of the oval. The head of your bee sketch is still to be added, so make sure there is still room on the left of the bee.

Step 3: Outlining the Shape of your Bee’s Head
In order to create the head of our bee drawing, the construction shape is needed first. Using a small oval to match its size, and slanted slightly to the back of the canvas, we will make the oval for the head appear as though it were floating off the top of the canvas.

Step 4: Your Bee’s Proboscis
Bees play an important role in pollinating our ecosystem by brushing against pollen when gleaning nectar from flowers. It is the bee’s pointy proboscis that they use to ingest this nectar. Create this feature by drawing a shape of a “V” right at the bottom of the head’s oval. Now when you look at your bee drawing, you might start to see something like a wasp with no wings.

Step 5: Your Bee’s Antennae Outline
Let’s start building the bee antennae as we continue to focus on construction. Two simple curved lines that are attached to the right and left sides of the head of the bee, are going to be used to delineate the antennae.

An appropriate perspective should be captured such that the top antenna ends within the oval of the head and that the bottom antenna must be longer than the top antenna. It is possible for the lower antenna to be positioned almost directly below the axis of the head and should be shorter in length as well.
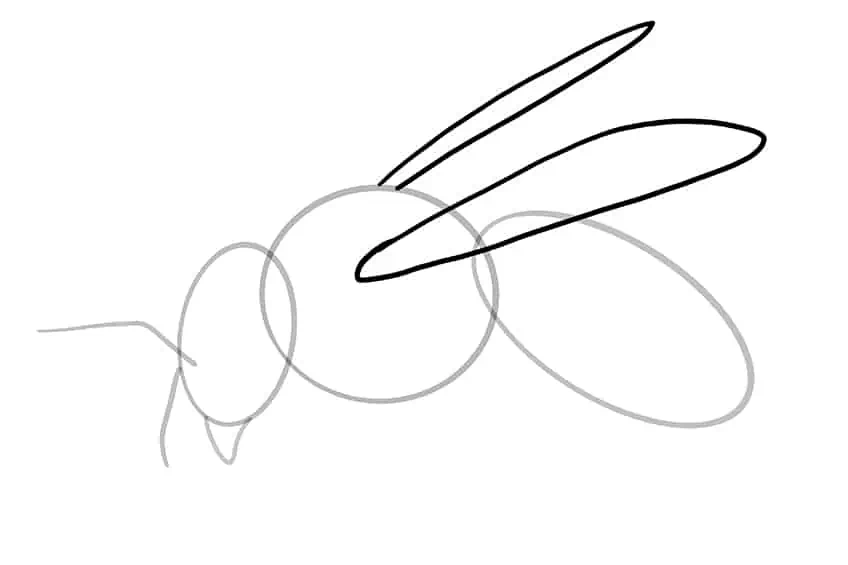
Step 6: Adding a Pair of Wings to your Bee
If you have been wondering how to draw a bee, you might also be curious how to draw a bee’s wings, right? This is our next focus, and you can start with the wing on top, which is the wing that is further back, and this perspective makes it look smaller and more narrow than the wing that is closer to you. The shape for the wing’s construction is a wonky oval, you can see the picture below as a reference.
Step 7: Drawing the Foundation Lines for your Bee’s Front Legs
Unlike most other insects, the bee has segmented legs as well as a segmented body. Begin by drawing a sausage-shaped shape down from the thorax circle, on the leg closest to you, the viewer. Squeeze out the shape just behind the intersection between the head and thorax. Another sausage must be drawn that is curvier than the first.

Step 8: Adding the Central Legs to your Bee
On all insects, like bees, there are six legs: two on each side of the body, two in the center, and two at the back. Once the thorax circle has been constructed, it is time to create the legs that will extend from the center of the thorax circle. Starting from the middle of the thorax circle, extend the middle leg nearest to the front of the body. The middle leg should extend from the center of the bottom line. As the leg we’re drawing is the one farthest away from us, it will look like the second front leg we drew in the previous step.

Step 9: Drawing the Bee’s Back Leg Outline
Your easy bee drawing will also need some back legs to support it. The largest set of legs is found in the back and it starts from within the abdomen. Draw both legs together at the base at an angle so that both legs overlap the rear abdomen. You should draw the back leg higher than all of the other legs you have so far drawn and it should end with a sharp point. After completing this step, You should have something that resembles our picture reference below.

Step 10: Adding an Eye to your Easy Bee Drawing
The eyes for your bee sketch must be quite large, or larger than you might think at first. This is a realistic thing to expect with most bees, so ensure that the oval you add for the eye intersects the thorax’s construction circle, and that it is about one-third of the head’s oval’s size.

Step 11: Creating the Outline of your Bee’s Pollen Ball
We are going to add in a pollen ball to draw our bee drawing in order to make it look as realistic as possible. Pollen gathering usually occurs on the large back leg, therefore drawing an oval that is angled in the direction of which pollen gathers.

Step 12: The Final Outline for your Easy Bee Drawing
Now for the outlining of your bee drawing. Just follow the construction shapes you have drawn already. Keep close to the lines of your construction shapes. They’re already in the shape of a bee, you must just delineate the outline. After highlighting the bee’s head, you can make it a little pointier toward its mouth and make it look a little more realistic. You may wish to use short feathery strokes in order to achieve the impression that the bee’s head is covered in fur. The short hairlines added to the body of a bee may be continued for the rest of its body as well. If you arrange this furry texture in the right way, you will also be able to divide the thorax and the abdomen.

If you want to craft the wings in a smooth manner, you can trace out the wing shapes with sensitive lines. On the abdomen, you can trace a smooth line that brings the bottom to a slight point. It is also necessary to outline the legs with smooth lines in order to keep the segments of the legs visible, and you do not need to draw in the segmenting line at these joints, simply ensure that the segments are not lost.
Step 13: Creating the Furry Texture of your Bee
Before we add any color to our bee drawing, we will add a few other details. At the beginning of the step, draw short lines and segment them. Following the angle and direction of the wing would be best, and while you are there, you can add some of the texturing at the wing’s base to give me depth.
In the next step, add texture to the thorax of your bee by using short furry strokes to create more character. As these fur lines go outward from the base of the largest wing, they should extend in an outward direction. It will look best if you follow the shape of each segment carefully while you create the fur lines on the rest of the bee’s body.

In order to create the bee’s signature striped patterns, you can start to use these short lines on the abdomen. As far as the head is concerned, there should be a few rings around the eye where the fur lines should extend. Shade the antennae and the legs with a darker shade if you wish. After we have completed the coloring steps we will paint these areas of the legs black. As a final step to finish detailing the pollen sack, make some squiggly lines to create a bumpy texture.
Step 14: Adding in the First Layer of Color
The first bit of color we will add to your bee is the base coat. This color must be a light mustard yellow, light enough for darker orange shadows, and paler yellows and whites to be seen. Color the whole bee, but leave the wings out.

Step 15: Coloring in the Bee’s Wings
The wings that you left out in the previous step will be base coated with a beige or very light brown color. The color needs to be light enough to suit the wings and to allow for some highlighting and shadowing to be added.

Step 16: Adding the Black Detail to your Bee Sketch
Bees are also notable for their black coloring, which makes them a very distinctive species. You will need a black color in this stage, a fine brush, pen, or pencil, and a shade of black to color in the black parts of the bee. The antennae, eyes, and legs should be shaded black.

Step 17: Creating Dimension with Shadows and Highlights
The difference between the previous stage and this one is based on the shading that you will be adding. This is essential to add definition and depth, which is essential when drawing a realistic looking bee. Add a light tone at the separation between the thorax and abdomen of the bee, and at the thorax and head, using a soft-bristled brush and white pencil or paint. You can add a reflection to the eye of your bee by adding a small shape that looks like a “U”, following the curve of the eye.

Creating the shadows comes next. A soft brush with a small tip can be used to shade the bee’s fur with black. Draw your attention to the areas of the head and body that will naturally be less in the shade, such as the neck underside and the area just after entering the thorax where the head meets the body. Creating lines on the abdomen of your bee drawing will require you to use black and yellow, alternating one after the other along the bee’s abdomen.
Step 18: Adding Yellow Highlighting to your Bee Sketch
To create some more highlights on your drawing of the bee, we are going to use yellow and white in this step. Where to highlight is entirely up to you, but you should consider where natural light would fall on the bee and use that to guide your choices. We suggest adding highlights between the segments of the legs. Highlighting the legs in this way will emphasize the segmentation.

Step 19: Blending the Color on your Bee’s Wings
You will use a shade of dark brown to blend out the colors and increase the wing’s opaqueness. The first step is to pick out a light shade of dark brown for the wing bone that abuts the main body of the bee. Then, gradually blend this shade up into the wings, concentrating most of the shadow at the bottom edge of the largest wing. Do not forget to smooth it out so that it gets lighter the closer to the top.

Step 20: The Final Touches to your Bee Drawing
This tutorial concludes with an optional step that offers a gorgeous and smooth bee drawing. Using the corresponding color of the area, paint over the outlines of your bee drawing to erase them.

Congratulations on successfully creating a drawing of a bee. We are sure you have an impressive drawing ready and waiting to be displayed! Show off your new skills with your friends and share this tutorial with them.
Frequently Asked Questions
What Are the Best Tips for Drawing Bees Easily?
You should consider a few things when creating an easy bee drawing. The first step is to lay down construction lines and shapes to represent the shape of your bee sketch. By drawing with construction lines, you get a good grasp of the shape of the bee before adding detail. It is also important to build your color up in layers, which will aid you in drawing realistic bees.
What Art Supplies Do I Need to Draw Bees?
All you need is the preferred medium that you are most comfortable working with. Once you are skilled with the style of this drawing, you can incorporate the many various art mediums if you wish.

Learn more about Israel Benloulou and about us.


