How to Draw the Earth – Make Your Own Home Planet Picture
The planet that sustains us, our home in the cosmos – this will be our subject for today’s drawing tutorial! The third planet from the sun is easily recognizable by its blue, green, and tan coloring. What better way to celebrate our planet than with an Earth Day drawing? This how-to-draw-the-Earth tutorial will guide you through 10 easy steps to create an Earth drawing in vivid realistic color. Looking at your completed sketch, you will feel like one of the astronauts who viewed their first earth-rise from space. What are you waiting for? Let’s begin our Earth sketch!
How to Draw the Earth in 10 Easy Steps
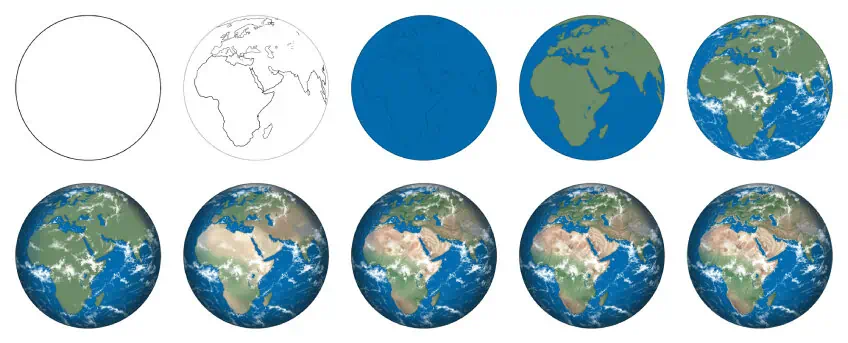
Today’s exciting drawing project will be learning how to draw the planet Earth. We will be creating a very accurate planet Earth drawing in full color, from scratch! Hopefully, you will walk away from this Earth drawing tutorial with a greater understanding of how to construct the Earth’s shape, its continents, and how to add the color, texture, and shading required to make your Earth sketch realistic! The perspective of the Earth we will be drawing today is the well-known view from outer space. Analyze the diagram below before we begin the 10 steps to create your Earth Day drawing.
This drawing of Earth tutorial was designed for those using acrylic paint; however, you can choose whichever medium you wish to work with, be it colored pencils or a digital design tablet. As with most of our sketching tutorials, the process is very adaptable to your medium of choice.
Step 1: Create an Outline of Your Earth Drawing
To start your Earth sketch, you can sketch the Earth’s outline or foundation line. To do this, you can draw a medium-size circle in the center of your drawing pad, page, or canvas. Are you feeling a little insecure about drawing the shape free-hand? That’s not a problem! You can use some compasses or something to trace a perfect circle instead! A drinking glass or mug will suffice.
Step 2: Sketch the Continents of Your Earth Day Drawing
Step two will be to sketch the continents of your Earth drawing. To make your Earth drawing look realistic, you should take your time and focus on the outlines of the continents. We suggest looking for a more detailed image of planet Earth as a reference to assist you. Start with the bigger continents first and then add in the smaller ones. An important thing to remember is that your Earth drawing is a sphere shape, and the continents are curved. This must be taken into consideration when making the outlines.

If you feel that the contours of the continents are too complex for you to draw freehand, then you can trace them from a tablet screen, or cut each continent from a printout and use this as a stencil.
Step 3: Apply the Base Color to Your Drawing of Earth
You will now begin applying the base coat to your Earth sketch. Using a regular paintbrush and ocean blue pigment, gently coat your Earth drawing with a base color. Try not to color in the continents because you will add a separate paint coat in the subsequent steps, but if you accidentally do, make sure that you don’t obscure their outlines, or you’ll have to draw them all over again.

Step 4: Add Color to the Continents of Your Earth Drawing
Drawing Earth is very simple! Once you grasp the basics, you will be able to sketch Earth drawings with ease! In this step, you will add a paint layer to the continents. Select a regular paintbrush and olive-green paint to fill the landmass and the small islands.

Step 5: Create the Atmosphere on Your Drawing of Earth
Remember, we are viewing our subject from space, so to make sure it looks realistic, you must create the atmosphere of the Earth. To do this, you can draw white clouds sporadically placed over the globe. There will generally be more clouds over the equator since rain forests predominate there. Be sure not to make the clouds look too solid, they should be light and wispy. You can use a small blending paintbrush and a small sharp paintbrush with white paint.
Gently, add the soft clouds over the landmass and sea area of your Earth Day drawing.

Step 6: Add Definition to Your Earth Sketch
By now, your Earth drawing with color should look two-dimensional. The next step will be to accentuate the outlines of the continents and the globe. Use a medium-sized blending paintbrush and a smidgen of black paint, and gently add shading and definitive outlines to your globe drawing.

Step 7: Add More Color to Your Earth Drawing’s Continents
As you move forward to the next part of your Earth Day drawing, it should be looking beautiful and green. That said, much of the planet is not lush and green and consists of sandy desert areas too! To ensure the realism of your Earth sketch, it is important to add in the Earth’s variations of color.

You will now add the desert areas to the African and Asian continents. Using a light shade of brown and a small blending brush, gently blend the brown into the green base color. Star from the top of Africa and the southern area of the continent. Leave the middle area of the continent green. This is the break between the Sahara Desert and the southern part of Africa. Don’t forget about Madagascar! You will also need to add some light brown paint to Eastern Europe and Asia.
As you move towards the Asian continent, you can begin adding a darker shade of brown or tan. Add some gray to provide shadow and depth. If unsure, have a look at your reference image for some guidance. Finish off this step by carefully blending the colors to look more natural.
Step 8: Add Texture to Your Earth Day Drawing
Now that you have completed creating the variations of color on the continents of your Earth drawing, it is time to add texture to the landmass. Make a mixture of brown and a touch of white paint and apply roughly textured brush strokes within the land areas. Repeat this method using browns for the dry areas and greens for the lush areas.

Let this application dry for a moment, and then continue layering by creating more defined brush strokes using a fine paintbrush as you develop the Earth’s surface of mountain ridges and rivers. As you reach the greener areas, you can use dark green and switch to a sharp paintbrush.
For the desert areas, you can swap the darker brown paint for a light tan. You will repeat what you did previously using a light color. You can add touches of white paint too. Play around with shading variations using light orange or peach color on the sand.
Step 9: Apply the Finishing Touches to Your Drawing of Earth
Now, you will create the visible rivers on the continents in your Earth Day drawing. Using a sharp fine paintbrush, paint the mighty river Nile running from the top area of Africa. Use the reference image below to help you get it perfect. Using the same paintbrush and the same colors used for the continents gently define the mountains and higher grounds of the Earth’s terrain.

Step 10: Complete Your Earth Drawing in Color
You have reached the final stage of our how-to-draw-the-Earth tutorial, and all you need to do now is clean any outlines or shading that looks untidy. Use a fine paintbrush and the corresponding colors of your Earth drawing as you go over any loose ends that need it.

Congratulations! You have completed this how-to-draw-the-Earth tutorial You should now have an understanding of how to construct a globe shape and how to add color and texture to your Earth sketch. We hope you are pleased with your drawing of the Earth. Remember to keep practicing and maybe try your hand at some of the other planets in our solar system!
Frequently Asked Questions
What Are the First Steps to Making an Earth Sketch?
Like any art project, you must start the drawing with a few basic steps. The first step will be to create the foundation lines of the Earth sketch and then outline the continents. Next, you will add to your Earth drawing with color by finally creating texture and adding the finishing touches.
How Difficult Is It to Learn to Sketch Earth Drawings?
It is easy to learn how to sketch Earth drawings when you use our simple step-by-step guide! This how-to-draw-the-Earth tutorial will teach you all the necessary steps to create a realistic Earth sketch. The trickiest part of your artwork would be creating realistic continents of the Earth.

Learn more about Israel Benloulou and about us.