Epoxy Resin River Table – How to Make a Resin Table Top
Epoxy resin is a material that has taken the world by storm due to its versatility and overall aesthetic. One of the most popular epoxy resin projects is that of creating a resin table top that looks as though there is a river running through it. You do not have to be a professional to achieve this look, however, as we have prepared a step-by-step guide that will show you exactly how to create a resin and wood table of your own!
Why is the Epoxy River Table So Popular?
Recently, social media has become saturated with photos and videos of people creating tabletops out of epoxy resin. While a basic use of epoxy is that of coating wooden furniture, this trend has created a twist on this normal use by turning an everyday piece of furniture into a work of art.
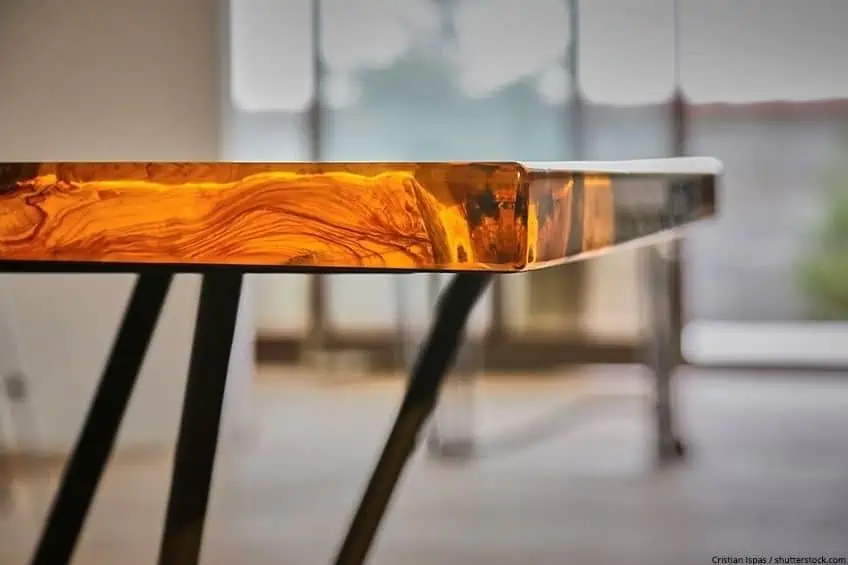
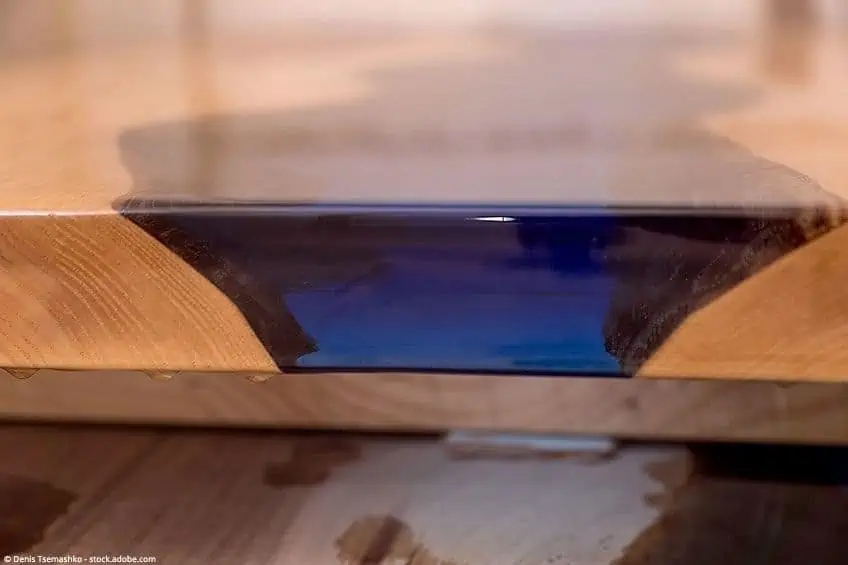
A resin river table mimics a bird’s eye view of a running river that is cushioned between two embankments. These designer tables are the perfect blend of rusticity and modernity, making them the perfect functional art piece for a home of any aesthetic.
The possibilities of creating an epoxy resin table DIY allow for an endless stream of creativity, as no table can look the same. You can create your table in a way that suits your personal interests and style so that it is a unique representation of you!
The Best Epoxy for River Table Projects
There are a variety of brands to choose from when purchasing epoxy resin for your resin and wood table. It is important to select a product that is of a high quality that suits your particular needs so as to ensure that you receive the best results.

Which Epoxy is Best for Casting My Resin Table Top
The casting process of your river epoxy table refers to when you pour the resin liquid into the mold of your tabletop. The viscosity, or flowability, of the resin, is important to consider here.
FGCI Liquid Glass Casting Resin
- High-quality crystal-clear casting resin.
- One pour will result in a 2 to 4-inch thick layer.
- Odorless
- No VOCs
- Resistant to UV rays

- High-quality, crystal clear Castin Resin from FGCI
- Pour 2 – 4 inches thick forms
- Perfect for Epoxy Tables and deep Resin molds
STONE COAT Super Cast Epoxy
- An epoxy cast of thick consistency.
- Each pour covers up to 3 to 4 inches.
- Transparent results.
- Can be mixed with colored pigments and dyes.
- Ideal for epoxy tables and filling deep resin molds.

- A durable woodworking/countertop epoxy resin
- Scratch-resistant and UV resistant
- Provides a clear and shiny finish
Which Epoxy Should I Use for the Final Coat of my Resin Table?
It is necessary to add a final coat to your table so as to protect both the resin and the wood from being damaged.
FGCI Super Clear Epoxy Tabletop Resin
- Completely clear resin used to coat surfaces and for resin art.
- Ideal for coating river tables, resin art, and jewelry, as well as the countertops of hard surfaces.
- Extremely high UV-resistance.
- Low VOC production.
- Free of solvents.

- Super clear table top epoxy for wood
- Formulated for river tables, bar tops, and countertops
- Highest UV resistance, low VOC's and is solvent-free
Choosing the Right Wood for Your Resin River Table
It is important to choose the right kind of wood for your resin wood table, as this material will form a major component of your final product. It is definitely worth spending a bit more on a top-quality wood, as it is likely that you will be putting in a significant amount of time and effort into creating your masterpiece. Thus, spending more on these materials will result in a piece that not only looks beautiful but will also last for a long time.
It is best to use as natural a piece of wood as possible, where the “natural edge” aesthetic with pieces of bark is a popular and stylish choice. You can find this wood from your local carpenter or by going online. Another option is to get two wooden boards from any craft store, although this will require you to cut a slightly curved shape on one side of the wood. Regardless of where the wood is sourced, it is imperative that the wood is dried well. There should be no more than 12% moisture present within any piece of wood.
Preparing the Boards of the Resin and Wood Table
There are two courses of action from which to choose when it comes to preparing your wood. The first option is to prepare the wood yourself, for which you will require a circular saw and a wood planer, as these tools will help you to cut the wood into the correct length and thickness while dividing the wood into two equal halves.
Alternatively, those with little to no experience in processing wood may prefer to buy the two wooden boards pre-prepared or to have the wooden boards cut and planed by a professional. This option also eliminates the need for purchasing expensive wood-cutting tools and machinery and will ensure that your wooden boards are prepared correctly.
Whether you choose to prepare the wood yourself or to have it done professionally, you should ensure that the following is true before proceeding further:
- Your two wooden boards are identical in length and thickness.
- The wooden boards must be completely flat.
- Ensure that the side edges of the wood are cut at a 90-degree angle to the sides on the outer part of the wood.
The Best Working Conditions for Your Resin Wood Table
Using epoxy resin can be difficult, as this material is very sensitive to external factors such as drastic temperatures and other weather conditions. Thus, it is imperative that you select a workspace that is well-ventilated and temperature controlled. This space should be dry, free of any dust and debris, and ventilated well so as to avoid the inhalation of any fumes that may be released.
When making your resin table, the optimal temperature at which the epoxy resin should be processed is at a constant minimum temperature of 20 degrees Celsius. The temperature of your workspace should also be kept in mind with regards to storing your table, as the temperature of any room will drop considerably near the floor. Thus, what may be an ideal room temperature of 20 degrees can be as low as 15 degrees at floor-level.
Storing your river epoxy table on the floor can cause several tiny bubbles to develop within the resin. These bubbles are very difficult to remove, regardless of whether a hot hair dryer is used. Thus, it is preferable to store your table on a workbench or shelf instead.
Step-by-Step Instructions for an Epoxy Resin Table DIY
Now that you have prepared all of the materials needed for your epoxy river table, you can begin following these straightforward steps to create your masterpiece!

Step 1: Remove the Bark and Sand the Wood
- Before you can begin making your resin wood table, you need to prepare the wood. First, you should thoroughly remove any bark with a chisel or similar tool. While the bark is often left behind for a more rustic look, this can make it difficult to form a bonding base for the epoxy resin. Once the bark has been removed, take some sandpaper and go over the edges by hand so that the wood and the resin can combine properly.
- Now, you will sand the bigger surfaces of the wood until it is smooth. You can do this with an electric sander for the best results, beginning with an 80 grit that is gradually heightened to 220 grit. You should remove the dust after each grit and finish up the sides by using sandpaper and sanding it by hand.
- Clean the wood from any remaining dust or other residues. The most effective means of cleaning the debris off of the wood is by using a vacuum cleaner. You can then use a soft microfiber cloth to clean up any of the finer dust particles that remain.
Step 2: Level Out the Wood and Make it Airtight
- For this step, you should fill in any bumps, cracks, and other porous areas so as to completely level out the surface of the wood. You can do this simply by filling the areas with transparent, colorless epoxy resin. As the edges can be difficult to even out, we suggest that you seal these edges in advance with a strong adhesive tape, as this will stop the resin from pouring over the edges later on.
- Once the resin you have used to fill up the holes has dried completely, use crystal-clear resin to seal the wood in its entirety. Generously and evenly distribute this transparent resin over the whole wooden surface, as doing this will prevent the wood from outgassing at a later stage. Outgassing refers to the phenomenon whereby some pieces of furniture slowly release gases known as VOCs.
- It is worth investing in a brush that does not hair. Using a brush to apply the crystal-clear resin can result in brush hairs being left behind and stuck in the resin, which are nearly impossible to remove. Leave the resin sealant to dry completely for approximately 5 hours at an optimal temperature of between 18 and 24 degrees Celsius.
- Once the sealant has been cured, use sandpaper to roughen the inner edges of the table slightly. Focus on the edges that will later come into contact with the casting resin, as sanding it down will help to form a base that is ideal for the resin to bond to these wooden edges.
Step 3: Build a Mold or Framework for Your Resin Table Top
- Here, you will build a molded framework that corresponds to the required length and size of the table. You can use a medium-density fiberboard (MDF board) to do this, where you must ensure that these boards are measured and cut out according to exact specifications. It has been found that MDF boards with a thickness of 16mm for both the underside and side panels are ideal for this purpose.
- The side panels of this mold should be longer than the resin table by about 15mm. To join the underside panel to the side panels, you can either screw each individual part together or stick them together with hot glue.
- Use transparent sanitary silicone to secure the edges of your mold. You should be very careful when applying this sealant, as it is vital that the mold is completely sealed. If not, liquid resin will leak out.
- Finally, apply a release agent to the finished mold to prevent the resin from sticking to the MDF boards. If the resin adheres itself to the boards of the mold after drying, it will be nearly impossible to separate the two without causing damage. You can prevent this from happening by wrapping the entire mold in adhesive tape or liquid release wax. You can also spray the mold with Teflon spray or silicone spray, although the latter needs to be applied over a few layers to create a smooth surface.
Step 4: Add the Wood to the Mold
- Ensure that the surface on which you are resting the mold is completely balanced to prevent skewness and leakage. You can now place the wood of the table into the mold simply by pushing the planks into the position that they will be in once the table is completed. Secure the wood with multiple parallel clamps or, if working with smaller pieces of wood, you can use heavy objects such as stones to keep the wood in place. It is important to keep in mind, however, that any object used here has a chance of touching the resin.
- We suggest that you create a barrier of sorts between the resin canal space and the rest of the table to avoid getting resin in unwanted areas. You can do this by applying sanitary silicone along the inner edges of the canal approximately 1 to 2cm apart.
Step 5: Mix Your Epoxy Resin
- Calculate the appropriate amount of epoxy resin for your river table epoxy As this can be somewhat complicated to do, we have provided you with an easier means of calculating the correct amount of epoxy resin to use:
- Mix your epoxy resin. For this step, you should ensure that you wear protective goggles, a mask with a built-in filter, as well as nitrile gloves.
- Ensure that you adhere to the manufacturer’s recommended mixing ratio and that you mix the resin liquid and hardener thoroughly. You can ensure that the two elements are properly mixed by using a drill with a mixer attachment.
- You can get rid of air bubbles by using a hot hair dryer or torch. A good rule of thumb in this instance is to use as much as necessary but as little as possible so that the resin does not become damaged by the heat.
- Find a bucket that is voluminous enough to hold the entire quantity of resin, or at least the first layer of resin. This bucket should be wider than it is high so as to prevent too much heat from being produced.
- As resin is such a sensitive material, a particular amount and thickness can result in it overheating, boiling, and then becoming cloudy or unusable. It is therefore vital to cast your resin in a number of layers. The maximum layer amount and height will depend on the manufacturer’s directions as well as the thickness of the tabletop.
Step 6: Add Color to the Resin to Create a Water-Like Effect
- To create a watery look in your resin, you must add the desired color pigment to your epoxy resin only after the two components have been properly mixed together. To add the color pigment, separate the resin mixture into two containers of slightly different ratio sizes. For the water effect, add a metallic pigment such as turquoise to the larger container and a matte color such as blue to the smaller container. You can use any color of your choice to create this look!
- You have two options for pouring the epoxy resin into the canal mold. You can choose between pouring the resin from the two containers separately into the mold, or you can pour them at the same time from different sides. We suggest that you use small circular movements, particularly when pouring in the metallic resin, as this will result in the final look appearing to be more dynamic.
- You can adjust the final pattern by using a wooden stick or a similar tool. You now need to leave the resin alone to cure completely.

Step 7: Transform the River Epoxy Table into Art with Clear Resin
- While the water-like aesthetic is a popular choice for many people attempting to make an epoxy resin table DIY, there are many other ways in which you can turn your epoxy table into a masterpiece. One such method is creating a river table made of crystal-clear epoxy resin that has been decorated by embedding objects such as pebbles or crystals.
- To create this kind of design, you should begin by pouring in an initial layer of transparent resin into the canal formed between the two wooden boards. This should be done quickly and carefully. You can then go over the resin with a hot hairdryer to help it set, although extra caution should be taken here. Exposing a piece of resin to heat for more than a few seconds will cause the material to burn and may result in the resin developing a yellowish tinge.
- This next step is known as the “B-Stage”, where you will apply the second resin layer. When pouring this second layer, you should ensure that the initial layer has not dried completely, and is still a bit sticky to the touch. This is important, as the layers will not be able to bind together properly unless the first one is still slightly sticky.
- If the first layer has already dried completely, you will need to wait until it has cured. Then, you can sand the resin surface with a 220-grit sanding machine, wash it properly, and then add the second layer.
- You can add any decorative items to be embedded in this second layer, as they will not be able to sink to the bottom.
- You can finish up by filling the final resin layer to just above the edge of the two wooden boards. Allow the resin to dry until it is completely cured.
Step 8: Remove Your Resin Table Top from its Mold and Begin Sanding
- Now that the resin of your table has been cured, you can remove the cast from its mold. To remove the tabletop from its framework, simply remove any screws and parallel clamps, and then carefully use a chisel or plastic hammer to loosen the resin table top.
- Once the resin table top has been removed from the mold, you can sand down the surface by hand. You can, however, use a sanding machine such as an orbital sander to do this step. We suggest that you begin with a low grit of 80 that is then increased up to 400 grit. At the end of this step, there should be no resin anywhere on the wood.
- If you want to achieve edges that are perfectly smooth, you can process these further by using a router before sanding. You may find that you need to recut or plane the edges again with a circular saw, although this is not a necessary step. In general, you can assume that the surface of the resin of your table will be lighter when using sandpaper of a higher grit.
Step 9: Finishing Touches
The final steps include polishing and cleaning up the table in order to reach the desired effect.

Polishing and Oiling Your Resin River Table
- You should finish the wood so as to protect it. You can choose between a more natural, matte look or a glossier, polished look.
- To create a matte appearance, you must thoroughly polish the tabletop (with particular attention to the resin river) with a polishing machine and paste. Doing this will remove all traces of sanding, and will result in a silky-smooth surface. You will then evenly apply oil over the tabletop with a soft cloth, thus sealing the wood in a single application.
Using Crystal-Clear resin
- To achieve a glossier finish, you can coat the surface of your table with crystal-clear resin instead. Before you begin doing this, you need to apply a strong adhesive tape around the underside of the table over to the top, hanging over by 1 to 2cm. Using this tape will help to stop the resin from spilling over onto the sides.
- Once the tape has been applied, pour and evenly distribute the crystal-clear resin over the whole surface of the table. You can use a plastic spatula to do this, after which you should use a hot hairdryer to get rid of any bubbles. Allow the resin to harden completely.
- As the initial layer of resin only forms the base, you will require an additional layer. Once again, you should lightly sand down the first layer to ensure that the two layers bond together successfully.
- Once the resin has been completely cured, you can take off the rest of the adhesive tape. The next step is to tape the edge of the painted underside at a width of at least 5cm. You can then flip the tabletop over, placing it on some fleece to protect the resin. You must ensure that the tabletop is completely level and balanced so that you can pour the crystal-clear resin over this side of the table. Use a plastic spatula to distribute the resin evenly and allow it to dry completely.
- Once dry, you can remove any remaining tape and can sand down any sharp edges with a piece of fine sandpaper.
Professional Spraying with Polyurethane Lacquer
- Some people may prefer a surface that is completely perfect and as smooth as the glass of a mirror. To do this, you will need to commission a professional to apply a coat of polyurethane lacquer, as this technique requires specific equipment, skills, and is quite costly. An advantage of this type of finish, however, is that it is highly durable and insensitive to nicks and scratches. As creating your own river table epoxy project results in a piece of such a high quality, it may be worth investing in a finish that is of a high quality as well.
Step 10: Attach the Legs to Your Epoxy River Table
- Now that your tabletop has been completed, you only need to attach the legs! Where wooden legs may offer a more classic, rustic look, using metal table legs can turn your stylish tabletop into a modern statement piece of furniture.
Epoxy river tables offer an exciting element to your dining room. These tables are fun to make and look amazing. The guide above should have prepared you on everything you need to know for building your own.


