Epoxy Paint for Wood – Complete Tutorial on Wood Floor Epoxy
If you require a transparent wood coating that maintains the visibility of the wood grain and provides a protective finish, then epoxy paint for wood may be the perfect solution. There are some considerations to be made, not only due to the many variants of epoxy available but also the choice of wood. These factors will determine the preparative measures necessary in order to ensure the epoxy bonds effectively to the surface of the wood.
What is Epoxy Paint?
Epoxy is a protective coating that is both durable and resistant to chemicals. You can get either water-based or oil-based paints. As it can successfully endure a multitude of weather types and extreme temperatures, the application of Epoxy is common in outdoor environments.

Oil-Based Epoxy Paint
Oil-based epoxy is ideal for the coating of both smooth and porous surfaces like plastic, sheet metal, wood, and other metallic substrates. It creates an even and easily sandable surface preferable to more absorbent products. Epoxy paint for wood floors is highly effective when applied to rough or textured surfaces. This also includes both tiled and hardwood floors.
For the general coating of surfaces such as tile-over-concrete and hardwood floors, oil-based epoxy paint is commonly used in commercial, industrial, and residential situations. Epoxy paint is also effective as it repels harmful insects that may damage the surfaces of roofs and floors. The manufacturing process uses a formula that is water-based and as a result, no vapor of any kind is created at the point of contact with the material’s surface. Indoor applications like factories and a range of other enclosed areas are well suited for the use of oil-based epoxy paint.
The absence of chemical content used in the manufacturing of epoxy paint makes it ideal for use on wood as this prevents erosion over time. Epoxy coating for wood floors acts as a natural repellent, making it impossible for the paint to be absorbed by porous wood surfaces.
Acrylic-Based Epoxy Paint
Acrylic-based epoxy is your likely choice should your focus be purely aesthetic, or fashion over function. Although this paint type may achieve an even, polished finish; the paint’s smooth, absorbent surface allows dirt and dust to easily penetrate through. The unfortunate risk of using acrylic-based epoxy is its composition makes it more susceptible to undesirable stains. The application of epoxy coating for wood floors can be problematic when coming into contact with uneven surfaces as the slightest inconsistencies often result in bubbling.
As acrylic-epoxy is a high gloss paint variant it is incompatible as a solution for rough or textured surfaces like tiles and wooden floors. Removing the topcoat requires a certain level of experience and is not recommended for first-time users. Whether choosing acrylic or oil-based wood floor epoxy paint for your surface, either one comes with its respective cons and pros.
The Best Epoxy Paint for Wood
If you require superior epoxy paint for wood floors or simply for general use on wood, the following list should be sufficient in providing you with a solution for a quality high-durability protective finish. Research into the materials you select, the application technique, and necessary implements is important and will be the determining factor in the quality of your end result.
Best Multipurpose Epoxy Paint: RUST-OLEUM Marine Topside Paint
The most ideal choice when it comes to epoxy paint for wood, metal, or fiberglass is Rust-Oleum Marine Topside. This epoxy paint for wood is not only flexible but has impressive leveling and fantastic ease of application. Smooth surfaces that regularly come into contact with moisture are the ideal application for this oil-based epoxy paint which also means it excels as an epoxy floor paint for wood. A decent fast-drying wood floor epoxy is a rare thing to find, it hardens to a durable, glassy finish within two hours, making it the ideal epoxy over wood coating.
As a high-end product, the price point often chases away DIY rookies and regardless of its ease of use as a flexible wood floor epoxy, it still requires careful application in thin layers. If too thickly applied, the finish of this epoxy floor paint for wood will bubble as a result. This is certainly one of the finest epoxy paint for wood products currently on the market.

- Perfect for any fiberglass, wood, or metal surfaces
- A flexible oil-based formula that is easy to apply
- Durable coating for protection against extreme weather conditions
Pros
Cons
- Delicate application in thin coats
- High price tag
The Best Epoxy Primer: RUST-OLEUM Maximum Adhesion Primer
Although the epoxy primer is not an epoxy floor paint for wood technically, it remains an absolutely essential product in the process of painting. Without this necessary priming, the epoxy paint will not sufficiently adhere to a bare wooden surface. To achieve the finish you desire, you will need to apply this acrylic latex primer before the first application of paint. Selecting an epoxy primer to complement the hue of the wood is important, so they are available in a variety of different colors to suit your needs.
In the process of enhancing the surface adhesion between the paint and wood, Rust-Oleum Maximum Adhesion Primer is one of the best products on the market. Adhesion for paint application in both wet and warm environments is often required and this primer allows for these conditions on a variety of different surfaces.
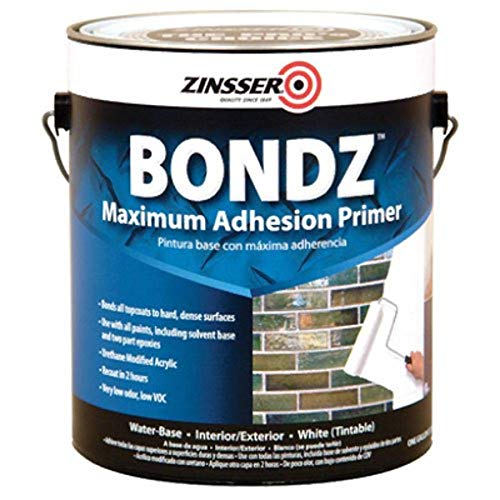
- A water-based primer and sealer
- This product is easy to use and versatile for various surfaces
- Suitable for interior and exterior finishes with any topcoat
Pros
Cons
- Does not provide adhesion to all surface types
The Best Epoxy Additive: RUST-OLEUM Marine Anti-Slip Additive
The hazard of a slippery floor remains a major concern in the process of painting a floor with epoxy. Regardless of what its appearance may suggest, exposure to water can quickly create a danger zone for anyone around. Using this anti-slip additive on an oil-based epoxy wood floor is a preventative measure that can save both yourself and others a potential headache. Although the majority of epoxy coating for wood floors is water-based, a non-slip additive is still required on oil-based epoxy wood floors.

- A skid-resistant coating for wood, metal, fiberglass, and concrete
- Provides a slight texture to any interior or exterior surface
- Wont change the color or performance of the paint
Pros
Cons
- Product not suitable for use with a deck stain
The Pros and Cons of Epoxy Floors
As with any coating or finish, epoxy wood floors have their inherent advantages and disadvantages. Before deciding which wood floor epoxy to use, it is necessary to consider certain factors pertaining to the process on the following list. Knowing exactly what you will need for any particular project.

Benefits of Epoxy Floors
The benefits of epoxy coating listed below are also relevant to a number of other surface materials, depending on the paint you use. Keep in mind that the quality of the resultant finish is highly dependent on the expertise of the applicator.
Appearance
An epoxy floor’s appearance is a decidedly appealing factor. The sleek, glossy finish of the epoxy coating creates a bright, professional look and feel. Without ever requiring polish, the task of regular maintenance and hygienic cleaning is a breeze.
Cost
When pricing is measured comparatively per square foot, the cost of epoxy floor coating is extremely competitive, as it allows application over wood and other materials. Price point is a factor that certainly holds sway with any DIY enthusiast.
Resistance
Epoxy-coated floors have a high resistance to many hazardous substances that may otherwise damage or degrade wood, masonry, or cement. Harsh chemicals like transmission and brake fluid, motor oil, gasoline, bleach, and including many other commonly found industrial items. For this reason, epoxy is used in both home garage flooring and larger workshops in the automotive industry.
Durability
The incredible strength and durability of epoxy-coated flooring make it an outstanding option. Concrete may indeed be more durable but does not have as impressive an appearance. Although seldom necessary, there are measures you can take to even further improve and protect the finish of your flooring.
Protection
You can ensure expensive maintenance costs will be lower in the future with proper protection. The essential protection provided by epoxy flooring prevents stains, cracks, grease, and moisture from seeping in. It is crucial that the application of your epoxy flooring is professionally managed, as this will determine the quality of its protection.
Longevity
This flooring will last a long time If installed correctly, making it quite a long-lasting solution for floors. Decades can pass by without epoxy flooring requiring replacement and over time, any noticeable peeling or cracks are extremely rare. Its length of lifespan makes it widely used in industrial situations.
Variety
Not only is the appearance of epoxy floors elegant but there is certainly room for your creative vision. The range of patterns and colors available ensures that you will acquire your desired style of finish. You have the ability to transform the look, feel, and ambiance of your home, or workspace and give it a more defined identity or character.

Disadvantages of Epoxy Floors
There are negative factors to consider with the use of any paint type, but these are mostly due to inferior product quality or incorrect application. Potentially this negates any benefits provided by an epoxy floor coating.
Temporary
The fact that epoxy flooring is not a permanent solution is certainly a major disadvantage. Over time, the floor coating will degrade and fade, losing the brilliant appearance it had. It will require eventual replacement, regardless of its high durability or chemical resistance.
Slippery
‘Slippery when wet’ is a phrase synonymous with oil-based epoxy floors, and they can be extremely hazardous. It is, therefore, necessary to texturize the surface of flooring in areas like bathrooms and kitchens where frequent liquid spillage is problematic.
Preparation
The effort required to prepare a surface for the application of the epoxy coating is considerable. The entire concrete or wood surface requires complete cleaning in order to ensure it is free of any grease, oil, or solvents. In the past, it was a lot more complicated but thanks to modern improvements, the materials available today ensure a much faster and simpler job.
Application
Keep in mind that due to the lengthy time-span it takes epoxy paint to dry, it may render the painted area inaccessible for a number of days. Before each additional layer is applied, the initial coat must have dried completely, so make the necessary allowances as this could take up to a week.
Smell
Wet epoxy produces strong fumes which give epoxy paint a rather acrid and toxic smell. The ammonia odor is more evident in epoxy as darker colors contain more hardening agents, so this is something to remember when selecting your color.
Removal
As a procedure, the application of epoxy can be both costly and highly involved in terms of labor, and should the floor require repairs, the removal is also an intensive procedure. Attempting this on your own is not advised as it could become an even greater expense as a result.
How to Apply Epoxy Paint to Wood
The application of epoxy to wood is a detailed procedure that can be divided into three sections. Please read each step carefully, as any parts skipped my result in redoing the process. The process is outlined in its entirety below, accompanied by some helpful tips.
Part 1 – Positioning and Sanding the Wood
Step 1 – You will want to use sandpaper with a grit between 120 and 220. This is to prepare any uneven wooden surface, use sandpaper with between 120 and 220 grit. The surface needs to be completely even and smooth in order to avoid any issues you might run into when applying the epoxy. To make sure your surface is smooth when done, do not forget to sand with the grain of the wood.
Step 2 – Although tiresome, ensuring the wood is completely clean is a crucial step. A damp microfiber cloth will allow you to easily wipe away any remaining dust. A brush or small vacuum may also be very handy in removing excess dust.
Step 3 – Attaching painter’s tape behind the wood will prevent epoxy drips. You will now need to place it on a level surface and make certain that the surface is flush with the workbench or the epoxy could leak. Remember just to apply tape to the wood’s edges.
Step 4 – In order to prevent epoxy spillage, covering your work surface with cardboard or plastic ensures its protection. A table can be easily damaged by epoxy, causing an inconvenience. The combined use of cardboard and plastic together creates a flat protective shield to work upon.
Step 5 – Some old cups or empty tins can be used to elevate the wood, ensuring it does not touch the surface. While working, the side of the wood you are planning to coat should be elevated and facing upwards.

Part 2 – Mixing the Epoxy
Step 1 – As inhalation of epoxy fumes can cause headaches, make sure to use a dust-free room with decent airflow to join the epoxy. Air temperature below 18.3` C can produce a poor epoxy mixture, so avoid mixing in a room that is too cold.
Step 2 – Use two separate disposable containers for the hardener and resin, as a different mix ratio is required for these. Using a plastic cup or container for its indentations makes it ideal for measuring.
Step 3 – Once correctly measured, combine the resin and the hardener. You can scrape the resin or hardener from the sides of the container using a piece of wood. Whether you pour the resin into the hardener or vice versa, it achieves the same end result.
Step 4 – Using a clean piece of plastic or dowel rod, very slowly stir the mixture for 5 minutes. Keep in mind that stirring too fast will result in bubbles. Don’t panic if you do see bubbles as they can later be removed using heat.

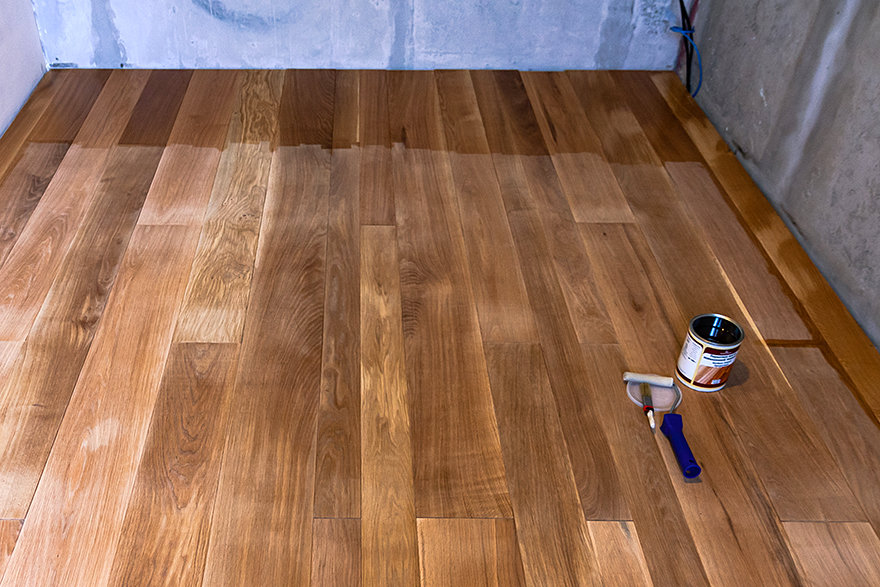
Part 3 – Coating the Wood
Step 1 – Make sure that the epoxy mixture is poured centrally on the wood before you begin covering the surface with a thin coating. Perfection is not necessary, however, the mixture will harden once it touches the surface of the wood, so work speedily.
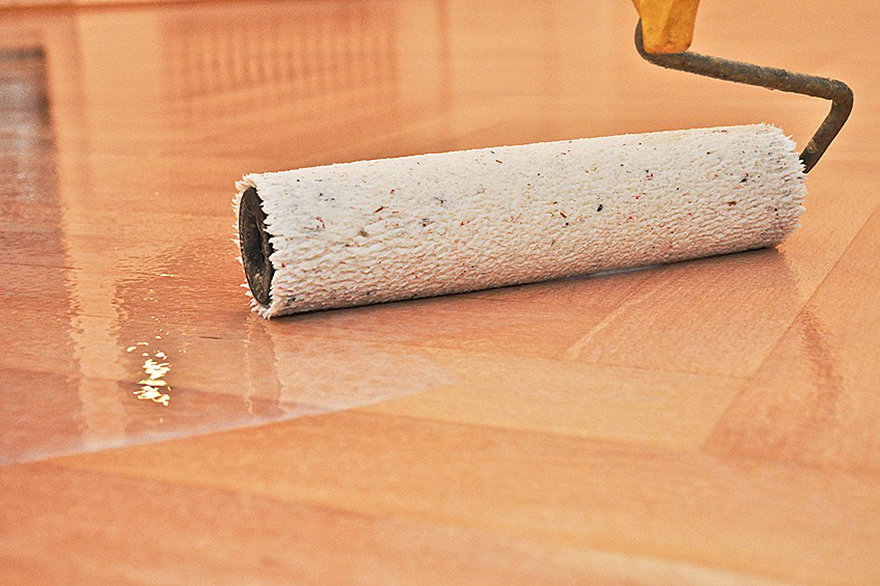
Step 2 – Using a brush made of foam, spread the epoxy to all edges of the wood. Although a simple enough procedure, be sure of the evenness of the coating and wipe down the edges with either side of the brush.
Step 3 – A heat gun can rid you of any air bubbles you encounter along the way. A hairdryer is also a worthy substitute here and can be just as handy. Remember, the heat source needs to be kept moving and around 25.4cm from the surface to remove the bubbles. Do not allow it to linger for too long as you may burn the epoxy.
Step 4 – To dry and harden, the initial coat requires around four hours. When it still has a tacky feel to it, apply an additional epoxy coat. Pay attention to any bubbles, you will notice them after around 30 minutes.
Step 5 – As a protective layer, an additional epoxy coat must be added and repeat the mixing process as before. Make use of a harder spreading tool like a spatula for ensuring this coating is even, as a foam brush will prove ineffective here.
Step 6 – Once the epoxy has dried for at least 24 hours, you can safely remove the tape applied to the wood. It is recommended to allow up to 36 hours leeway, as touching the surface may ruin the finish.

Frequently Asked Questions
Do Wooden Surfaces Soak up Epoxy?
Yes, and, it is for this very reason that it is essential to precoat the wood with an epoxy primer, otherwise the wood may crack and incur further damage due to the epoxy soaking in.
How Do I Clean Off Wet Epoxy?
Rubbing alcohol can be used to clean wet epoxy from a surface, however, this will prove ineffective once it has hardened. It depends what type of epoxy paint for wood floors you use. Water-based paint can be cleaned up with soap and water, oil-based paint requires solvents.
Which Brush is Best to Use to Smear Epoxy?
A foam brush is recommended for the application of the initial coat, while a harder spatula tool is better suited for the subsequent layers.
How Many Coats Will I Need to Apply?
Usually between two and four coats are required when applying epoxy paint for wood floors, but use your own discretion according to your respective needs.
How Do I Achieve a Clear Finish After Applying Epoxy?
Sanding with a variety of sandpaper grits from 100 to 1200 produces finer surface scratches that are polishable once the application is completed.
There are a lot of things to think about with epoxy paint for wood. Our guide above should have cleared up any questions you may have on how to apply the paint and choose the right epoxy products. We hope your epoxy paint for wood floors project is a success!


