
Wood Slice Crafts – Fun Projects Using Crosscut Wood Rounds
When many people think of crafting, they might imagine glitter and bright colors, but wood slice crafts are more rustic and down-to-earth. Decorating with wood rounds can add a more natural touch to a room. These wood slice decorations can be used in any room from your living room, bedrooms, and dining room table to front porches. Not only that, but they also make great gifts as well.
Wood Slice Crafts
Wood is an amazing natural material that brings warmth and a sense of naturalness to an environment. The ideal time to get involved with wood slice crafts is in springtime. This is the time of the year when you have to prune the trees on your property and prepare them for another season. Instead of burning the branches or logs, why not use them for some wood slice crafting ideas. However, if you do not have trees on your property that need pruning, then various sizes of wood slices can be bought at any craft store.
Wood slice projects are a DIY crafting idea that can be enjoyed by the whole family, and the finished product can be displayed in your home or given as gifts to friends. Wood slice projects can include things like plant holders, tables, or coasters, and there is always something for everyone. The beauty of it is that the branches you pruned or those that fall during a storm are free. So, let us get started with some popular wood slice projects and ideas.
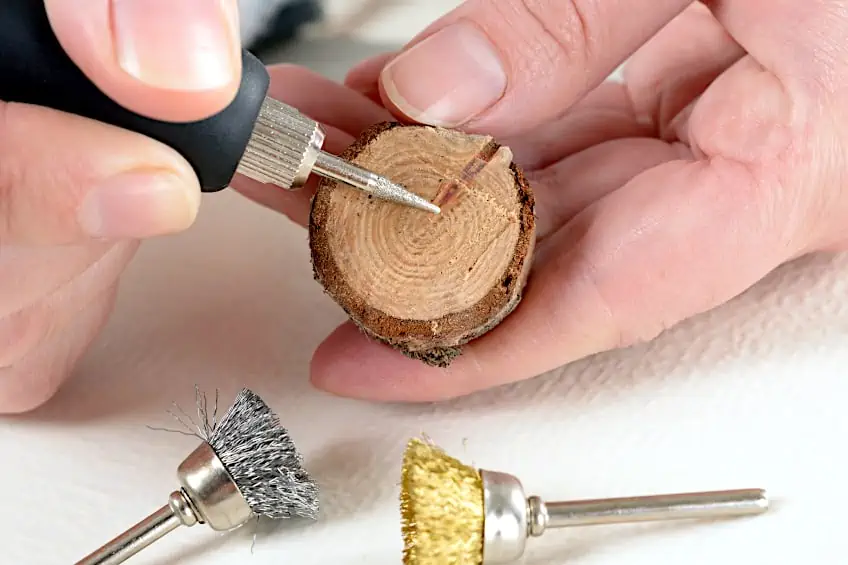
Sourcing Your Wood Slices
You can now buy precut wood slices from craft stores or online retailers in a range of thicknesses and sizes, or if you have access to trees and tools, you can make your own. Do remember that when you cut your own slices, ensure that you take the necessary safety precautions when cutting the wood. It is also important to allow the slices to completely dry out before you commence your project. If you use the wood too soon it may crack or warp, and any moisture retained will negatively affect any paint, adhesive, or sealer applied to it.
Wood Slice Coasters
Coasters are ideal wood slice ideas, as you do not have to be concerned if they are not perfectly round or all of the same thickness. They are ideal as they can handle the heat from your coffee cup perfectly. You can leave them in their natural state, or you can decorate them with an Easter, Christmas, or wedding theme, or even personalize them with the names of loved ones or guests at a party.
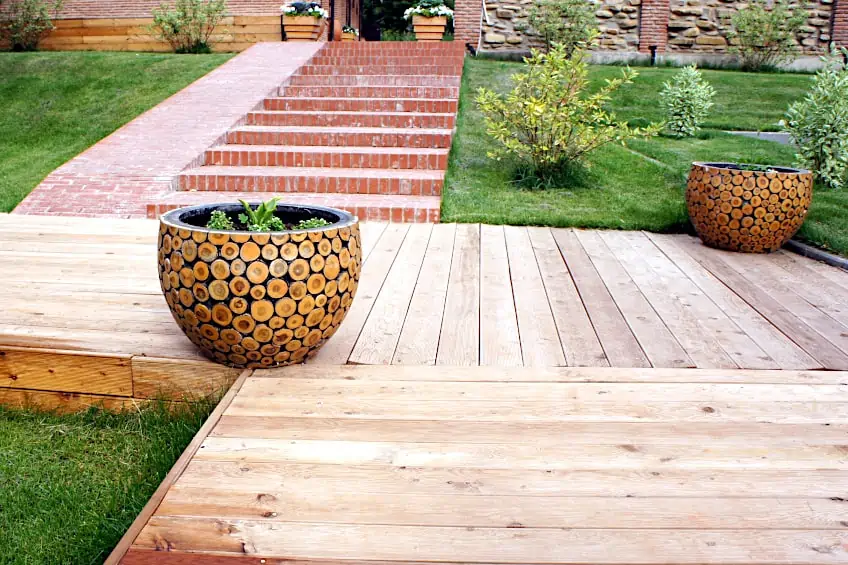
Wood Slice Tables
Larger tree trunks, with the bark still intact and the rings to indicate their age, can be used to make beautiful rustic furniture, like coffee or side tables. The final item can give the impression of being fresh, and brings nature and the outdoors inside. The idea of making your wood slice table falls under large wood slice crafts, as you need a wooden log around five inches thick. Alternatively, you can use a number of small slices set into resin to create a wood mosaic effect.
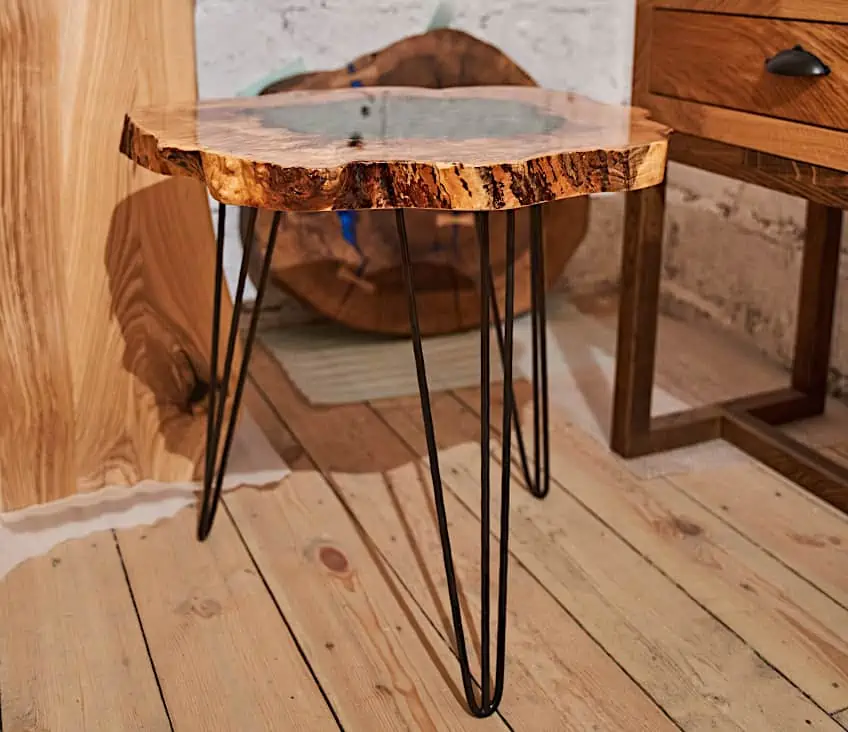
Remember that you will need to sand it down to give it a level and even, smooth surface. If you are using raw wood, you must apply a top coat to seal it and clear lacquer for protection. Lastly, you add some metal legs, and you have a super coffee or side table that should last a lifetime.
Wood Slice Wine Charms
When you attend a dinner party or some big event, to try and keep track of your wine glass is almost an impossible task. You put your wine glass down, and turn around, and when you look again, there are two or three more wine glasses, so which one is yours. To solve this problem, you can attempt small wood slice craft ideas by making wood slice charms. Take a small slice of wood or even use a slice of wine-bottle cork, then write the names of your guests on them, and then attach a thin cord that can be fixed to the wine glass. There you have it, you will always know which glass is yours.
Wood Slice Magnets
There are many small wood slice craft ideas, and mini-fridge magnets are one of them. They can bring a rustic flair to the kitchen when used on the fridge. For decorating with wood slices, use a sharpie or even burn the image on the wood, then glue a small magnet to the back and you have created your unique fridge magnet.
Wood Slice Shelves
These shelves again fall under large wood slice crafts and are very quick and easy to make. Take your wood slice and attach three strong cords to it, then you can hang it from the ceiling with your favorite plants or other ornaments you want to display. You can also cut the wood slice in half and attach both the flat ends of the wood halves to the wall with a bracket, which you can then use to hold a vase with flowers.
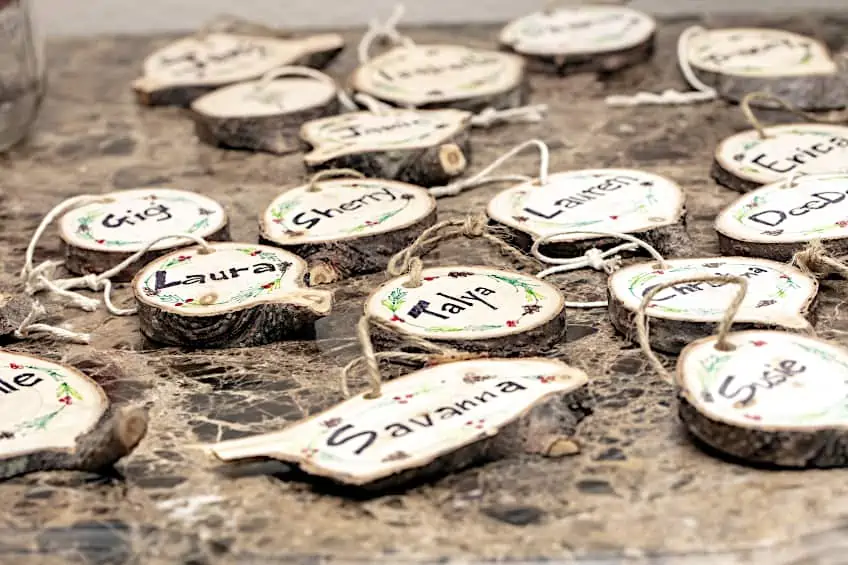
Wood Slice Photo Ornaments
Take a photo from your camera or get any other image, and transfer them onto a wood slice, which can be of various shapes or sizes. You might have to trim the photo to fit the wood slice, and then apply a layer of Mod Podge to the wood slice surface. Position the photo where you want it to be and apply a second coat of Mod Podge over the photo. Attach a piece of twine or cord to the wood slice and you can hang it wherever you want it to be displayed.
Wood Slice Pencil Holder
Instead of having pencils lying all around the room or rolling around in a drawer, why not make a rustic pencil holder for storing them in. This will make it a lot easier to keep them organized. You should use a wood slice that is thick enough to hold the pencils upright without falling over. Now you can either, cut out the whole middle section of the wood slice, or you can drill several or more individual holes, which is where you place your pencils, then place the holder on your desk.
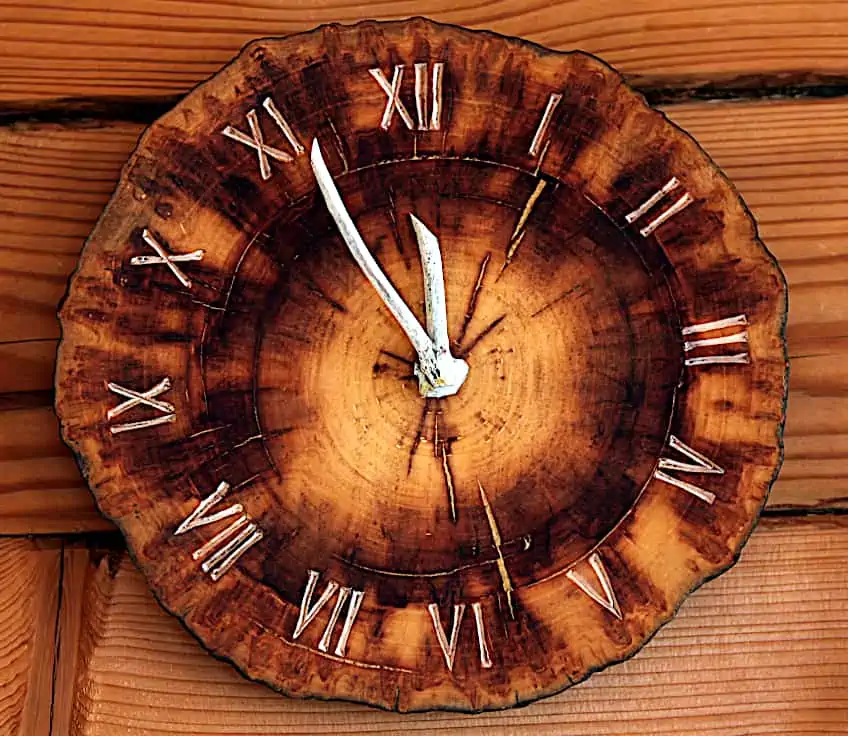
Wood Slice Wall Clock
You first need to find an old wall clock that has a damaged case, with a working mechanism, which you can then dismantle. Find a wood slice that will be suitable for the clock size face and drill a hole in the center. Insert the clock’s mechanism and fix it in place with some hot glue. Next, you can fix the clock dial in place, attach the hands, insert the battery, and your wood slice wall clock is ready to hang on the wall. If you do not have an old clock, you can just purchase the clock mechanism and paint the numbers on the clock face yourself, this will make a unique wall clock for your home.
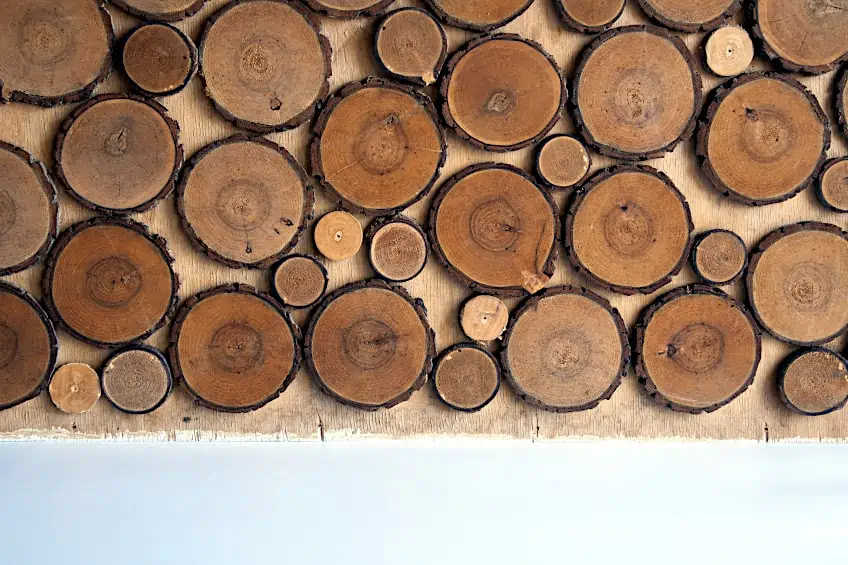
Wood Slice Wall Hanging
For this wood slice project, you make a purely decorative or a functional wall piece. You will need to have a baseboard of the size and shape you want. You will also need something to secure the finished piece to the wall. Now you need different size wood rounds or slices with varying thicknesses to give your wall hanging a topographic feature or texture. For a functional piece like a coat rack attach a few attractive hooks to some of the larger wood slices.
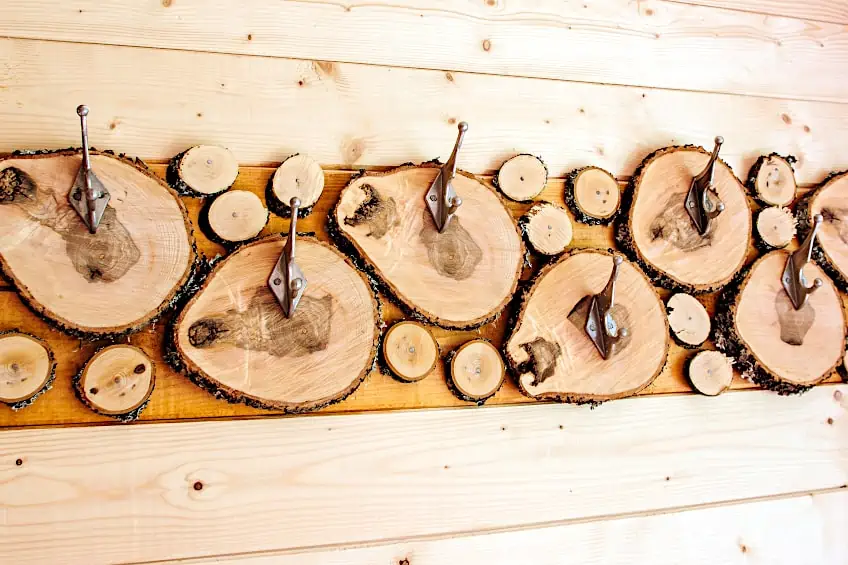
Take some sandpaper and remove the rough edges of your wood slices, then you can begin to arrange them on the baseboard in a certain pattern or design. Then beginning in the center, start to glue the wood slices in place using good quality wood glue, and once the glue is dry you can apply a finishing coat. You can paint the wood slices different colors or leave them as-is for a more rustic effect.
Wood Slice Mirror Frame
If you have a mirror and you want to frame it, what better way to do this than doing a wood slice mirror frame? The mirror can be oval, round, rectangular, or square. Take a piece of plywood about three-eighths of an inch thick and cut it to the shape of your mirror. However, make sure it is about three and a half inches bigger than the mirror around the edges.
You can purchase wood rounds for crafts, which need to be rather small and of varying diameters, or you can try making the slices from branches of trees in your garden. Make sure you have plenty to finish the project. You can leave the plywood raw, or give it a coat of paint that will match the wall where you are going to hang it, then apply the glue to the space where the mirror is to go.
Be careful not to use glue that will attack the backing painted on the mirror. A good option for glue would be wood glue, special mirror glue, liquid nails, or some double-sided tape. Let the glue dry for at least 12 hours. Attach your wood slices in a pattern all around the mirror and glue them in place with some wood glue, allow the glue to set and your mirror is ready to be hung on your wall.
More Wood Slice Projects
So far, we have given you only a few of the options you can use for wood slice decorations. However, there are a lot more ideas that involve wood rounds for crafts. Most of these ideas can be used as gifts or simply as a hobby to pass the time.
- Keyholders
- Serving trays
- Wooden door wreaths
- House number signs
- Tablemats
The ideas for wood slice crafts are many, from items you can hang on walls, to small trinkets, and even furniture. Wood slice ideas will always give you that rustic look and bring in a bit of that outdoor feeling. Start with your wood slice crafts today and see how easy to make something unique from nature.
Frequently Asked Questions
What Type of Paint Should You Use on Wood Slices?
When decorating wood, the best paint to use on your slices is acrylic paint. This type of paint will do the job perfectly, and you do not have to spend a lot of money. However, it is a good idea to use a primer before you paint the wood slices, otherwise, the paint will easily be absorbed into the wood.
Can You Decoupage Wood Slices?
Yes, you can decoupage the wood to make some beautiful wood slice decorations that will go perfectly on the Christmas tree, or for items you can give as gifts to friends and family. A beautiful wooden coaster or wall hanging can also be a great décor item in the home.
Is It Necessary to Seal the Bark on Wood Slices?
This is a crucial part of wood slice crafts, so you should always seal the wood bark unless you want the rough edges. To help with this, you can apply polyurethane, to protect it from moisture damage, especially if the items are going to be outside. You can also use varnish for smaller items inside the house.
How to Keep the Bark Intact on Your Wood Slices?
You need to cut your wood slices in the winter as the sap is not flowing yet, which will keep the bacteria or mold from forming under the bark and reduce its life span. Keep the wood slices in a cool, dry place before using them. The wood slices must be completely dry before working with them.


