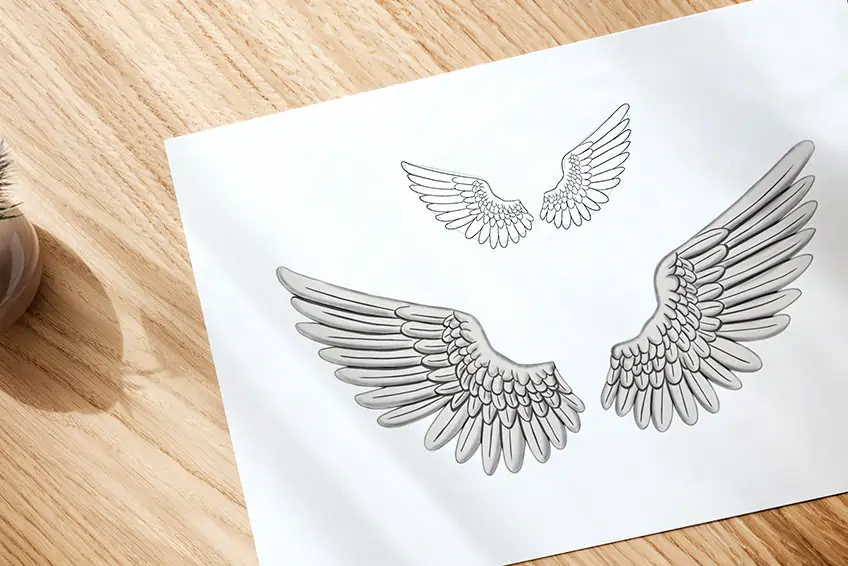
How to Draw Wings – A Feathered Angel Wings Drawing Lesson
Angel wings are beautiful and graceful. Still, some say they are challenging to draw. As with everything that seems impossible to conquer, you just need a manageable plan! We have designed a simple step-by-step drawing tutorial to show you the best way to draw and paint feathered angel wings. By the end of our how-to-draw-wings guide, you should be able to replicate them perfectly. So, if you are looking for a tutorial on how to easily draw wings, then you have found the right place!
How to Draw Angel Wings
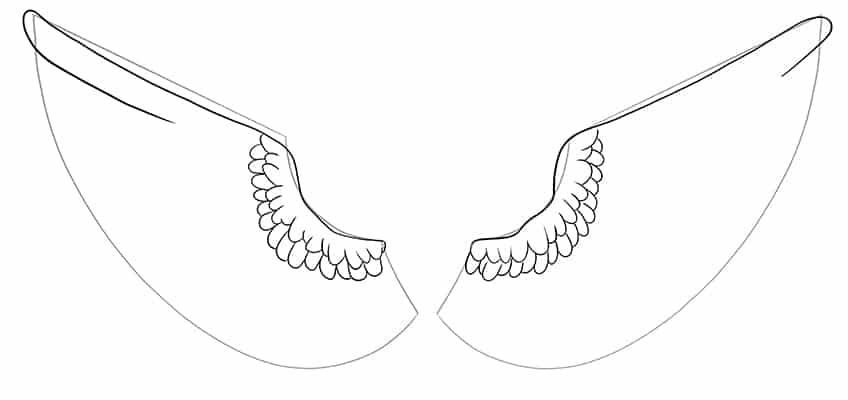
To begin our angel wings sketch tutorial, you must take a moment to plan the stages. The trick to achieving perfect symmetry for the wing drawing is to create construction lines for a foundation and build from there. Take a look at the wing drawings below to see the different stages we will be moving through to give you a better understanding of how our wings sketch will unfold. Study the plan to understand how the wing stages will unfold.

Angel wings are generally depicted as similar to those of white doves. As we begin this wing drawing tutorial, we suggest that you choose what drawing and coloring medium you want to use. You could use pencils, paint, or a digital painting tablet. Gather your drawing and painting tools and let us begin our drawing demonstration.
Step 1: The Foundation Topline
To start the wing sketch, first decide where the center point of your wings will be. Draw a line from there to the right-hand side upwards. Make sure that the straight line is angled diagonally towards the top of the page. This is the arch to your first wing. You can use a ruler to help create a perfectly straight line, as this will be repeated at a later step. Keep in mind that this line will determine the actual size of your wings.

Step 2: How to Draw the Curve of the Angel Wing
The next step in building the first wing is to draw a downwards curve. Do this at the left end of the foundation line and draw a curving line, similar to a half-moon shape. This will become the arch of our wings.

Step 3: How to Draw the Shape of Your Angel Wings Sketch
This step is divided into two parts. First, you must draw a short line angled diagonally to the left. Do this from the end of the half-moon curve you drew in step two. Be sure to make this the correct size because it will affect your entire wing shape. The second part of your wing drawing is to finish it off with a large curved line from the top tip of the foundation line to the bottom of your short connection line. This will give you a completed wing shape. Take a look at the image below to see how broad you can make the bottom part of the curved line to create the wing’s fullness.

Step 4: How to Mirror Your First Angel Wing Drawing
How to draw wings is easy in this next step. Your first wing is complete and all you must do next is to mirror exactly what you have already done in the first four steps. Remember to leave a small gap separating the wings. Use a ruler to devise perfect symmetry for your wings sketch and don’t be afraid to erase and redraw.

Step 5: Adding the First Feather Layer to Your Easy Angel Wing Drawing
Feathered wings have dimensions to them. This is achieved with layers and shadows. To begin building your feather layers we will start with the top layer on the border of the half-moon-shaped curve we drew in step two. The feathers in this stage are small and plump in shape and they don’t need to be precise. Have fun with it!

Step 6: How to Draw the Outline of Your Angel Wing Sketch
In this next step, you will create the first large feather of your wing drawing. We will start with the main feather layer on the top part of the wing. These feathers are large and curve up from the center curve. Begin the large feather line by outlining the middle half-moon-shaped curve these along the top part of the wing. Finish it off with the round of the top large feather. This line will be the definition of your angel wing drawing.

Step 7: Creating the Second Layer of Feathers for Your Angel Wings Sketch
We will now continue with the smaller feather layers. Remember that while layering your feathers you must keep to the trend of the half-moon curve, this will create that expanding feeling that you want to achieve with your drawing of wings. The second and third layers can be larger than the first small and plump layers. See the diagram below for guidance.
Step 8: Adding More Feathers to Your Angel Wing Drawing
In this step, we will continue from the previous step. Simply continue by adding the third layer of your small plump feather center row. This third layer can be slightly larger than the second row and as you draw the bottom part those feathers can begin to curve downwards. Refer to the example for an idea of what you are drawing.

Step 9: Creating the Mid-Feathers on the Angel Wings Drawing
By this stage, the middle half-moon curve should have three layers of small plum feathers. Now you will add the fourth layer of slightly larger feathers. This layer is important because you will begin to draw more defining feathers and your feather wings will start to emerge. Draw medium size feathers in your fourth row. They must be noticeably larger than the feathers in the first three rows. Begin the sequence with large and long feathers at the top and as it curves to the bottom, they become smaller. See the example image below to give you an idea.

Step 10: Finishing Your Drawing of Angel Wings
It is now time to complete your wings sketch. To do this, you must draw large feathers on each wing. Make sure that these feathers are large and curved beginning from the top of your foundation lines all the way expanding down to the middle of the wings. Continue the theme of large feathers at the top layer leading into smaller ones. Note that the feathers at the bottom are thicker and rounder than the feathers at the top. Once you are finished drawing the actual feathers, gently erase the foundation lines.

Step 11: Adding More Detail to Your Angel Wing Drawing
We have now reached the second phase of our easy wing drawing. You will begin detailing the feathers on your angel wing sketch by drawing a small line in the center. This is an accent line, its purpose is to create depth and movement, so only draw it in the center of each feather. Do this from the third row down to the final layer and with each row, your lines should become longer with the size of the feather. Please see the diagram below for inspiration.

Step 12: Adding a Base Color to Your Angel Wing Drawing
Angel wings are generally a white shade. We will start the coloring process with ivory cream color paint or colored pencil. Use a regular paintbrush and add an even base coat on each wing without any blotches, remember to keep it light as it is only the base.

Step 13: Adding Contour to Your Angel Wing Drawing
In this next step, you will be creating depth and shadows. Take a sharp black or dark grey pencil crayon or if you are painting you will need a fine blending paintbrush. Add a tiny touch of paint to each of the feathers connecting lines. The idea is to accentuate the feather’s dimensions with the use of shadows and thicker lines. Also, you can contour the edges of the larger feathers.

Step 14: Adding Shading to Your Angel Wing Drawing
Shading and contouring are both different ways to use color and depth in your drawing. Contouring is used to emphasize the different layers and shading is to accentuate the light of your drawing. Take a small blending paintbrush or sharpen your colored pencil and add a gentle shadow to the outline of the wings.

Step 15: Completing Your Angel Wings Drawing
At this final stage, you can gently erase the foundation lines of your angel wings drawing and you should be left with a seamless finished picture of angel wings. Now you can use white paint or colored pencil and simply trace over the whole outline of your wing drawing and then to finish it, you can use light grey paint or colored pencil and trace the inner to create texture and detail.

Well done! You have just completed your first stunning angel wing drawing. We hope that you have loved this step-by-step drawing tutorial and that you are satisfied with the outcome. Always use foundation lines and simply break down the drawing procedure into simple steps like we have done in this tutorial and you will be able to draw anything.
View our How To Draw Wings web story here.
Frequently Asked Questions
How to Draw Wings Easily?
Drawing wings is challenging, especially if you begin in the wrong place. Luckily, we have created an easy-to-follow tutorial and show you how to draw angel wings easily. Start by using a foundation line and then layering the feathers to create expanding wings. We have made learning how to draw wings easy for everyone!
Can You Make Three-Dimensional Wing Drawings?
To create a three-dimension effect on your wing drawing, you will need to focus on contouring and shading between the layered feathers. In our step-by-step tutorial, we will show you how to do this.
Which Color Should I Choose for My Angel Wings Sketch?
The color of your angel wing drawing is completely your decision. In this tutorial, we use ivory cream and white because it is more traditional, but try to be creative and let your imagination go wild.

Learn more about Israel Benloulou and about us.


