Encaustic Painting – Instructions for Hot Wax Painting
This post may contain affiliate links. We may earn a small commission from purchases made through them, at no additional cost to you.
Encaustic art, also known as wax painting, is a fascinating art form. Our guest author Sonja Werner provides an encaustic definition and shows how to create your first encaustic paintings in a step by step guide. This includes which techniques are available, and which materials are needed. Sonja will also reveal many helpful tips and tricks from her many years of practice.
Table of Contents
What is Encaustic Art?
Encaustics, or wax painting. describes an artistic painting technique. Here special encaustic wax colors are heated with a painting iron and applied to the painting surface. These wax colors can then be worked on with different tools such as sponges, which results in beautiful effects.

The basic technique of encaustic art has a very long history, which goes back even further than oil painting, for example. The heyday of this technique was in Greek-Roman antiquity. The word encaustic alone has been around for over two and a half thousand years. At that time, the materials were permanently burned into the surfaces with fire and red-hot iron and applied with hot spatulas. The beeswax was mostly mixed with imported pigments from Egypt or Sudan.
Safety first
Since this technology involves a lot of heat, electricity, and fire, the motto is always safety first! Always observe the following guidelines when doing encaustic painting:
- Never leave hot equipment unattended.
- Should you leave the room, always turn everything off and remove the power plug from the socket as well.
- It is best if you have an emergency power switch so that you can react quickly in the event of overheating.
- Always have the fire extinguisher handy in case of an emergency.
- Important: If you burn the shellac with a blowtorch – make sure that the flame is completely off from the painting – it often burns invisibly. It is safer to use a hot air dryer. Always keep a sufficient distance to your painting (approx. 20 to 30 cm) because it will also get extremely hot!
- Don’t burn the shellac on paper!
- Be careful, hot wax causes burn blisters – always hold your paint iron so that the wax cannot run over your hands.
- Protect your clothes with an apron, because wax and shellac are very difficult to get out of the clothes.
Please always handle all equipment with the greatest possible sense of care, so that in any situation (including situations that may arise spontaneously and are not listed here) there is absolute safety for you and your surroundings. Do not handle any device carelessly and check all devices for possible damage before each use.
Materials Required for Encaustic Painting
For beginners, or those looking to get started quickly, you can get a complete encaustic art set. This will kit you out with everything you need for this art technique for greater convenience. A full list of all the encaustics materials needed for encaustic painting are:
- Starter set for encaustic technique incl. paint and paper
- Heat adjustable pen
- Hot air dryer or blowtorch
- The colored encaustic beeswax
- Clear wax – which is also very suitable for cleaning
- Encaustic paper
- Wood panels
- Cover for the table (nothing that burns quickly!) a wax tablecloth works great
- An apron to protect your clothes
- A multiple socket plug with switch – so that the power can be switched off quickly in case of an emergency
- Kitchen roll for regular cleaning of the male iron and pen
- A fine stocking to polish up the finished pictures at the end
- Shellac in the right colors
- Brushes
- Fire extinguisher
Encaustic Art Basic Techniques
In modern encaustic painting, special electrical painting devices are used, such as the pen, special hot plates or hot-air dryers. The dyed beeswax is melted and applied to the respective surface.
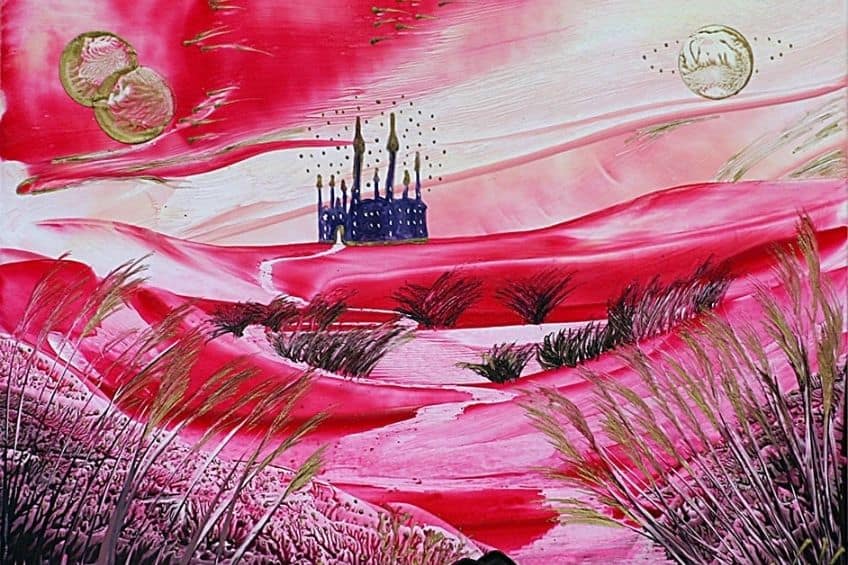
For creating encaustic art, you will need the right surface. Specially coated papers, wood boards, and canvases, but also MDF boards (a good and inexpensive alternative to encaustic wood surfaces – simply have them cut to size at the DIY store) are ideal for processing.
Guide to the Encaustic Mixed-Media Technique
The encaustic mixed media technique is a wonderful and exciting variation. Here special shellacs are usually processed together with the classic encaustic paints. You can also use other different media such as oil paints and acrylic paints with this technique. But here, I would prefer to go into this encaustic mixed-media technique with shellac.
I prefer to work with wooden foundations. These do not have to be specialized for the encaustic technique. You can get them at art shops or on Amazon. Why don’t I paint with wax on canvas? A canvas is flexible and because of the material, it is always moving. When the wax gets cold, it becomes hard. If the background is movable, just a small motion is enough to break the wax painting. Of course, this is very annoying, because you put a lot of time and energy into your artwork.
First I always go over the wood painting surface with fine sandpaper to straighten any rough areas. Afterward, the wooden surface must be “dusted”. Then the edges are covered with standard masking tape because the wax will run down the sides. I almost always prime with wax only. If I want to have an especially bright white – commercial Gesso is also a good choice.
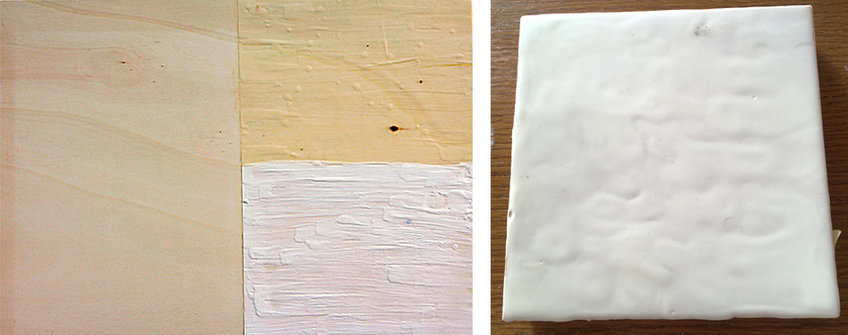
Left: Wood painting surface without and with different wax layers. Right: This is what your wood base looks like after 5 to 7 layers of wax
Very important: Every single layer of wax must be blown out. For this purpose I bought a hot-air dryer at the hardware store. This creates a background where the respective wax layers have to bond together so that they do not crumble away individually later.
What do you have to consider when blow-drying? Always keep the hairdryer in motion and about 20 to 30 cm away from your painting. Set the blow dryer to the lowest power setting – otherwise, you will blow the wax off your surface and it will not become smooth. Because of the air trapped in the wood, bubbles can form in the wax, which you can eliminate by moving the hairdryer steadily.
I always let the wax layers cool down completely first so that the underlying color does not mix with the other colors so quickly. Because this technique requires a lot of wax, I bought an electric grill and some aluminum bowls.
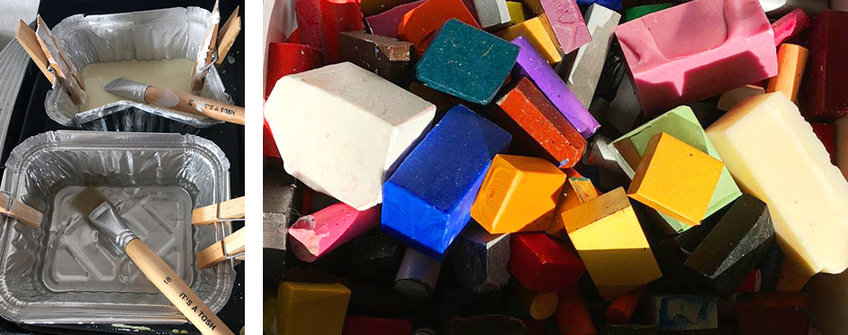
Left: Melted encaustic wax in aluminum bowls Right: Colored encaustic wax blocks
There are also great painting boards that keep the temperature constant and do not get too hot. Here you have the guarantee that your wax won’t melt too hot when adjusted correctly. Now you’re ready to begin your real work of art. Most of the painting irons – which you buy in every basic set – can be converted into a small painting board. Here you can melt small amounts of wax.
Now simply paint with wax and brush, or directly with the paint iron an image on your underground. I prefer to work with the brush here because I can paint a little more filigree. If you paint directly on the surface, please pay attention to the pressure, otherwise, it is possible that the surface melts or grooves appear. Important: Here, too, each layer must be blow-dried separately so that the layers bond!
If you like your painting so far, you can now start with the first shellac layer. Below you can see on the left side how I painted the grass with green shellac. On the right side, I burned the shellac with a blowtorch (but you can also use a hot air dryer).
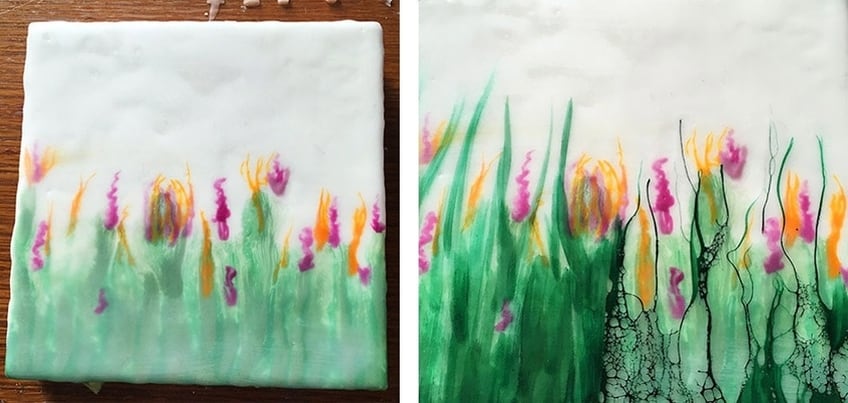
Left: The wax layers are applied Right: Baked shellac gives the painting a wonderful depth and structure
Here it is important to burn the alcohol from the shellac with enough distance and caution. The pigments contract and a “tearing effect” is created. To get more depth, you can apply another layer of clear wax or photo wax after the drying time (this time is very different due to the room temperature). Then “blow-dry” again to connect the layers and let them cool down. Repeat this process until your painting is finished.
Another tip for the depth of the images: Don’t use the same shellac paint over the wax colors. Use contrasting colors. This is where the tearing effect comes out best. Then burn on again – maybe another layer of clear wax or just work directly with more shellac colors.
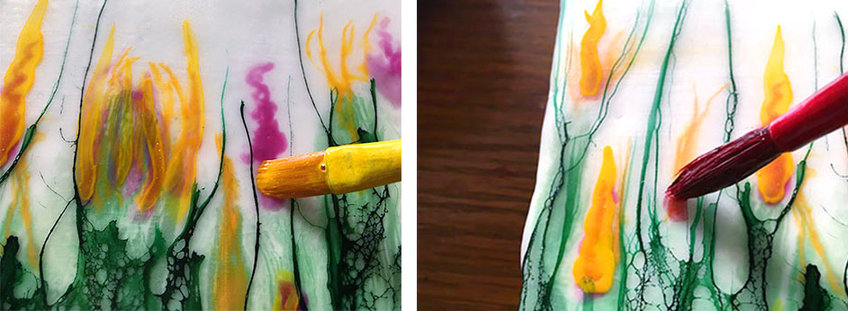
Set colorful accents with wax colors
When you are finished and satisfied with your painting, let the shellac dry well. I always let my paintings dry for several days. After that, you can smooth the edges with your paint iron. In addition, the crepe adhesive tape dissolves much better if it is warmed up a little.
 Left: After the painting has dried well, the edges are smoothed out with the hot iron. Right: Finished painting without sealing
Now you can remove the masking tape and clean the edges. Since we work on wooden surfaces, you should paint the back and sides with paint to prevent them from warping. I make my mine black or white because this adds some depth. For this, I use normal acrylic paint from the hardware store for wood in a matte finish. But this is a pure matter of taste. I know many who like colorful or high gloss paints. Then, do you want to seal your picture? You can also use very light shellac. I deliberately did not seal this painting, because I liked it better that way.
And there you have it, a complete guide to the encaustic definition and creating encaustic art. We hope that this guide has inspired you to start creating your own paintings in this style!

Sonja Werner
Sonja Werner was born in Reutlingen in May 1979. She has been interested in art and music from an early age. She has tried out many creative things. There are so many beautiful things and she is always open to new things. In 2002 - in a difficult phase of her life - she came into contact with encaustic art for the first time through an acquaintance. She showed her the basic techniques and painted together with Sonja from time to time. Sonja was immediately fascinated by working with wax. Working with beeswax has become a kind of meditation for her. Here she comes to rest, here she lets her energies and thoughts flow. Not only painting with beeswax has enchanted her, but also working with hot wax. When Sonja held her first finished painting in her hands, she was blown away. The luminosity of the colors, the depth of the pictures...
simply indescribably beautiful.
After a few years, however, Sonja wanted even more in encaustic art - just think outside the box. Combining different materials was the solution. She started experimenting in the mixed media technique and was very enthusiastic when she tried the Encaustic mixed media technique with shellac for the first time. Then in 2016 her dream came true. She had 2 exhibitions (Pfeiler law office in Sonnenbühl and at the TUI Reise Center Pfullingen). These were especially nice experiences for Sonja, because the feedback was overwhelming. 2018 to 2019 followed her largest exhibition to date - in Eningen u.A. in the Town Hall 1 - over several floors she was allowed to show what inspires and moves her. Again, the feedback was all positive throughout and Sonja felt the enthusiasm. What could be better for an artist?


