
Best Oil Paints – A Guide on Oil Painting for Beginners
As an artist, the time may have come to experiment with a new medium. Sure, acrylic paints have been getting the job done, but have you ever considered giving oil paints a try? This medium is extremely versatile, offers stunning colors that last, and has options available for artists of all skill levels. Investing in an oil painting set may seem daunting at first, but we are here to help you select the best oil paints to get started with this guide on oil painting for beginners.
What Are Oil Paints?
Oil paints have long been the preferred choice for professional artists around the globe. So much so that some of history’s most famous painters such as Monet and Rembrandt even made use of this versatile medium. Having said this, you may still be asking what oil paints are, and more importantly, why you should be using them.

Oil paint colors are brought about by suspending paint pigments in a drying oil, the most common of which is linseed oil. You can also mix oil paints with various mediums (like oils, thinners, and solvents) in order to change the texture, sheen, and consistency of the oil paint. Natural pigments found in the best oil paints include cadmium, zinc oxide, umber, and sienna. However, this does mean that most oil paints have higher levels of toxicity and will require certain preventative measures to prevent adverse health effects.
There are synthetic pigments available that are used for creating safer-to-use oil painting sets, although the lack of natural pigment will result in a less impressive color quality.
Two of the greatest benefits of using oil paints include their vibrance of color, which will not change once dry, as well as their delayed drying time, which gives artists the opportunity to change their creations as they see fit. This means that you will have time to make changes if you are not happy with the result, or you can choose to continuously add to the piece until such a point that you are happy.
Remember, the longer you work on the piece, the longer it will remain wet and as a result, the longer it will take to dry. Make sure that you store your masterpiece safely until it is dry so that it is not at risk of being altered by the slightest touch.
Choosing the Best Oil Paint Brands
As with any hobby that requires equipment, especially art, knowing what to look out for from the get-go will save you from spending unnecessary money or potentially damaging your gear, while ensuring that you have everything you need in your oil paint set for beginners. The selection can be intimidating given the number of oil-based paints currently available on the market, but do not stress about it; we have a few tips to help you find the best oil paint to get you started.

Understand the Cost
When it comes to comparing different paint options, oil paints are more expensive than acrylic paints. This is because oil paint colors are made using pure pigments. As a result, certain colors may be more expensive than others due to the pigment contained within them. There are more cost-effective options available that make use of synthetic pigments, and these are often referred to as student-grade oil paints; however, the color quality is not of the same vibrancy.
Artist-grade oil paints are often labeled using a number or letter scale, the higher of which indicates the quality of pigment used. For example, a #one tube will contain less pigment than a #10, and so on. By default, higher numbers will indicate a more expensive paint.
When beginning oil painting, we recommend investing in small tubes and a limited color palette to get a feel of the medium. Depending on your budget, you may be able to buy artist-grade paint, which we highly recommend. The vibrant nature of natural pigment oil paints means that you will need less paint to achieve your desired result, which makes the smaller tubes a great option.
In addition to the cost of the paint, you also need to factor in the equipment needed to start painting, which will include your brushes, canvases, easel, and cleaning supplies.
Reading Paint Tube Labels
You need to know what you are going to be using and spending your money on, right? Well, the best way to do this is to understand the label. Oil paint tube labels will indicate lightfastness and opacity, referring to its permanence and non-transparency, respectively. You will obviously be looking for a paint that lasts and provides the best possible coverage, although this can also depend on what you are wanting to paint.
Palette
While it may be tempting to go out and buy all of the colors of the rainbow, you may want to slow down a bit. You can get away with using a limited palette of oil paint colors, mostly because you can mix the different colors to make any other colors and shades you may need. We recommend including alizarin crimson, cadmium red, cadmium yellow, phthalo blue, ultramarine blue, ivory black, and titanium white.

Texture
The best oil paint brands all have a unique texture to their paints, leaving it up to you to decide which consistency and texture work for you. You can, of course, also use turpentine and other mediums to further change the properties of your oil paint should you wish to. You can get oil paints with a butter-like texture that can be spread with a palette knife, while others can have more of a grainy texture.
These textures provide their personality to the painting, so it is something to look out for when buying an oil paint set for beginners.
The consistency of the paint you choose will determine the drying time of each type of paint. Do not forget that it can take oil paints anywhere from a few months to a year to properly dry. In general, the thicker paints dry more quickly than the runnier varieties. The same can be said for different colors and pigments. Some colors have different oils mixed into them, which can take longer to dry. White paint is usually mixed with poppy oil, which has a slower drying time.
Texture can also be added by using different surfaces (such as wood or stone), different paintbrushes, as well as the different angles of the brush. Your palette knife will also come in handy if you are looking to add texture.
Quality
Of course, we all want to use the best-quality paints when working on our creative masterpieces. When it comes to painting with oil, there are two different types available, namely student- and artist- or professional-grade. As this implies, each paint is best suited for different levels of expertise and as such, the quality and pricing will differ for each.
Student-Grade Quality
This is the best oil paint to use when first starting out as it is the most cost-effective option and will give you a feel of the medium. It contains less pigment, more fillers, pigment substitutes, or even pigment mixes. The quality here will not be nearly as vibrant and impressive as the professional varieties, but the truth of the matter is you pay for what you get. Thus, student-grade paints are the best for practicing and getting the hang of using oil paint colors before forking out on a more expensive set.
Artist- or Professional-Grade
Both professional- and artist-grade refer to the more expensive, pigment-rich oil paints used by all the great artists. You can expect the best oil paints here, with the most vibrant colors and luxurious textures. However, the high cost of these quality paints means that it is best to really know what you are doing before spending that kind of money. However, you can guarantee great value for money when purchasing artist-grade oil paints, as the high pigment content means that a small amount will go a long way, making it last longer.
We recommend beginning with a student-grade oil paint set for beginners, and as you use up your paints and progress, replace the empty tubes with artist-grade paints.
Best Oil Paints for Beginners
Naturally, this article would not be complete without the official list of the best oil paints for beginners. Whether you are a newbie or pro, this list will share some of the best paints on the market that you may not have heard of. It could also act as a quick refresher on the paints that are currently available, in case you are looking to try something new. In this section, we will focus on student-grade oil paints, which are a bit more cost-effective and most suited to those just starting out.

Best Value for Money: WINSOR & NEWTON Winton Oil Paint Colors
When it comes to oil painting for beginners, this 10-piece set from Winsor and Newton is the perfect place to start. While we recommend Amazon, these paints can be bought from almost anywhere and are readily available should you need more paint. Considering the fact that they are rich in pigment, their price is actually quite reasonable. You can expect lightfast, permanent, and high-quality paints with good coverage from this set.

- Sold as a set of 10 individually formulated colors for student artists
- A high level of pigmentation at a moderate price
- Lightfast, permanent, and intermixable with other brands
PROS
- Easy to mix
- Great value for money
- Good range of colors
- Dries within a week
- Lightfast and permanent
- Good coverage
- High level of pigment
CONS
- Not water-soluble
Health-Conscious Paints: GAMBLIN 1980 Oil Color Set
Many oil paints are known to have some level of toxicity, and this is where Gamblin’s 1980 Oil Color set is different. This oil paint set for beginners does not use lead in their white paints. In addition to this, Gamblin also has a range of solvent-free mediums. This means that when you use the paint, you can rest assured knowing that it will keep you and your studio safe. While this is just a basic set of eight, there are up to 40 individual student-grade oil paint colors to choose from as well.

- Includes 8 colors of Gamblin 1980 Oil Colors in 37-ml tubes
- Added bonus of a free cradled wood panel and solvent-free gel
- A high-end student-grade oil paint set at a real value
PROS
- Creamy texture
- Easy to mix
- Solvent-free and non-toxic
- Includes a cradled wood panel and a solvent-free gel
- Good value for money
CONS
- Less vibrant colors
Best Oil Paint for Professionals
While the paints listed above are of high quality and are perfect for almost everyone, there are some oil paints out there that are more suitable for professional painters and artists. If you have the experience (and budget) to truly understand and respect a good oil paint, then you will want to take a look at the list below.

Best for Wet-On-Wet Painting: MARTIN & F. WEBER Bob Ross Basic Paint Set
You did not think that we would discuss oil paint and not mention The Joy of Painting master, Bob Ross? This Bob Ross-endorsed oil paint set offers great value for money, including five smaller tubes of basic oil paint colors, as well as a larger tub of liquid white paint. You will also receive a landscape brush and palette knife for details, so there is not much else you will need to get started! While these artist-grade paints may not be as rich in pigment as other professional paints, their consistency is perfect for trying Bob Ross’ wet-on-wet painting technique.
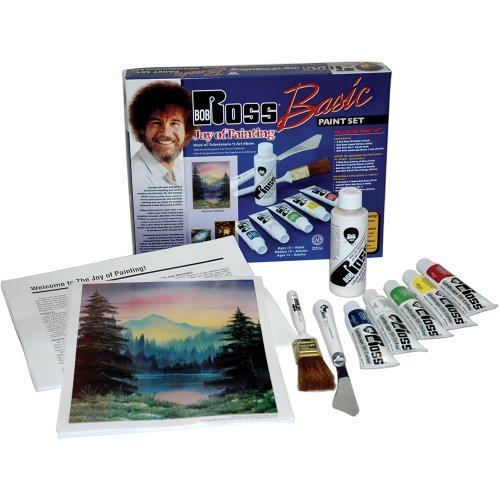
- Learn to paint with this starter paint set of five tubes of oil color
- Includes a liquid white color, painting knife, and landscape bush
- Painting surface, palette, and paint thinner not included
PROS
- Cost-effective
- Smooth, butter-like consistency
- Includes extras such as a landscape brush and detail painting knife
- Great for practicing the wet-on-wet technique
CONS
- Colors are not as vibrant
Richest in Pigment: WILLIAMSBURG Traditional Oil Paint Set
This set is perfect for those looking to embrace the vibrant pigment that oil paints have to offer. Williamsburg’s oil paints are a standard for many professional artists. Rich in pigment and offering a gritty and thick consistency, these paints were made to highlight beautiful brushstrokes and other textured features. This set of eight traditional colors also comes with a larger tube of titanium white, allowing for easy blending. These oil paint colors are handmade, renowned for their permanence, and are perfect for any artist wanting to use the best oil paints.

- Contains eight traditional colors and a tube of Titanium White
- Handmade oil colors known for their excellent lightfastness
- Great gift idea for any artist looking to use quality oil paints
PROS
- High pigment concentration
- Ideal for adding texture
- Excellent lightfastness
- Very high quality
CONS
- Expensive
Tips for Beginning Oil Painting
When you finally decide to take on the world of oil painting and have gone through the potential beginner oil sets available, the time will come to put paint to canvas. This medium has been used for centuries and has remained popular due to its quality, vibrant color, and versatility. While getting started is a fairly simple process, there is a lot more that goes into it when compared to painting with acrylic paint. For instance, some paints are toxic and can take a lot longer to dry.

Keep It Small
Your first oil painting is an opportunity to experiment with different techniques and play with your color palette. You do not need to be too extreme – start with small canvases, canvas boards, or even use paper. This will give you an idea of how the paint reacts to different surfaces and how best to use them.
Organize Your Space
Due to the toxic nature of oil paints, we recommend working in a well-ventilated space. You will also want to have enough room to set out your oil painting supplies while giving you the freedom to move around unobstructed. This will allow you to give more thought to your work, whether you are painting at the time or not. It will also make the space feel more inviting, encouraging you to work on your craft more often.
Choose the Right Setup
In the beginning, buying a student-grade set of paintbrushes is the most obvious and realistic option. The goal, however, should be to build up your set with professional paint brushes as you are able to afford them. It could be as simple as buying one new paintbrush a month until you phase out the beginner brushes.
This process works well regardless of your medium; after all, you want to be using the best while producing exquisite works of art.
Start simple while you get to know the medium, and only invest in more professional brushes and paints as the student-grade paints begin to diminishing. You do not have to buy a new paint set; you can simply start by investing in a limited palette.

Use a Primer on Your Surface
With oil paint, you are able to paint on multiple surfaces. In order to do so, however, you need to add a primer or gesso first in order to stop the paint from seeping into the surface you are painting. The primer will also protect the surface from any acids found in the paint and will allow the paint to stick to the surface. You can also buy pre-primed surfaces to save yourself some time.
Start with a Sketch
When it comes to creating an oil painting, the best way to go about it is to create a thin underpainting layer. This is essentially a simple sketch or lighter version of your piece that you will build onto as you progress with your painting. It will dry quickly and have you on track to completing your masterpiece in no time.
Use a Limited Palette
You do not need to use every single color at once. We recommend starting with a monochrome setup. Pick your favorite color and experiment with different shades and hues by adding black or white to the mix. This will help you get to know oil paints and work on your technique without having to spend too much money on unnecessary tubes of paint. When you are ready to add to your set, look at adding a warm or cool variety of each primary color.
Understand the Different Layers
Start by painting with a thick-over-thin technique, and by using slow-drying paint as opposed to a fast-drying one. You want to ensure that the first layer has dried before applying the next layer. We recommend using thinner paint for the first layers, letting it dry to prevent cracking, and saving the thicker, oilier paints for the outer layers.
Keep Your Brush Clean
We cannot stress this enough – you have to clean your brush. After each color, wash your brush with soap and water. Painting with oil can be messy, so you should keep rags and paper towels on hand to clean up any excess paint.
In keeping with the theme of cleaning, clean off any paint that is left on your skin after painting. The toxicity of the paint can be absorbed through the skin and is incredibly dangerous when ingested. Make sure that you properly dispose of any paint soak rags and cleaning supplies after use, and safely store your gear out of reach of children and pets.

Developing Your Oil Painting Technique
The first step to painting with oil is to determine your technique. This is not something that will happen instantly. As with most things in life, it will take dedication and practice to master your new skill. You will learn as you progress, as with most types of paints. To help get you started, we have a few tips on mastering your oil painting technique.
Holding Your Paintbrush
We recommend holding your paintbrush at the end for improved control. There are so many different ways to hold your brush, but holding onto the end will result in improved sensitivity of your strokes and will ensure fluidity. In the beginning, it may feel strange and uncomfortable, as you will be controlling the brush with your arm instead of only using your wrist.
Take Note of Brush Orientation
To add versatility to your creations, try to use every angle of your paintbrush. When you get caught up in the painting process, it can be easy to forget that your brush has more than one side or angle. Do not limit yourself to only using a wide stroke with the flat side of your brush. You can turn your brush to create even sharper lines. This will allow you to work on controlling your lines, allowing you to embrace the versatility of painting with oil.
Be Conscious of Your Pressure
Do not be too heavy-handed when it comes to painting. The pressure applied to your brush can be the difference between simply making a mess and forming ridges along with the brushstrokes, which can be a problem – unless that is what you are looking to achieve. Experiment with different pressures to learn how to use it to your advantage and add texture to your art.

Use the Medium to Your Advantage
Painting with oil is about more than simply the paint. To control the paint, you need to understand the oil medium you are using. Know how to use solvents and oils to change the paint and have it respond in different ways when used. When it comes to the medium, you need to know and understand how much needs to be added to the paint in order to achieve a particular result.
Experimentation is key to understanding.
Clean Brushes Keep Colors Pure
The last thing you want to do is contaminate your color, so make sure that you keep your brushes clean between colors. Soap and water will clean your brushes effectively, ensuring that your colors remain true to their form.
Keep Your Mix Simple
When mixing colors, try to limit it to two. The fewer colors you mix, the more vibrant the color creation will be. Adding too much to the mix will result in a dull and less enticing color. This is once again an opportunity to experiment with your options to see how they will react, which will increase your color knowledge and improve your color mixing skills. Only mix as much color as you need, as you do not want to waste your medium.
Dry Brushing versus Wet-On-Wet
You can paint on both wet and dry surfaces, so why not experiment with both? A wet-on-wet or impasto technique will allow paints to blend, which makes gradients and transitions possible. A dry brush, on the other hand, will result in a more textured effect, making it ideal for painting dirt or bricks.
Invest in a Palette Knife
In some cases, the best paintbrush of all is not even a brush. While many people only use a palette knife to mix colors, it can actually be used to create interesting strokes and textures. These effects are unique and cannot be duplicated by using a brush.

Frequently Asked Questions
When Did Oil Painting First Exist?
There is evidence of oil painting that dates back to the fifteenth century in Northern Europe. Since then, the medium and associated techniques have continued to grow and become a global phenomenon.
What Is Oil Paint Made Of?
Oil paint consists of three main ingredients, namely binder, pigment, and solvent. The pigment refers to the color, which is usually in a powdered form, while the binder in this case would be an oil. When it comes to oil paint binders, many people choose to use linseed oil. The solvent can be almost anything, although turpentine or mineral spirits are the go-to for many artists. You need to understand these ingredients to be able to use them properly.
What Surface Can I Use?
The beauty of oil paint is that it can be used on most surfaces. We recommend applying a primer to the surface you have chosen to paint on to ensure that the paint sticks and does not seep into the surface. When in doubt, buy a canvas that has already been pre-primed. The type of surface you use will contribute to the texture of your piece, so choose and use it wisely.
What Brush Should I Use?
There are a lot of brushes on the market that have been specifically made for oil painting. We recommend using stiff hog bristle brushes. Due to the thick nature of oil paint, stiff-bristled brushes are more suited to hold the form of the medium. When it comes to brush size, this will depend on your preference. You also need to consider what it is you will be painting and select brushes that will best accommodate your artistic vision. When in doubt, play with the available options beforehand.
How Can I Clean Oil Paint Messes?
Oil paints are oil-based and cannot be cleaned off with water. The best way to clean your creative mess is to use turpentine or mineral spirits to remove any excess paint. A pro-tip is to head to the hardware store to buy turpentine or spirits instead of art supply stores – they are usually cheaper even though they are the same thing. To prevent messes, keep some newspaper on hand to protect surfaces and clean excess paint off of your brushes.
What Can Help Bring My Vision to Life?
We recommend starting with a simple charcoal sketch to get started. Create a simple outline of what you are picturing before you even reach for the paint. Once you have completed your sketch, you can add color to it layer by layer until you are happy with the result.
What Do I Need for Oil Painting?
To start with, choose to wear comfortable clothes that you do not mind getting paint on – things will get messy very quickly. Next, we recommend investing in an easel to keep your canvas upright, at the correct height, and steady. This will prevent the canvas from moving around while painting and potentially ruining your work as the paint dries. Of course, you need a surface to paint on, so having a few canvas boards or canvases on hand is always a good idea. This is all in addition to your set of paints, paintbrushes, palette, and palette knife. Do not forget to prime your surface before painting!
Can I Paint Acrylic Over Oil Paint?
No, the oil in the oil paint will prevent the acrylic paint from sticking to the surface. You can, however, paint over dried acrylic paint with oil-based paint, as the acrylic paint dries quickly and leaves no oily residue. Remember, when it comes to painting with oil paints, start with a thin layer (which could be acrylic, should you wish) and slowly build it up, layer by layer. If you do not let each layer dry properly, the paint will crack, and your creation will suffer as a result. Oil painting requires a great deal of patience and time.


