
How to Draw an Orchid – Learn to Draw This Exotic Flower
The orchid flower boasts incredible colors and unique shapes. Its gorgeous petal color formations make the orchid flower a muse for many artists. Today’s tutorial will be an easy-to-follow guide on learning how to draw an orchid. Hopefully, it will leave you with the knowledge and expertise to create any orchid drawing in the future! We will begin the first stages by sketching the foundation lines, ending with adding color and detail to your illustration.
A Fun and Easy Guide on How to Draw an Orchid Step by Step
The orchid flower shape is perfectly symmetrical, which means it can be easily illustrated on paper. This tutorial has been carefully created to assist you in learning how to draw an orchid flower. Follow these simple steps to build your orchid, beginning with sketching the foundation lines, applying coats of color, adding details, and finishing the drawing with highlights and texture.
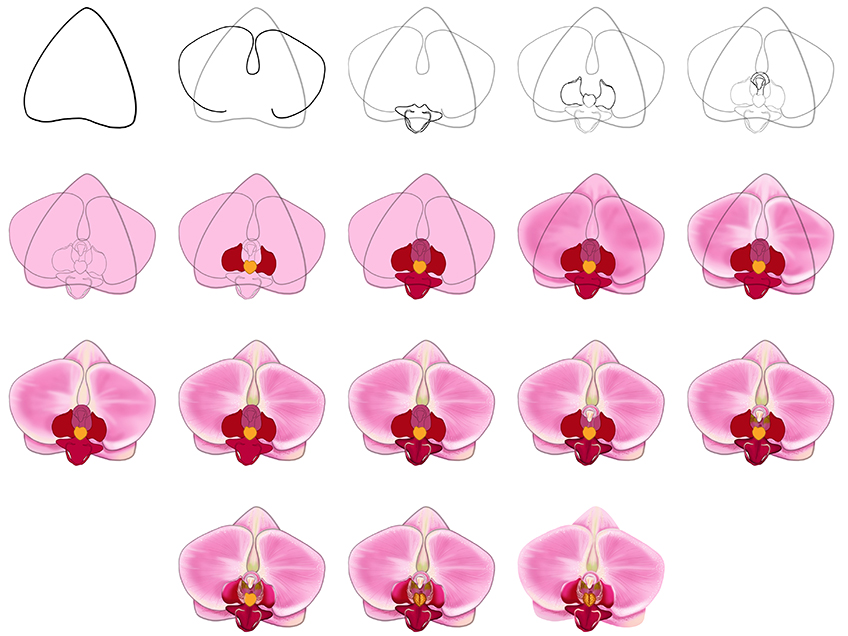
When it comes to being creative, you should let nothing stop you or your imagination! Once you have learned the basic rules of art, you will have the freedom to produce something to be proud of! This how-to-draw-an-orchid tutorial has been created to assist you to achieve just that. While this guide was designed for a painting medium, you as the artist are welcome to adapt our steps to any physical or digital medium you feel comfortable with. Those of you who wish to use a design tablet should just be aware of creating separate layers for the foundation lines so they can be easily removed at a later stage. Get your paper ready, and we can begin this how-to-draw-an-orchid step-by-step tutorial.
Step 1: Creating the Foundation of Your Orchid Sketch
To begin the first step, you must draw the main orchid flower petal, which is known as the sepal, in the middle of your page. The main petal should be drawn in a curved and large triangle shape, almost like a dome or a guitar pick. The bottom should curve inwards.

Step 2: Sketching the Petals of Your Orchid Flower Drawing
The next step will add two petals on each side of the sepal you drew in step one. Using a single line, draw two curved fat petals expanding on each side, connecting in the center. The petals should expand outwards on both sides.

Step 3: Drawing the Lower Petal of Your Orchid Sketch
Continuing the orchid flower outline, you must draw the lower petal orchid’s bottom lip. Place the lip in between the two main petals of the orchid. Draw fine curvy lines on both sides of your flower’s lip petal.

Step 4: Adding Details to Your Orchid Flower Drawing
Draw a small round shape in the center of your orchid above the orchid lip. Next, you will add two orchid petals on each side of your centerpiece. These petals must be facing downwards, should expand, and should have dome-shaped tips.
Be sure to have these petals perfectly symmetrical.

Step 5: Adding the Anther of Your Orchid Drawing
To draw the orchid anther, you will need to draw three shapes, each on top of one another. Take a look at the sketch below to gain an understanding of the anther shape. The anther will extend upwards from the central shape. Draw two curved lines and top them with a rainbow shape and then a bell shape, facing downwards.

Step 6: Applying the First Coat of Color to Your Orchid Sketch
You can now choose a color for your orchid flower drawing. Naturally, orchids bloom in a variety of colors, so the options are endless! For today’s how-to-draw-an-orchid tutorial, we have opted for using shades of pink. To begin the painting process, you will use a regular paintbrush and light pink paint.
Evenly coat the entire orchid flower on your sketch.

Step 7: Applying More Color to the Petals of Your Orchid Drawing
You will need two shades of paint for the seventh step. Take maroon and a gold color paint, apply the gold paint to the centerpiece, and coat the two smaller petals on each side in the maroon paint, do this using a small paintbrush.

Step 8: Applying Detailing to Your Orchid Flower Drawing
Continue to use the maroon paint from step seven and coat the orchid’s bottom lip petal. Next, you will apply a base coat to the anther in purple and burgundy paint. Take your time and keep the color between the lines.

Step 9: Creating the Next Layer of Color in Your Orchid Drawing
You have now reached the halfway mark of our how-to-draw an orchid step-by-step tutorial! By this stage, you have completed the base coat layer, and you will now begin contouring the colors of the orchid drawing. You can do this by using a darker shade to your chosen color. We have chosen pink for our example. With a small blending paintbrush, you can gently add contouring to each petal in a fan-type wave.
You can erase any pencil lines from the previous steps now too.

Step 10: Adding Highlights to Your Orchid Illustration
You created contours for your orchid flower drawing previously, and now, you will add highlights to each of the orchid’s petals. Do this by using a touch of white color paint and a small blending paintbrush and gently applying highlights from the center flowing outwards and to the edges of the petals.

Step 11: Adding Another Coat to the Center of Your Flower
You have done a fantastic job by applying color and creating definition on your orchid sketch! Time to focus on the orchid flower centerpiece! Select a cream paint paired with a small blending brush, and use small brush strokes to create definition on the flower center over the gold-colored area. This technique is similar to adding highlights.
You can add a touch of this cream to the white highlights, too.

Step 12: Adding Texture to the Petals of Your Orchid Sketch
Using a sharp paintbrush, you will now be adding contrasting texture to your orchid flower drawing. Begin by using a darker shade of purple and create thin hairlines flowing upwards on the sepals and petals. Next, you will take white paint and add tiny dots in the center and along the edges of the orchid petals and sepal.

Step 13: Creating Definition on the Center of Your Orchid Flower Drawing
You will need to create some definition on the orchid’s bottom lip and center. This can be done by adding a touch of black paint to a small blending paintbrush. Remember that when you are working with black paint, it is best to start with using less than more. Gently, create shading around the bottom of the orchid flower lip. Next, add a touch of shading to the center of the orchid’s bottom lip.
Take a sharp paintbrush and a smidgen of cream paint to add a highlight to the upper part of the orchid lip.

Step 14: Coloring the Anther of Your Orchid Illustration
It is time to add definition to the orchid flower anther cap and arms. Using a small blending brush and a touch of white paint, gently paint the inner area of the anther arms and cap. Be sure to leave the base coat visible, and you can end off by adding a hint of golden yellow and some white to the middle bell-shaped centerpiece.

Step 15: Applying Color to the Column Arm of Your Orchid Drawing
This phase will be slightly time-consuming because it is highly detailed work. Using a shade of bright green and a small blending paintbrush, you must shade the green to the base of the orchid anther. To complete this step, you should use a sharp paintbrush and dark purple and add small dots on top of the green shaded area.
This will give it a realistic effect.

Step 16: Blending Colors in Your Orchid Flower Drawing
Using a soft blending paintbrush, gently add white paint to the edges of the center petals. Repeat this motion to the inner sides of the petal. Using bright purple, shade it onto each side of the inner petal. Paint fine hairline stripes on the highlighted area of the inner petal.

Step 17: Adding Color to the Central Part of Your Orchid Drawing
The main focal point of an orchid should be the center pollen pod. You coated it with two layers of color and highlights previously, and now, you will add definition to it. Using a sharp paintbrush and some dark purple paint, you must create tiny dots and lines along the middle of the center pollen pod. You can complete this step using black paint and a soft blending brush to add a shadow to the bottom of the pollen pod.
Use fine brush strokes.

Step 18: Applying the Final Touches to Your Orchid Sketch
It’s the end of our how-to-draw-an-orchid tutorial! All you need to do in this final step is tidy and soften the outlines. Take a sharp paintbrush and the matching colors used to gently trace the outline. By now, you should have a finished product you are happy with!

Good job! You have just finished your orchid flower drawing! You should be proud! By the end of our fun tutorial, you should be equipped with the knowledge of how to draw an orchid easily, and able to tackle any future orchid drawing tasks! There are thousands of species to choose from! We hope you have lots of fun experimenting with your orchid artwork!
Frequently Asked Questions
Is It Hard to Make an Orchid Flower Drawing?
The orchid flower has a unique body, but the shape is simple to draw. The trick with the Orchid flower is to focus on its inner details and color. This is what makes an orchid flower the subject of many paintings! This simple how-to-draw-an-orchid step-by-step tutorial will cover all the basics and have you creating a work of art in no time!
What Is the Best Color for My Orchid Flower Illustration?
Traditionally, the orchid flower colors are in shades of yellow, pink, and white. When it comes to art and color, however, the choice is entirely yours! If you are using this how-to-draw-an-orchid guide for fun, we suggest letting your hair down and making a magical orchid flower drawing in any colors you like!

Learn more about Israel Benloulou and about us.


