How to Draw a Flame – A Fiery Flame Drawing Tutorial for All Artists
This one is hot! Fire is one of those notoriously tricky things to draw, but if you are looking to find out how to draw flames, you have come to the right place. In this easy-to-follow step-by-step fire drawing tutorial, we break down drawing fire to make it possible for artists of all levels. If drawing a hot and fiery flame sounds like something you would like to try, join us as we dive right in and light the spark of creativity!
The Best Step-by-Step Fire Drawing Tutorial
For some reason, drawing fire seems to be one of the hardest skills to master for many artists. Perhaps the reason for this is because fire has no definite or obvious shape. Flames shift their shapes, and they are not the slightest bit solid. Fire also tends to be quite see-through and it is difficult to tell where the flame ends and the air begins! You will notice that the flame we are drawing today is quite stylized because this is the easiest way to draw a recognizable fire.

Supplies You Need to Draw a Fiery Flame
You can see from the photograph above that we drew this flame on a graphic tablet, but you are more than welcome to complete this tutorial in any medium you like! If you do not use a drawing tablet and you would prefer to use colored pencils on paper, then we can highly recommend the following supplies:
- A good quality pad or sheet of artist’s paper
- Top-quality artist’s pencils
- A good set of coloring pencils
- An eraser
Step 1: Constructing the Belly of the Flame
If you have ever followed any of our other tutorials, like our animal drawing tutorials, then you will know that we always start our drawings with construction lines. The first shape that we are going to use to construct our fire sketch is a half-moon. This shape is going to represent the belly or the bottom of the flame.
The most important thing to remember in this first step is that you will be adding a lot to this half-moon. Make sure that you draw it in the center of your page or canvas with plenty of space around it.

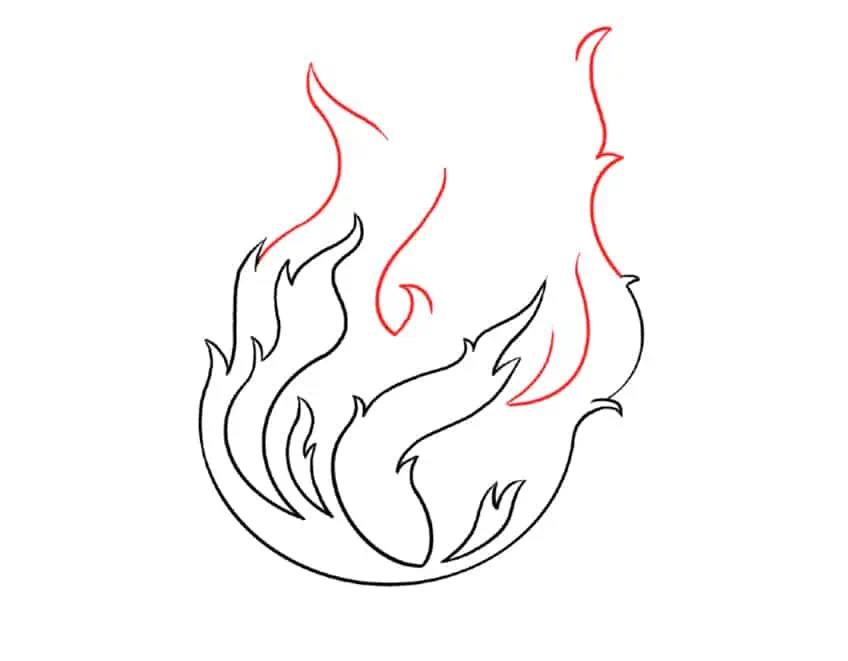
Step 2: Adding the First Flaming Flares
In this second step, we are going to begin to draw the flared points of the flame. On either side of the half-moon, draw a sharply curved line that dips outwards and then back in. These lines should form a curved flame-like shape that ends in a point. Ideally, these two flares should not be identical or symmetrical, because fire is not perfect.
In each step, you will see that the bit we add on is drawn in red.

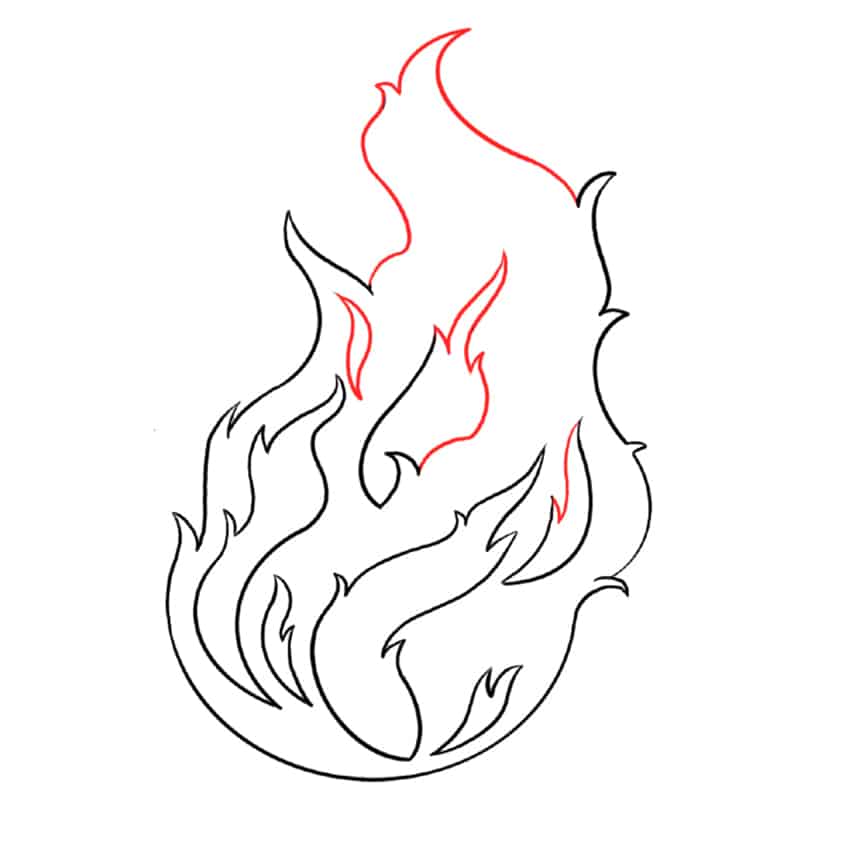
Step 3: Adding More Shape to Your Flame
You have a lot of freedom in your creation in this tutorial, and this step is no exception. For this step, you first want to carry on adding to the height of the flame with another one or two curved lines on either side. You can copy the shape that we have drawn if you want to, or you can freehand draw your own unique shape.
No two flames are exactly the same, so do not be afraid to let your imagination run through your pencil.
In this step, you can also start to add some defining lines inside the body of your flame. These curved lines inside should somewhat follow the bigger shape of the flame, but some can start to deviate a little.

Step 4: Fleshing Out the Inner Flames
In general, fire is unpredictable and so is the shape of its flames. To capture this unpredictability, you can freehand draw a range of curves and arched lines on the inside of the flame. You can connect any of the curved lines that you like with sharp pointy edges, like those on the outer edge of your flame shape.

At this point, you can see that the inside of your flame is going to include several smaller flames, all held by the belly of the larger flame.

Step 5: Finalizing the Inner Flames and Outer Shape
In this step, we are going to finish outlining the shape of both our main flame and the inner flames. Begin by drawing several small flames in the belly, filling the space as much as you want to. Sometimes too much detail can be detrimental, so work with a medium that you can erase if necessary.
This step might take some time if you erase and begin again. Have some patience with yourself, and only move on when you are happy with your flame.
Next, using a few more curved vertical lines, complete the top tip of your flame. You can add a few more sharp points, or some unique squiggles. You are also welcome to copy us directly or explore your own style. The most important thing to get right is the single sharp point at the very top of the flame.
Hopefully, at the end of this step, you are happy with the final shape of your flame. Here is our final shape!
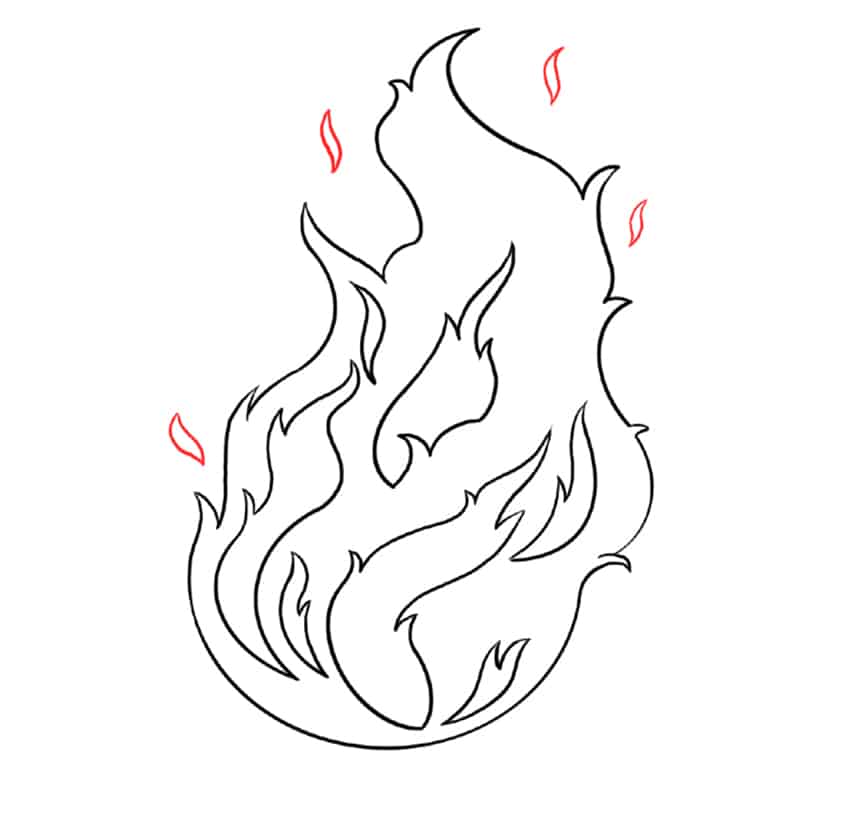
Step 6: Adding Mini Flames and Sparks
This is a very simple step, but it helps to add a sense of realism to your flame. All you need to do is draw a few little “S” shaped flames around the edge of your main flame. You can add as many or as few of these as you like, and the exact placement and shape is also up for artist’s interpretation .
Step 7: Applying the Fiery Colors
When you get to this step, you have pretty much drawn a finished flame! Now comes the most exciting part where we add vibrant colors to our drawings. There are three colors that really represent fire, including red, orange, and yellow. You can use whichever shade of these colors you have on hand. The middle of the flame is the hottest part, so we will use yellow to color the inner flames you drew. You can use orange as your base color, and then add red shapes to the top of the flame.
Tip: Try to replicate the inner flame’s outline (the one’s painted in yellow) with the red color upside down to create a realistic flaming effect.
You can finish your drawing at this stage if you are happy with the more cartoon-like effect. If you want to make your flame more realistic, then continue to the next and final step.

Step 8: Highlighting and Blending
This final step can help you make your flame look a little more realistic. The first step is to blend a touch of white into the very center of your yellow inner flames, along the small curved edges of the main flame, and in the little sparks. This white helps to make the flame look hotter and more three-dimensional. Finally, you can use the brush on your graphic tablet, or your coloring pencils, to blend some of your colors together. Removing the strict distinction between areas of color will make your flame appear more real.

Now that we have come to the end of the flame drawing tutorial, we hope that you are happy with your fire sketch and that you feel more comfortable with drawing fire. Although drawing fire can be an intimidating process, hopefully you now know the basics of fire drawing and know how to draw flames easily and realistically!
Frequently Asked Questions
Will this Tutorial Tell me How to Draw Flames?
That is exactly what this tutorial will do! In this hot and spicy drawing tutorial, we lead you through the process of creating a realistic fire sketch from scratch.
Is it Possible to Create a Realistic Fire Drawing?
Fire is a tricky thing to draw because it is not physical and has no definitive shape, but we have made a tutorial that can help you get to grips with how to draw fire very easily. We make it very simple to create a realistic flame drawing in only seven steps!
How Long Does it Take to Make a Fire Sketch?
Not long at all! If this is your first time drawing fire, it may take a little longer to get into the rhythm, but this is a very quick and easy flame drawing tutorial.

Learn more about Israel Benloulou and about us.