Best Driveway Sealer – In-Depth Concrete Driveway Sealer Review
When selecting a sealer for your concrete or asphalt driveway it might seem difficult to decide which product to choose. Which driveway sealer is the best is linked to a few aspects which include the condition of your driveway, the type of driveway, your budget, and the finish you are hoping to achieve. The following article will assist you in selecting the perfect driveway sealer to suit your budget as well as your specific needs and aesthetic taste.
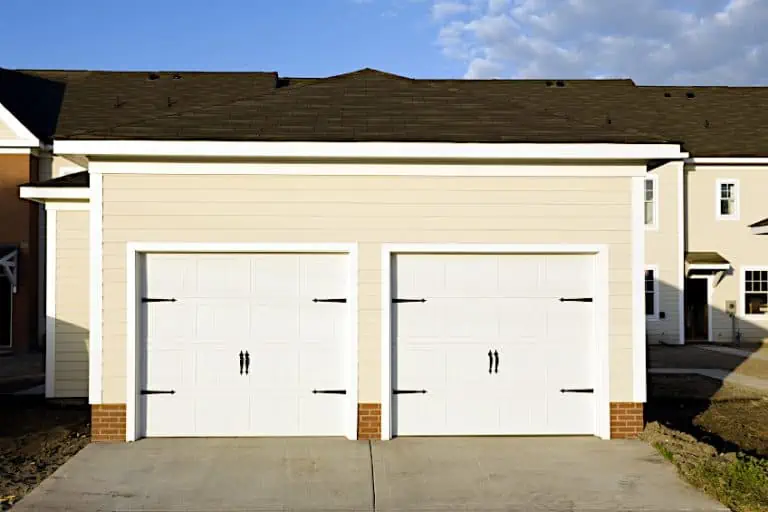
Concrete and Asphalt Driveways
Asphalt and concrete are both made from stone, sand, and gravel. What makes the two materials different is how the ingredients are bonded together. The adhesive which bonds asphalt is called bitumen and is a petroleum-based substance. Cement is bonded together with concrete. You will have a hard-wearing surface when these materials dry that is used for the building of driveways and roads. A driveway sealer will enhance and protect your driveway regardless of whether it is made from asphalt or concrete. But the question stands what is a driveway sealer and why does one have to seal your driveway?

What Is a Driveway Sealer?
To ensure your driveway’s life is prolonged you must seal it, regardless of whether it is made from asphalt or concrete. Through sealing your driveway, you can protect it from oil stains, UV rays, chemicals, and freezing and thawing during the winter months. Both concrete and asphalt are not naturally resistant to UV so the UV rays of the sun can cause significant damage.
There are several UV stabilized sealers available to purchase that will provide years of protection to your driveway.
A driveway that has been sealed is also easier to keep clean and ensure your curb appeal is maintained. Preventative maintenance is cheaper as it means you will not have to resurface the whole driveway or handle expensive repairs. As the name suggests a driveway sealer does just that it seals the surface of the driveway from the elements, there are however specialty sealers available.
Types of Driveway Sealers
A well-built driveway can withstand the elements but will begin to degrade over time. Low spots will form as well as web-like cracks and these can result in potholes which will cost a lot of money to repair. Mold also forms on driveways, particularly in humid areas. The different type of driveway sealer is as follows:
- Coal tar sealers
- Acrylic sealers
- Asphalt sealers
- Oil-based sealers
- Epoxy sealers
- Fill-and-seal sealers
- Mold inhibiting sealers
- Linseed oil-based sealers
Coal Tar Sealers
Coal tar is a black liquid with a syrup-like consistency that is a derivative of coal, which is simple to apply. It works well in filling any exiting cracks and the coating will last for a long period. it resists fading due to sun exposure and stands up well to gasoline and oil stains.

Coal tar sealer unfortunately not environmentally friendly and is quite toxic. The substance is not flexible so in extreme weather due to contracting and expanding it will in all likelihood crack. Due to the toxic chemicals, it contains it has been banned in several cities and states.
Acrylic Sealers
You can buy acrylic sealers in an assortment of finishes and colors. It is a costly form of sealer but is ideal for use to seal driveways and is also environmentally friendly. The majority of acrylic sealers are UV stabilized and stand up well to harsh environments and temperature fluctuations.
Asphalt Sealers
Asphalt sealer is made up of many of the same materials as found in asphalt. Asphalt sealers are simple to apply and will give you long-lasting results. Asphalt sealer is more eco-friendly than coal tar sealer, but as a result, is more expensive. When asphalt sealer has cured it is slightly flexible so it will not crack as easily as coal tar sealer.
The asphalt sealer is DIY friendly as you do not require any heating equipment to apply it. The sealer penetrates deep into the existing asphalt.
Oil-Based Sealers
Oil-based sealers last a long time before you will need to reapply them thanks to them penetrating the surface of the asphalt. These sealers are not as effective in resisting petroleum and oil stains and will not protect the asphalt from UV rays, they are not environmentally friendly.
Fill-and-Seal Sealers
This type of sealer contains silica particles or sand that can fill the existing small cracks and at the same time seal the asphalt. Fill-and-seal type sealers are perfect for asphalt that is cracked. They will not successfully fix potholes or large cracks, unfortunately. If you have any large cracks or potholes you will have to first repair these issues before you can apply any sealer.

Mold Inhibiting Sealers
The look of your concrete or asphalt driveway can be completely ruined by mold, algae, mildew, moss, and lichen. We recommend the use of mold inhibiting sealers in humid climates where algae and fungi thrive. If your driveway is prone to algae and mold, we suggest you clean your driveway and remove any algae and mold first before you apply the mold inhibiting sealer.
Linseed Oil-Based Sealers
A great alternative to other driveway sealers as they have no negative impact on the environment, linseed oil-based sealers are an early method for use to seal asphalt driveways. Using these sealers can be very effective in preserving the concrete and asphalt driveways.
Linseed oil-based driveway sealers can be mixed up with ease by yourself and they are one of the safest options as they do not emit any harmful fumes.
Epoxy Sealers
Epoxy sealers hard wearing and are more durable than the likes of acrylic sealers. They are simple to clean but unlike asphalt sealers, they do not penetrate the surface. You can buy epoxy sealers in different colors. Epoxy sealers tend to be more expensive than acrylic sealers and the finish is not as breathable in comparison to acrylic sealers, while also being quite slippery.
Why Should One Use a Breathable Driveway Sealer When Dealing With Concrete?
It might seem counterintuitive to have a breathable or vapor-permeable driveway sealer. But vapor permeability is a necessity when it comes to concrete driveway sealers. The movement of vapor and water through the concrete’s surface may be slowed down by breathable concrete, but it shouldn’t completely stop it.

Degradation and delamination of the concrete may occur over time if a non-breathable concrete sealer is used. You need to consider the ground’s water content below the driveway sealer which even if you live in a dry area, is in constant flux. The majority of concrete driveway sealers available are breathable, so you do not need to worry if it seems like the water is slowly absorbed into the surface of your sealed driveway as this happens but is not ideal.
Our Recommendations for Driveway Sealers
There is a vast array of sealers available so you may feel overwhelmed when trying to select the correct sealer for the job. We have put together a list of a few products that are highly recommended and we hope they will assist you in choosing the correct sealer for your needs.
Regardless of whether your driveway is made from asphalt or concrete, or if it a newly laid driveway or one which has experienced significant wear and tear, there is a driveway sealer that will work for your needs.
Top Fill-and-Seal Driveway Sealer: EZ Stir Driveway Asphalt Sealer
This product is the perfect 2-in-1 option for sealing your driveway and filling cracks at the same time. the product takes four hours to dry to the touch and you can cover up to 500 square feet with the 5-gallon pail. The sealer is designed to provide durability and better traction.

- For use as a filler and sealer coat for blacktop pavements and driveways
- Reinforced for improved traction and durability for a longer life
- Covers 250-500 sq. ft. per 5-gallon pail, depending on surface texture
PROS
- Improved durability and traction
- 2-in-1 seal and fill formula
- 4-year warranty
- Value for money
- Fast drying time
CONS
- It does not work well on concrete driveways
- It takes a long time to cure
Top Concrete Driveway Sealer: FOUNDATION Armour Concrete Sealer
This is a sealer that has been approved by the department of transportation and is a solvent-based concrete and masonry sealer. This sealer will provide you with 10 years of protection and will in no way alter the look of your driveway. SX5000 has does not give off any toxic fumes, will not require any heavy equipment to apply, and can be cleaned up with ease using just water and soap.

- A breathable, non-yellowing, solvent-based acrylic sealer for concrete
- Self-priming and can be applied to unsealed concrete and paver surfaces
- It Will help to reduce damage and deterioration caused by surface abrasion
PROS
- Versatile
- Lasts long
- Finish is non-slip
- Simple to clean-up
- Low levels of toxicity
- Simple to apply
CONS
- Will not work on asphalt
- Pricey
Value for Money Concrete Driveway Sealer: RAIN GUARD Water Sealer
This is a highly recommended concrete driveway sealer that you can apply using either a sprayer, brush, or roller. It will not yellow over time and it can resist sun damage thanks to the product being UV stabilized. Rain Guard driveway sealer will not leave any surface film and will in no way alter your driveway’s appearance.
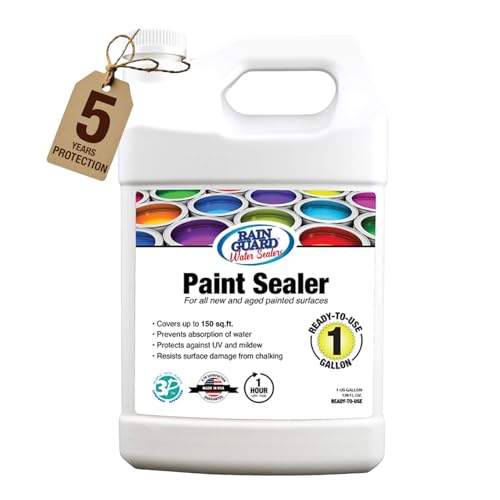
- Prevents damage from rain, snow, ice for up to five years
- Does not alter the surface appearance and does not leave a surface film
- Apply a flood coat of this safe sealer with a sprayer, brush, or roller
PROS
- No impact will occur to the surface appearance
- All state environmental guidelines are adhered to
- Will cover roughly 1000 square feet
- UV stabilized
- 5-year guarantee
- Can be applied with ease
CONS
- No finish options available
- Should not be used on asphalt driveways
Top Eco-friendly Concrete Sealer: ECO ADVANCE Concrete Sealer
Eco Advance is a well-known and trusted brand that manufactures environmentally friendly products. This waterproofer will protect against mold, mildew, oil stains, de-icing salt and will repel water. It is vapor permeable and is will in no way harm plants, animals or children.

- Ready-to-use sealer can be applied with a garden pump sprayer
- Ideal for use on concrete, brick, stucco, stone, EIFS, pavers, and more
- Prevents damage from water, oil, mold, mildew, and de-icing salts
PROS
- Permeable vapor
- Non-toxic
- Protects stone, brick, and concrete
- Non-flammable
- Will cover roughly 1200 square feet
- Water-based
CONS
- It will not work well on asphalt driveways
- You will need a garden pump sprayer to apply it
A Step-by-step Guide to Sealing a Driveway
Before you can begin applying your selected driveway sealer you will need to prepare. You will have to begin by filling in any large cracks and patching up any potholes before you can apply the sealer.

Any areas which you have patched up and any cracks which have been filled need to be allowed to cure completely before you can start sealing your driveway. If your driveway is in decent condition you can simply begin with the steps below. We have provided a guideline that will be a useful supplement to the instructions you would have received with your selected driveway sealer.
What do You Require to Seal Your Driveway?
Sealing your driveway is a DIY-friendly process that will not require any heavy machinery or special expertise. You will require some sealer and a handful of household items and you will be able to tackle the process of sealing your driveway.
- Driveway sealer
- Water supply and garden hose
- Old clothes and gloves
- Broom or stiff-bristles brush
- Old shoes or rubber boots
- Depending on the selected sealer, you will need a long-handled brush, squeegee, or roller
- Plastic sheeting
- Painter’s tape
The following items are optional to have, but they will make the process easier:
- Paint and drill mixing attachment
- Leaf blower
- Weed wacker
- Power washer
Step one: Planning
Before you begin you need to pick the perfect day to do it, start by consulting the weather forecast. The perfect temperature for sealing your driveway is over 10 degrees Fahrenheit. Try to not apply sealer on extremely hot days as the temperature will start to dry up the product before you finish applying the initial coat of sealer.
You will need to allow 48 hours for the sealer to cure correctly so you also need to ensure there will be no rain forecasted for days before you apply the driveway sealer.
Step Two: Remove Debris
Start by removing any debris and dirt from the driveway. This will include any weeds that have grown in the small cracks and any overhanging grass. You can do this with a weed Wacker if you have one, otherwise, you will have to do it by hand. To remove any bit of weed and grass you can use a broom or a leaf blower.
Step Three: Power Wash
You can remove dirt and debris using either a stiff-bristled brush and garden hose or a pressure washer. If there are any grease stains or oil spots you may need to use a degreaser or detergent. The sealer will not bond to your driveway if there is moisture and dirt. When you have washed the driveway thoroughly, rinse it and then allow the driveway to dry before moving on.

Step Four: Mask and Mix
Mask off any areas you do not want to get sealer on (such as where the wall meets the garage floor) using painter’s tape. Lay plastic sheeting on the space where you will be mixing the sealer to protect the surface from any spills. If there were any spills they can show through when you have finished sealing. Use a paddle to mix the sealer and ensure it is mixed completely. You can save time by using a mixing attachment for a drill to mix the sealer.
Step Five: Cutting In
The process of cutting in is when you paint the edges and corners first before you paint the larger areas. Use a small roller and paintbrush to apply the sealer to the edges and corners. Ensure that you do not apply the sealer too thinly as you are aiming to ensure the driveway’s pores are saturated.
When you have finished cutting in the edges and corners of your driveway you can start on the rest of your driveway.
Step Six: Pour and Spread the Sealer
Begin on one side of the driveway and work across to cover the whole driveway. If the sealer you are using has a thin consistency you might want to use a roller and a tray to apply it. If the consistency of the sealer you are using thick (such as an asphalt sealer) you can use a push broom or a squeegee. Always consult the driveway sealer manufacturers’ instructions before you begin sealing your driveway.

Pour the sealing in a line at the one end of the driveway and using the broom or squeegee spread the sealer around while working it into the asphalt. If you are using a roller coat the roller in sealer from the tray and roll it onto your driveway, spreading the sealer around while working it into your driveway.
Step Seven: Finishing it Off
When you have finished coating your driveway in sealer, place the pails that the sealer came in at the entrance to the driveway to stop people from driving onto it before it has completely cured. You will need to stop people from walking across the surface, we suggest using some construction tape to tape off the area. You may have to apply an additional coat of sealer to the driveway the following day.
You should wait at least two days before you can use the driveway normally again.
Tips and Tricks to Assist You Sealing Your Driveway Successfully
If this is your first attempt at sealing a driveway on your own, some additional tips and tricks should aid you with the process. Here are a few suggestions to make the process of sealing your driveway easier.
- If you are hoping to achieve a natural look, we recommend using a driveway sealer with no matte or gloss look. Matte finishes are less slippery overall.
- Wear clothing and shoes that you do not mind if they get damaged when sealing your driveway. The sealer will inevitably get on your shoes and clothes and it is very hard to remove or clean off.
- If your asphalt driveway is newly built the asphalt will require six months to cure before you can apply driveway sealer to it.
- If you are using a drill and paint mixing attachment to mix the sealer, make a small hole in the top of the pail of the sealer which is just large enough to allow the attachment through. In doing this you will prevent any accidental spills.

- The best time of the day to apply a sealer to your driveway is in the morning. You will then have the rest of your day to allow the sealer to cure and you will not find yourself working in the heat of the day.
- If you are finding it hard to remove the weeds from the cracks in your driveway, you can mix a solution of dish soap, borax, and white vinegar and spray it onto the weeds. The following day the weeds will have died and you can then pull them out with ease.
- To achieve an even finish and adequate coverage you will be required to apply multiple layers. This is of course subject to the driveway sealer’s consistency and the manufacturer’s guidelines.
- When you have finished applying the sealer to your driveway you will need to wait at least eight hours before you can walk on your driveway. You will need to wait at least a day before attempting to drive on the driveway.
There is an overwhelming number of options available on the market to seal your driveway, hopefully, the above article will assist you in selecting the best product for your particular driveway. Remember that sealing your driveway is simple to do and can be handled by any DIYer.
Frequently Asked Questions
How can I Repair Potholes and Large Cracks?
For cracks that are ¼,” you can use a Seal 7 Fill product. Any larger potholes and cracks can be repaired using a concrete crack filler available on the market which have been specifically formulated for such purposes. Certain of the products will require heat to be applied to them to activate them.
If my Driveway is Asphalt can I apply a Concrete Sealer?
We recommend using a sealer that has been specifically designed for use on asphalt driveways. If you apply a concrete sealer to an asphalt driveway the degradation of the asphalt can be accelerated. We also do not recommend using an asphalt sealer on a concrete driveway.
Are Blacktop and Asphalt the Same Things?
Both asphalt and blacktop are made up of stone, sand, and bitumen. The largest difference between the two materials is that there is more sand in blacktop and you need to apply blacktop at a much higher temperature than asphalt.
Will Driveway Sealer Adhere to a Wet Driveway?
When you have finished washing your driveway allow it to dry completely before you apply the driveway sealer. the adhesion will be compromised if you apply the sealer to a wet driveway and your sealer will come off completely. Certain asphalt sealer products can be applied to a damp driveway but to be certain which products these are consult the manufacturer’s instructions.
Are There Risks if I Do Not Seal My Driveway?
It may be several years before you notice any negative impact from not sealing your driveway. Over time chips and cracks will form and gradually you will notice degradation. Eventually, you will have to spend a fortune on pricey repairs.
How Often Must I Seal My Driveway?
Through sealing your driveway, it will last longer especially if you have selected the best sealer for your particular driveway. We recommend you apply a sealer to your driveway every three to four years. This is of course linked to the elements and climate your driveway is exposed to and which product you have chosen to use.
Will Rain Damage My Freshly Applied Driveway Sealer?
If it suddenly starts raining and your driveway sealer has not had a chance to dry in all likelihood all your expensive sealer and hard work will just wash away. Try to only sealer your driveway in the dry months of the year, and always consult the weather forecast before you begin. You will then save yourself any stress, time, and money.