How to Draw an Owl – Our In-Depth Realistic Owl Drawing Tutorial
Owls are some of the most mysterious and majestic creatures we have on this planet. In many places in the world, it is very rare to see an owl. In this easy-to-follow drawing tutorial by our resident artist, we take you through all the most important stages in drawing a realistic owl. We have made this tutorial for everyone, whether you believe yourself to be a professional artist or a beginner. So, grab your drawing things and your favorite drink, and let us create a realistic owl drawing.
An Introduction to the Mystical World of Owls
Because of their relative mystery and possibly the sense of haughtiness they communicate, owls have long been believed to be very wise. Since the beginning of recorded history, humans have looked up to owls as animals of superstition and pest control. There are around 216 species of owls in the world, and they are commonly divided into two families. The first is the barn and bay owls, and the second family is often referred to as “true owls.” Most of the owls that we see commonly are true owls with their round faces, large heads, mottled feather patterns, and short tails. Here, we have the barking owl, which is one of the true owl species.

Our Step-by-Step Tutorial for Realistic Owl Drawing
Now that you know a little more about these mystical creatures, it is time to get down to the drawing tutorial. If you have ever wanted to know how to draw an owl, your questions are about to be answered. Gather the supplies you need, put on some comfy clothes and your favorite TV show, and let us get started.
Step 1: Constructing the Owl’s Body
If you have followed any of our drawing tutorials before, you will know that we always start by using construction shapes and lines to ensure that our proportions are spot on. When it comes to knowing how to draw owls, we need to start with the shape that is most appropriate for their bodies. In this case, we are using a large and slightly andled oval shape to represent the main part of the owl’s body.
The most important thing to remember at this stage of the tutorial, is not to make this oval too big. We are going to be adding onto it, so you want to make sure that you leave plenty of space on all sides of the oval.

Step 2: Constructing the Owl’s Head
In this second step, we tackle the second biggest and arguably most important part of an owl, the head. We are going to use a circle to represent the shape of our owl’s head, and you need to draw this directly on top of the main body oval. The circle should be slightly smaller than half of the size of the body.
It may take a couple of tries to get this shape and placement perfect.

Step 3: Constructing the Owl’s Wing
The owl we are drawing is sitting side-on, so we are only going to be able to see one of the full wings. We are going to use a much more elongated oval to represent this wing. Starting just below the top of the main body oval shape, draw this long oval. You want the bottom of the oval to extend out the bottom of the main body oval, and follow the same general angle.
Hopefully, you will start to be able to see the general shape of our owl forming on your page.

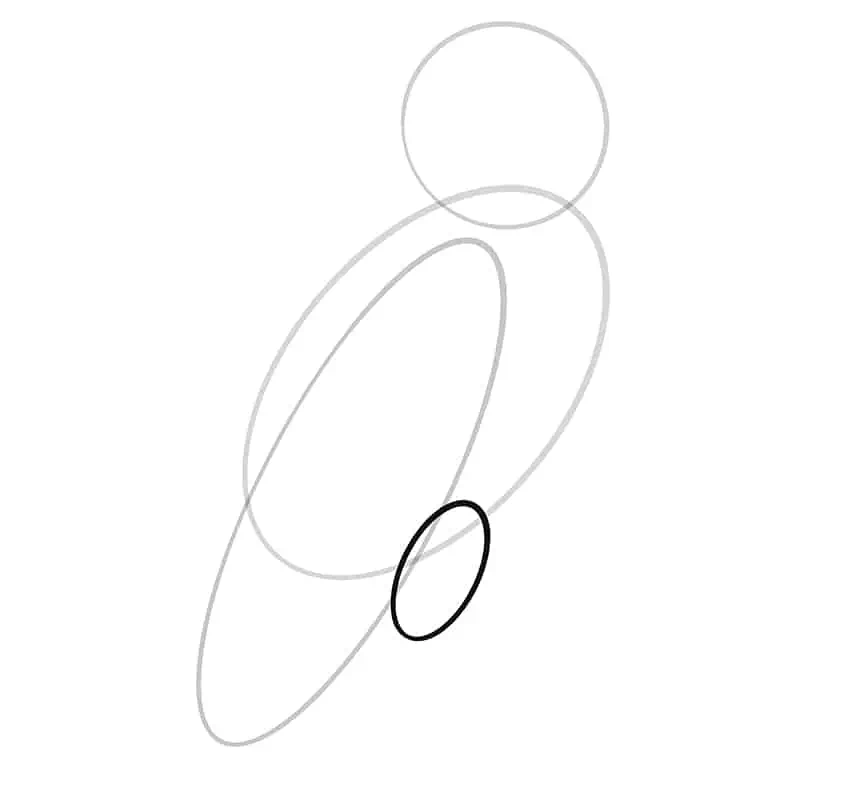
Step 4: Constructing the Owl’s Legs
Although an oval may not seem the obvious shape to use as a basis for an owl’s legs, it works! In this step, you need to draw a much smaller oval shape that extends out the bottom of the main body oval, overlapping slightly with the wing oval.
Owl’s wings are often not visible, but in the angle that we are using, they do poke out a little from under the wing.
Step 5: Constructing the Owl’s Talons (Claws)
Most owls have four toes on each foot, one of which faces the back. As a result, you can typically only see three, which is the case in our drawing. We want this owl to be as realistic as possible, so it is important that we have the right number of talons.
We are going to begin drawing our talons from the bottom of the leg oval. You do not want to go from the bottom point of the oval, but rather just in front of it. Draw a slightly curved line that goes all the way down, just past the line of the wing oval. The bottom section of this first leg line is going to represent the middle talon for this foot. Put one more curved line on either side of this, beginning about halfway down the mainline. You can repeat this whole process for the back leg, remembering that it is further away, so the top part of the line will be much shorter.
Tip: For a realistic effect, we want to draw the owl’s claws according to what we want the owl to be holding onto. In our case, our owl is gripping onto a tree stump. You can capture this position by ensuring that all the talons curve outwards and then back in again slightly.

Step 6: Constructing the Owl’s Face
Owls are known for their symmetry, so we want to ensure that our owl’s face is as symmetrical as possible. The easiest way to do this is to use some construction lines. Begin by drawing a vertical line right down the center of the owl’s head circle. Just above the center of this vertical line, draw a horizontal line that goes directly through the circle. Draw two more horizontal lines below this first one, with the bottom one sitting on the top of the main body oval.
In the next step, we are going to use these lines to position the eyes, nostrils, and beak of our owl.

Step 7: Adding Details to Your Owl’s Face
This step is the first test of your freehand drawing skills. Using the construction lines we have just drawn, we are going to add the eyes and the beak to our owl’s face. Begin by drawing two small circles on the top horizontal line. You need the circles to be equally placed on either side of the central line. Next, using the central vertical line and the bottom horizontal line, draw a ‘V’ shape to represent the owl’s beak. You want the ‘V’ to begin just below the middle horizontal line. You can also curve your ‘V’ slightly to the left as we have done, to make it a little more natural. The last step here is to add a little dot on either side of the vertical line inside the top of the ‘V’ to represent the nostrils.
Hopefully you can start to see your owl taking shape!

Step 8: Outlining the Shape of Your Owl
This is one of the biggest steps in the whole process because it involves pulling together all of the work that we have done so far. We are going to use all of the construction lines that we have drawn so far to create the outline of our owl. You can begin by following the curve of the head circle over the entire upper half. Halfway down the head circle on either side, you can bring the line down, away from the circle to join it with the outer line of the body oval.
If you look at our example, you will see that we do not follow the construction lines exactly. The top of the body, for example, where the head joins on, is slightly above the oval construction line.
You can take the line over the back of the owl, and just before you reach the intersect of the wing and body ovals, you can begin to draw little lines that curve up to indicate wing feathers. These feathers can be subtle here. Continue to take the line down onto the wing oval, coming to more of a point at the bottom of the wing, and then curving back up, following the wing oval quite closely until you get to around three quarters into the main body oval.

From the front line of the wing, using feathery strokes, draw around the legs oval and down to the top of the feet. You can then draw lines on either side of the feet construction lines to create the claws. It is also a good idea to add little claws on the end of each toe as we have done. After you have completed the feet, you can continue the leg outline upwards, joining it onto the side of the body oval and taking it all the way back up to meet the head.
You can now erase any of the visible construction lines, leaving your fine line outline. We do recommend leaving the head construction circle in place, because that will help in the next step.
Step 9: Adding Details and Fine Lines to Your Owl
Now, this step may be an intimidating jump for you, but remember that you have already laid all the difficult groundwork. This step may seem intimidating but with some patience and will, you can achieve the correct and realistic details as shown. Using tiny little strokes, frame the owl’s face with two circles. You can follow the head construction circle for this. Make sure that these fine lines are drawn in an outwards motion, to mimic the feather patterns on an owl’s face. Use similar little lines in an outwards motion around each of the eyes, and you can add as many as you like around the face to add texture and detail.
Tip: Begin drawing the outward flowing fur of the Owls face from the center line of the head at the top and split the outward motion into two directions, each side will have the fur going around in their respective directions.

You can now begin to add texture all over the rest of your owl’s body. Using a combination of short feathery lines, and longer ones, as well as small dots, you can create the impression of feathers. You can also draw swooping layers of feathers long the owl’s wings, and highlight the direction that they are lying with long, sweeping lines.
Tip: To draw realistic feathers on the wing, draw one layer of feathers at a time, think of it as “waves” of feathers, one on top of the next layer. Darken the outlines of the feathers.
Using the same technique, add curved streaks to the claws in a way that it is wrapped around the claws. When drawing the feathers and adding texture, it is important to be aware of the natural direction. We have shown you here with arrows, the natural direction that these feathers lie. Ensuring you draw your feathers in the right direction is the best way to make your owl as realistic as possible.

Step 10: Detailing the Eyes
Color in the eyes black while leaving a small portion around the inner line of the eye and a small part of the iris blank. This small patch of white will create a glare effect and make the eye appear more realistic.

Step 11: Adding a Tree Stump
Earlier we drew the owl’s claws in a specific way because we are drawing it perched on the top of a tree stump. Now is the time to draw the stump, to add yet more realism to our drawing. There is no need for any construction lines in this step, you can simply freehand draw any shape or surface that matches the claws and leg posture. We have drawn a small tree stump by using curves around and in between the claws.
You can flesh out the stump with added details and lines.

Step 12: Adding Final Shading and Blending It out
This is the last step in our owl drawing tutorial! In this step, all we are doing is adding a final layer of shading, and blending that out to make our owl appear as realistic as possible. Begin by using a pencil to add shadow to the areas that are realistically slightly darker, including between the claws, on the leg below the wing, and around the feathers on the wing. You can smooth out this shading with a cotton swab or a brush to make it more realistic. You can also add a touch of shadow to the beak.
Tip: Only add a layer of shading to each layer of the wing at a time. When using a cotton swab, each layer should be darkened independently for the best effect.

If you look closely at our example, you will see that certain areas on the wing appear to glow a little. To achieve this effect, take the sharp edge of an eraser and use it to erase small lines of the shading on each feather, following the natural direction. create the glow effect take a sharp eraser and erase small lines of the shading on each layer and feather following the same direction of the streaks/lines drawn on the feathers in previous steps.
Congratualtions for coming to the end of this tutorial! We hope that you are happy with the result, and that you now have the confidence and skills to draw an owl in a range of positions.
Frequently Asked Questions
Can this Tutorial Teach me How to Draw an Owl?
Absolutely, that is exactly the purpose of this owl drawing tutorial. Whether you are a professional artist or a beginner, you can easily follow this tutorial to produce a stunning and realistic owl drawing.
Do You Need Construction Lines to Draw an Owl?
If you have a lot of experience with drawing birds or owls, in particular, you probably could draw one without the construction lines. If, however, you are new to owl drawing or drawing in general, it is always easier to use construction lines. Construction lines help you to get the shape, perspective, and dimensions of your owl perfect.
Does it Take Long to Draw an Owl?
The length of time this tutorial will take you ultimately depends on how quickly you work. If you work quickly and do not re-draw often, you should be able to finish this tutorial in around half an hour. If this is your first tutorial, it might take you a little longer, but that is okay! Practice makes perfect.
Do I Need any Fancy Equipment for this Owl Drawing Tutorial?
Not at all. You can follow this tutorial with absolutely any supplies you have to hand. All you really need as a necessity is a pencil and an eraser! You can also, of course, follow this tutorial on a graphic tablet or with paint, the choice is yours.

Learn more about Israel Benloulou and about us.


