
How to Draw a Squirrel – Step-by-Step Squirrel Drawing Tutorial
Have you ever wanted to know how to draw a squirrel but you have no idea where to start? If this is the case, search no further because we have the best squirrel drawing tutorial for you. From our resident artist comes the latest in our easy step-by-step animal drawing tutorials. If you are feeling creative, gather your supplies and join us as we draw the cutest little squirrel.
An Introduction to the Squirrel
As far as we know, there are 285 different squirrel species across the world, and they can be found everywhere, except in Australia and Antarctica. From the beautiful red squirrel to the ‘bad guy’ common grey, squirrels are a common sight for most of us. Whether we live in the countryside or the city, squirrels make themselves known. Squirrels are pretty awesome creatures, and they can do some incredible stunts. Not only do they have fantastic vision, but they can leap across ten times the length of their bodies.

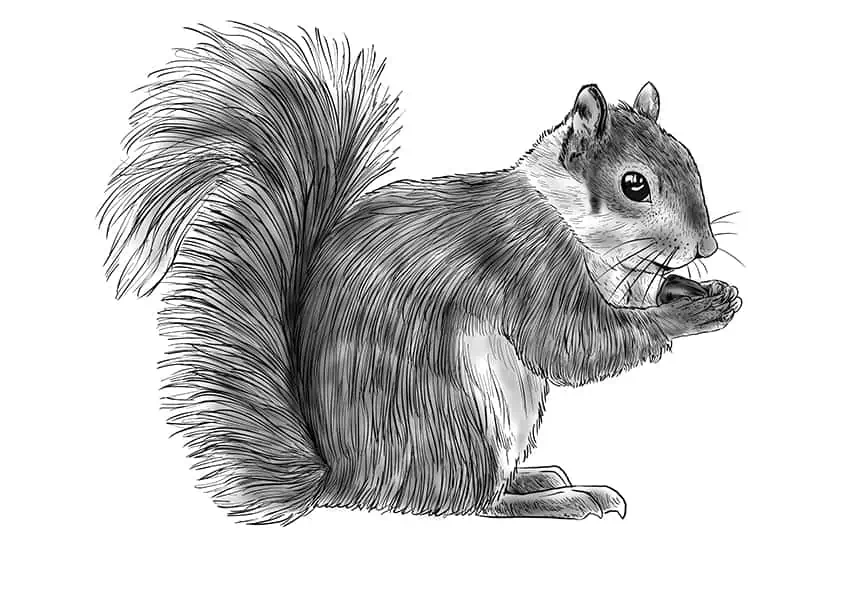
Pictured here we have a very cute and tufty red squirrel, sitting on a small branch and munching on a nut. We are drawing a squirrel in black and white, but you are more than welcome to add color if that is what you want to do!
Our Step-by-Step Squirrel Drawing Tutorial
Now that you know a little more about these interesting and adorable creatures, let us dive right into the tutorial. Put on some music, or play your favorite TV show, and gather up the supplies below.
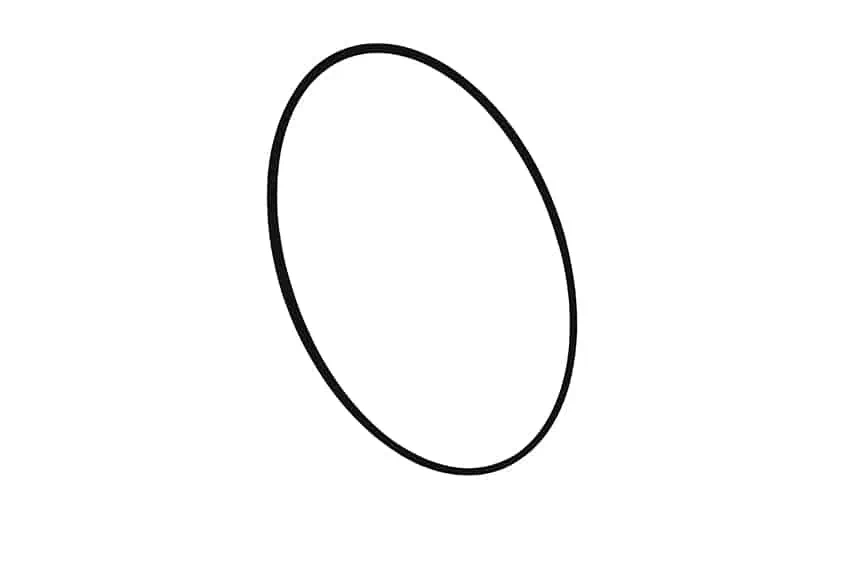
Step 1: Constructing the Squirrel’s Main Body
If you have followed any of our other animal drawing tutorials, you will know that we always start with construction lines. We use different shapes and basic lines to outline the overall shape of our squirrel, before fleshing it out and adding details. Construction steps are arguably the most important steps because they help us get the dimensions and proportions of our animals spot on. For our squirrel, we are going to use a slightly angled and elongated oval to represent the main body. The oval can lean towards either direction, but if you choose the opposite direction to us, you will have to do the opposite for the rest of the tutorial.
Tip: Make sure that your angled oval is in the center of your canvas or paper, and ensure that there is plenty of space all around it for the rest of the squirrel’s body.
Step 2: Constructing the Middle of the Squirrel’s Body
Our squirrel is sitting, much like the one in the example picture. The big oval represents the part of the squirrel’s body including the back and the hind legs. Now, we are going to draw a smaller, slightly more angled oval which is going to represent the upper part of the squirrel’s body, including the shoulders and neck. Ideally, you want this oval to be slightly more angled than the first, and you want it to overlap slightly with the right side of the main body oval.
At this stage, your drawing should be looking a little something like this.

Step 3: Constructing the Squirrel’s Head
In this third step, we are going to draw one more fairly big and angled oval. This oval should be ever so slightly smaller than the one we drew in step 2 for the shoulders and upper body. We do not want this oval to overlap with the others, as this will represent our squirrel’s head. You should have three angled ovals at this stage, perhaps you can see the shape of a squirrel starting to show through?

Step 4: Constructing the Squirrel’s Ears
When it comes to squirrel drawing, ovals are the name of the game. In this fourth step, we are using two much smaller, upright ovals to represent the shape and position of our squirrel’s ears. The positioning and size difference is very important in this step. You can see on our drawing that the ear closest to the back of the squirrel’s head is slightly larger, and begins lower down than the other one. The reason for this difference is that this is the ear closest to us, and it naturally appears bigger.
The bottom of the other ear is not going to be visible to us and the back ear is going to appear smaller because it is further away.

Step 5: Constructing the Squirrel’s Basic Facial Features
This step is another pretty simple step, but at the end of it, you will be able to see our squirrel slowly coming to life. We are still using construction lines, and this time we are using two small circles to represent the eye and the nose of our squirrel. Begin by finding the very center of the head oval, and placing a small circle on that point. Follow the line from the eye circle down to the center of the bottom of the oval where you would expect the nose to be. Draw another small circle of the same size that overlaps the end of the head oval.
Hopefully, at this stage your drawing is looking a little like ours. You can see we have the basic outline of the body, head, ears, and eyes and nose.

Step 6: Constructing the Squirrel’s Tail
At this stage of the game, it is important to remember that we are still working with the basic construction lines, which we will erase at a later stage. As such, when constructing the tail, you do not need to be particularly accurate. Using a slightly over-emphasized “2” shape, lay down the general path of your squirrel’s tail. You want the curved line to begin just below the halfway mark on the bottom line of the main body oval.
When we begin fleshing out our squirrel, you will use this basic line to guide your drawing of the tail on either side of the line, so remember not to draw the line too close to the body oval.

Step 7: Constructing the Squirrel’s Feet
Have a quick look at the tiny little feet on the example picture of the squirrel to get an idea of the end result. Using construction lines, draw a slightly curved line from the very bottom point of the main body oval. Draw another, smaller curved line extending from this line, to create the impression of two little toes. A little higher up the main body oval, draw a smaller version of these two curved lines.
You can see that our squirrel is slowly coming together. In the next step, we tackle the front paws which will be holding a nut.

Step 8: Constructing the Squirrel’s Front Paws
This is quite a tricky step because it involves a little more freehand drawing than all of the previous stages. If you need to erase the lines and redraw them a couple of times before you are happy, that is completely fine!
Begin drawing a line that curves slightly upwards from just above the bottom point of the upper body oval. You want this line to extend until it is a little bit further than being in line with the edge of the front ear on the squirrel’s head. From the end of this line, draw four smaller curved lines to represent our squirrel’s fingers. You want the two outer fingers to curve outwards and then in again.
This little squirrel’s hand should look a little like a fork, take a look at our example if you need help with this!
Now comes the slightly trickier arm. Begin this arm quite a bit higher up on the upper body oval, and curve it down gently before curving it back up towards the nose. You then want to bring the line down and almost backward. Our squirrel is going to be holding a nut, so that is why we are drawing this back arm at this angle. Draw a couple of little fingers that also curve back towards the other hand.

Step 9: Fleshing Out the Body of Our Squirrel with Fine Lines
Now that we have the general shape and features in construction lines, it is time to flesh them out and outline the final shape of our squirrel.
Tip: If you take a look at our example, you will see that we have not used a solid connected line to outline our squirrel. Instead, because the squirrel has fur, we have used many small strokes of fur in the direction that we are drawing. For example, from the head all the ‘outline’ fur will be directed towards the left and curve down/ smoothen down around the back of the squirrel, while from the arm to the bottom of the squirrel the fur will again be drawn going outwards.
It is easiest to begin outlining our final shape at the forehead. You can follow the top curve of the head oval pretty closely, remembering to shape the ears as you go. To achieve the right perspective, draw the headline below the back ear, and bring the front curved line of the front ear slightly down into the head. Use the same method to define the nose and eyes, with a short and sharp streak line underneath the nose to create your squirrel’s mouth. You can add a few small fur strokes on the underside of the head oval to provide definition from the rest of the body.

Using your freehand skills, draw a little nut shape, and using the construction lines as your basis, outline the paws and upper arms of your squirrel. You can do the same for the bottom feet, tracing around the construction lines to get the right shape. The second foot’s paws will only be partially visible as it is hidden by the one in front, and to achieve realism we use this same rule of thumb on the entire drawing.
If you need some visual guidance, refer to our example here.
Continue to draw small strokes of fur down the back of the head, joining the oval with the mid and main body ovals. You can continue to outline the rest of the squirrel’s body with these small strokes, following the general shape laid out by the ovals. Now, using much larger and freer strokes, begin to outline the tail. Try to keep the same width on either side of the construction line, and use the direction of your large strokes to shape the flow of your tail.
Step 10: Adding Final Details
After the last step, we have the shape of a squirrel and the beginnings of the impression of fur. In this step, we begin to add more fur and other details to bring our squirrel to life. Begin by drawing very light strokes of fur inside the tail, drawing outwards from the construction line.
Using the same method, begin from the separation fur drawn in the previous step from the bottom of the head and begin to follow the curvature of the squirrel’s body with line strokes. It is best to draw these lines one-by-one, and you can use a combination of short and long strokes. Leave the belly area of the squirrel empty, to define the separation. You can also use much shorter strokes on the squirrel’s head, hands, and feet.

For the head details, you can begin by coloring the eye in black, leaving a few small white areas to represent the reflection of the iris. Use short and dark strokes curving around and inside the ears to give them some definition. Around the mouth, you can begin to add a few little dots and some freehand whiskers.
The most important thing to remember in this step is the directionality of your fur strokes. The fur falls naturally in very different directions, and to create the most realistic squirrel drawing possible, you need to make sure you have this right. You can see the directions laid out here.

Step 11: Shading and Finalizing
In this final step, use a darker pencil or brush to add some shading through the center of the tail. You can use a cotton swab or brush to gently smudge out this shading and make it look natural. Using this same method, blend the rest of the squirrel’s body with shading. You can make the shading on the main body, the top of the head, the paws, and the bottom feet quite dark. Using the same technique but much lighter we shade the belly and facial features to give the impression of realistic fur.
It can be tempting to keep adding shading forever, but there will be a point where it is too much. Go gently, you can always add, but it is much harder to remove.
Just like that, we are finished with our squirrel drawing tutorial. We hope that you have enjoyed it, and that you will recommend this tutorial to anyone you know who wants to know how to draw a squirrel. You now have the freedom to play with the position and expressions of any future squirrels you want to draw. Have fun, and keep creating!
Frequently Asked Questions
How Many Types of Squirrels Are There in the World?
Although many of us only know one or two types of squirrels, there are 38 distinct species around the world, including three species of American red squirrels, and 28 species of tree squirrels.
Is It Difficult to Draw a Squirrel?
With our very easy step-by-step tutorial, drawing a squirrel has never been easier. Whether you are a professional artist who has yet to venture into squirrel drawing or a beginner, you will be able to follow this tutorial very easily. We take you through the most basic steps first and then guide you through adding details and shading to bring your squirrel to life.
What Is the Purpose of Using Construction Lines?
Construction lines are essential for getting the right proportions and dimensions in any drawing. Construction lines are particularly helpful when you are drawing a new animal for the first time, because animals have lots of different elements, and wonky proportions will be very obvious.

Learn more about Israel Benloulou and about us.


