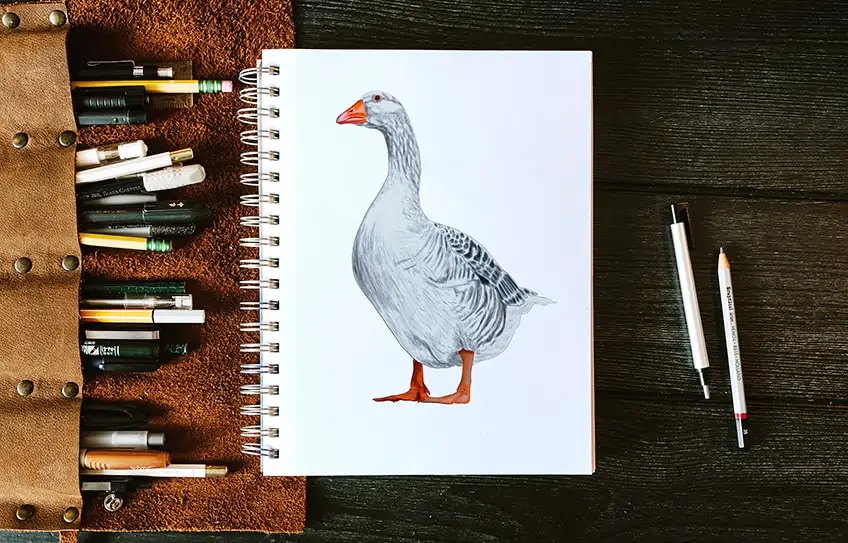
How to Draw a Goose – An Easy Method for Depicting Geese
If you have ever been on a farm, it is highly likely that one of the very first animals you spotted was a goose! In fact, one does not even have to visit a farm to see geese, your neighborhood pond is likely a good place to see them too. Perhaps you have recently spent the day picnicking at the pond or visiting the farm and would now like to test your skills in goose illustration, whatever your reason for wanting to learn how to draw one of these awesome birds, our how to draw a goose tutorial is the perfect place to start!
A Tutorial on How to Draw a Goose
As with all our wonderful step-by-step drawing tutorials, you will learn every step needed in order to create a beautiful and realistic goose illustration. When it comes to geese, drawing them with construction lines first is the best way to start. Construction lines are the building blocks to your goose drawing and will help you ensure your goose is in proper proportion. The best part about our how-to draw a goose tutorial is that you can use it no matter what medium you choose. That means it is not only useful for pencil or paint but a graphic tablet as well! Our guides are super easy to follow and adapt. If you are ready and have all your materials at hand, let us get started on our drawing of a goose then!

Step 1: The Main Body Shape of Your Goose
If you want realistic-looking geese drawings, you need to ensure that they are in proportion! A real goose will not have a head or body that is the wrong size. The way you can achieve correct proportions is by using construction lines and shapes. When we draw construction shapes, we often use a large-sized oval for animal drawings. When it comes to goose drawings, your oval should be long angled. This will be the foundation of your goose’s main body. Remember that the top end of the oval should lean towards the left of your page or canvas. When drawing your goose’s main body oval, do not forget to place it in the center of your canvas. This is so that you have plenty of space for the rest of your goose illustration.

Step 2: Creating the Head of Your Goose
You will now learn how to draw the construction shape for your goose’s head. Bear in mind that you will be using a circle here – even though geese do not have round heads. This is just the construction shape. Once you have located the top point of the main oval, you can draw the circle construction shape for the goose drawing’s head.

Step 3: Drawing The Shape of Your Goose’s Beak
Looking at the example image, you can see exactly where and how to place your circle. You will now need to place a curved “V” type shape to form the construction lines of your goose illustration’s beak. If you look at a real goose or other geese drawings, you will quickly notice that it has a rather large beak. The beak flows smoothly from the head. Make sure your V has a wide and open-end, attaching to your head shape. It will help if you curve the beak a little to help it flow.

Step 4: Joining the Body of the Goose to its Head
You will now need to join your geese drawing’s head and body together! At this point of your goose illustration, you will be drawing two curved lines. These lines will be on each side of your goose’s neck. The first line should start right at the bottom point of your circle (head), and make its way while curving slightly to the right and then slightly to the left. You want the line to end and join the front of the gooses’ body oval. Now, create the same line but this time, start just above the back of the gooses’ head circle. Again, your line will end on the body oval in a smooth sweep towards what would be your goose’s back. Remember that both the top and bottom lines should match one another and flow in the exact same direction with the same curve.

Step 5: Creating the Wings on Your Goose Drawing
We have made it to step five of how to draw a goose! You will notice that your goose is taking shape, and now it is time to add the wing. The wing of a goose is smooth and sleek, however, your feather detailing will be influenced by the shape of your wing, so make sure it is properly planned. The tail of your goose should be shaped almost like a curved leaf. Starting on the main body’s oval line right under where the neck-line connects, is where your wing shape should start. You want your goose’s wings to overlap where the goose illustration’s back would be. Make sure to create a point at the end of your wing to create the tip, but only slightly.

Step 6: Creating the Goose Tail’s Tip
Now that your goose drawing’s wing is in place, you will have to draw the tail your goose. Place your goose’s tail at the bottom of the main body oval. You will create a curved line up, right under the bottom of the goose’s wing. Using a sharp, swift motion, draw a small point. Then, have the line join to the top of your wings construction line. Now, you will move on to adding your goose drawings legs and feet!

Step 7: Creating the Legs and Feet of Your Goose Illustration
Most geese generally have chunky feet and legs to go with them. In this step of your goose drawing, you will only be drawing the construction lines to create the general shape. Starting at the bottom of your geese drawings’ main body oval, you will draw two straight lines down. You can also add some curved lines at the bottom of those lines, to create the basic shape of your gooses’ feet. Remember that perspective is important here: One leg of your goose is further away, and it should begin within the main body oval. The other leg should start on the line of the oval. The image below shows exactly what we mean.

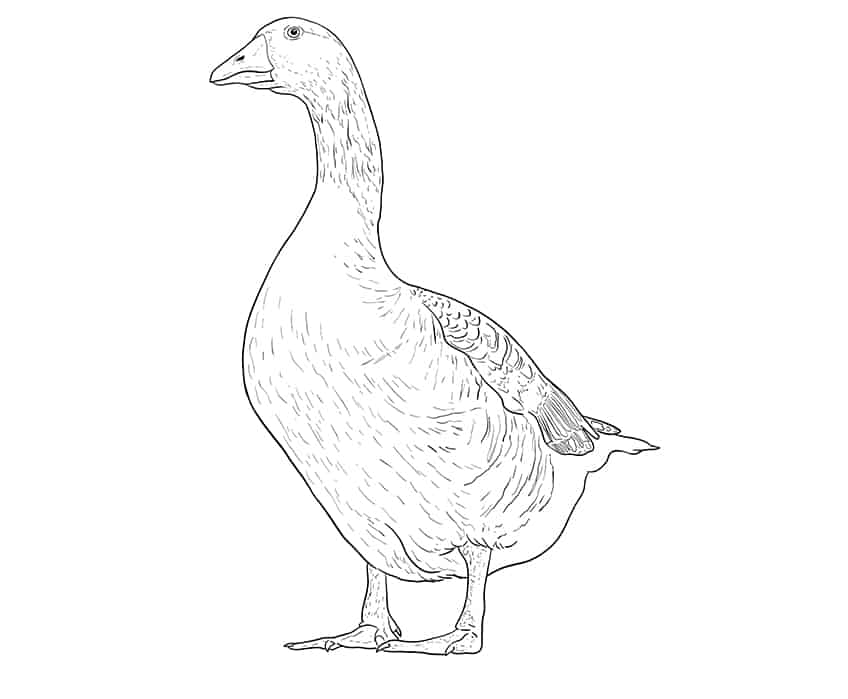
Step 8: Creating Your Goose’s Final Outline
You have now done all your construction lines! Good job! Now, it is finally time for you to draw your goose drawings’ final outline! Using your construction lines, you will be able to outline your goose perfectly. Once you are done with your outline, you can add all those fun extra details such as eyes, nostrils, and claws.
First, you will do the outline of your goose’s head. Make sure you follow your initial construction lines closely, while at the same time your beak will be a tiny bit more rounded and natural in appearance. You can also add a little round eye now, giving it a black iris, as well as a “separation” line on the beak, and a small nostril. Keep following the rest of your construction lines closely, all-around your Goose’s neck and body. Try using strokes similar to feathers when you get to the tail, the bottom of the legs, and the lower wings.

Moving onto the goose’s feet and legs, use your construction lines as your center point and keep similar width on either side of these lines. You can also add claws on each toe tip. If you are entirely and completely happy with your final goose drawing outline, you can now erase any lighter construction lines!
Step 9: Adding Feathers and Texture to Your Goose Illustration
To add proper texture and feathers to your goose illustration, you will need to use both longer and shorter curved lines to create the illusion of feathers on the body. Starting on your goose’s head with short, swift lines, make sure to follow the natural curve of the goose’s neck going right down onto the back. Now, change up to slightly longer strokes, which are downward facing and create lines across both the underbelly of the goose as well as the chest area. The wings of the duck should contain curvier lines in layers, helping create the impression of wing feathers. These lines should thin out towards the wingtip. For the feet and legs of your goose drawing, some texture can be created with small lines and some dots. Keep your goose’s tail and chest at the base of the neck blank and free of any texture or detail.
Step 10: Adding Color to Your Goose
For this step, you will need a light gray shade for your goose’s base coat. For a more realistic look, depth, shadow, and of course, highlights, are very important. To get these three things started, a base color is just the beginning. Fill your goose’s body with your light gray, but leave the legs and beak white.

Step 11: Coloring in Your Goose’s Beak and Legs
Choose a vibrant shade of orange and add it to your goose illustration’s beak, legs, and feet. This short and simple step marks nearly the end of your artwork! We are sure you can really see your goose taking shape now!

Step 12: Adding Color Texture to Your Goose Illustration
For step 12, the amount of texture you add, as well as the amount of detail, is purely your own personal preference. Be cautioned, as often, too much texture can look messy! Take a gentle shade of black as well as a soft brush, carefully, add some texture lines. For shading, use a slightly more diluted black pencil or paint. Some good spots for this would be the bottom of the wing and the front of the chest. You may choose to add a little orange paint around the goose’s eye, as well as some feature shapes on the wing towards the back.

Step 13: Creating Shading and Highlights for Your Goose Drawing
We are nearly at the end of our step-by-step goose drawing tutorial! You need to grab your gray, black and white pencils now, this is to add highlights and shading to your goose. If you want a realistic-looking goose with dimension, this step is crucial. Using your black pencil, add soft shadow along the places it would naturally fall, such as the more hidden parts of your goose, like his hind leg. Next, add a few small dabs of gray along the feet and legs, this will help increase the texture. Lastly, your white pencil can be used to highlight the beak area of your goose.

Step 14: The Last Few Touches of Your Goose Illustration
This step is not compulsory, so it is entirely your call if you want to include it or not, bear in mind that it does help create a seamless end to your artwork. Removing any remaining outline can be done by tracing around the goose in a corresponding color, you may also wish to add a few more details to your goose: use some light gray to trace the texture lines and create more depth

And, before you know it, our tutorial has come to an end! We are sure by this point that you are happy with your goose drawing! We hope you learned something new and had fun. Remember, you can use many of the principles and steps within this tutorial in your other drawings, especially bird-related art!
Frequently Asked Questions
How Do You Create a Realistic Geese Drawing?
The most important parts to drawing a goose is perspective, texture, and color! These are crucial should you wish to create realistic geese drawings. With the help of our step-by-step guide, you should be able to draw a very realistic goose in no time at all!
Is This Tutorial Useful in Learning How to Draw Other Birds?
Yes, you most certainly could use the fundamental steps within this how to draw a goose tutorial to help you draw other birds, especially other farmyard favorites such as chickens or ducks. You will of course need to adapt and alter your construction shapes, depending on which bird you are trying to draw.

Learn more about Israel Benloulou and about us.


