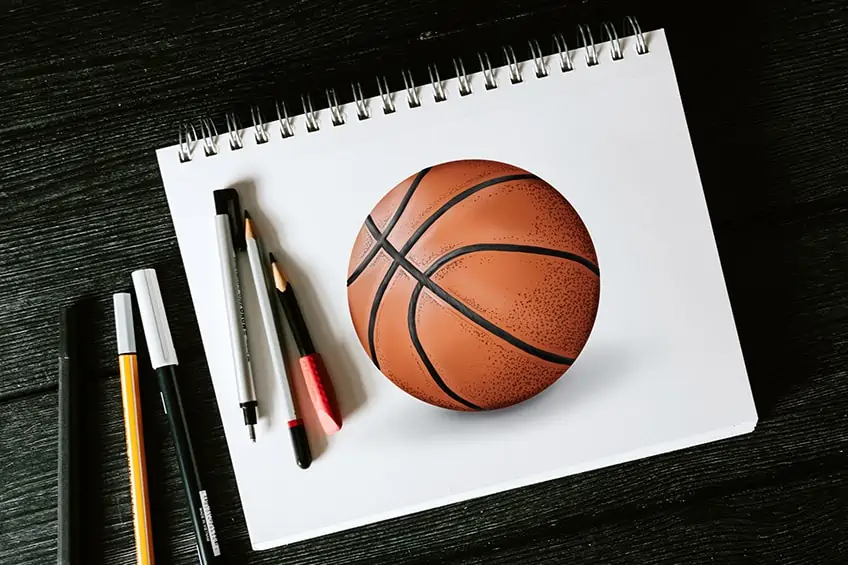
How to Draw a Basketball – Easy Sports Equipment Drawing Lesson
Whether you are a big fan of the sport or just want to create a realistic basketball drawing, learning how to draw a basketball can really help your artistic skills. You may think of it as just a simple round ball, but in reality, basketballs are very precise and full of texture. Our fun and easy basketball drawing tutorial is perfect for both the beginner artist and the artist with more experience. We will teach you easy basketball drawing in just 17 easy steps, including the detailed lines on the basketball and shading.
How to Draw a Basketball in 17 Easy Steps
A basketball is not just simply a basic round ball. When creating a realistic basketball drawing, it helps to follow a tutorial like this one because the texture, lines on the basketball, and exact measurements can pose a bit of a challenge – even for an experienced artist. This how-to draw a basketball tutorial is easy-to-follow, have a quick look at this breakdown of the steps that you will take in order to complete your realistic basketball drawing.

By looking at the image above, you can see that in the final steps you will be coloring in, shading, and adding highlights to your basketball drawing. As with all of our tutorials, you can use any medium you prefer for this, including a graphic tablet, pencils, or paint. We have chosen to present this guide to you using acrylic paint, but it is easily adaptable to the medium of your choice.
Step 1: Creating a Perfect Circle
This step is the most important when it comes to drawing a basketball. It requires you to draw a perfectly round circle. We recommend using a light pencil that can be erased easily. If you want to use a pair of compasses, feel free to do so. Do keep in mind that should you be using a graphic tablet, you should use layers.

On your page, choose the center point for your basketball. You can now either draw your circle freehand, trace around a round object like a bowl or use a compass. All that matters is that your circle is perfectly round so that you can properly implement the steps that follow.
Step 2: Dividing the Circle Into Four Quadrants
You will now split your circle into four perfectly equal parts. This will assist you further on in this tutorial when drawing the lines on the basketball. Find the center point of your circle and use a ruler to draw a line horizontally and another line vertically across the circle.

Step 3: Creating More Gridlines on Your Circle
You will now draw more construction lines on your circle, simply draw another line midway on the radius on either side of the vertical centerline using a ruler.

Step 4: Completing the Grid on Your Basketball Drawing
This is the last step involving grid lines. You will now draw a horizontal rectangle inside the circle. The top and bottom lines of the rectangle should be on either side of the original horizontal center line you drew in step one. Next, draw a vertical line on both sides to close your rectangle. By looking at the next image you can see exactly how to place your rectangle.

Step 5: Drawing the Strip Lines on the Basketball
We will now put that grid to good use by drawing the lines on the basketball. The first strip you draw will extend from the upper left to the lower right-hand side of the circle.

Step 6: Adding a Second Line to the Basketball Drawing
We will now add another line to the basketball drawing. It should curve upwards and around to the top left-hand side of your circle. As you can see by the image, it should extend from the lower right-hand side corner. Take care to draw your curves symmetrically, as these are what will create the illusion that your ball is round.

Step 7: Adding the Third Strip on the Basketball Drawing
You will now draw a third strip or line on the basketball drawing. This one will be curving in the opposite direction, following the curvature of the upper right-hand side of the ball. Follow our example as closely as you can, as this line is what gives a basketball its distinctive appearance.

Step 8: Completing the Lines on the Basketball
Well done! You are almost done with the lines on the basketball. The final strip on your realistic basketball drawing will be much shorter than the others. Draw a slightly curved line in the upper left-hand side of the ball. This strip should also be “underneath” the central strip. Once you are satisfied with this step, you can begin erasing the grid and construction lines on your basketball. Do not forget to erase any overlapping lines as well.

Step 9: Adding Texture for a Realistic Basketball Drawing
You will now add more texture detail to your easy basketball drawing. This is what will make your basketball more realistic. Focusing on the right-hand side edges and along the lines on the basketball, you will draw little dots. Your dotting should be closer together near the edges of the ball. This will help give the basketball a more three-dimensional appearance.

Step 10: Adding the First Coat of Color to the Basketball Drawing
Now for the fun part: adding the first bit of color to your easy basketball drawing. Select a regular paintbrush and evenly color your ball with a brownish-orange shade.

Step 11: Adding Color to the Lines on the Basketball
A basketball would not be a basketball without its signature black strips! Using a fine, small paintbrush and black paint, you can carefully trace the lines on the basketball. Make sure to apply the paint evenly.

Step 12: Adding Contour to the Basketball
Taking a soft blending paintbrush, you can now begin to contour your basketball with a little bit of black paint. This will help create more dimension, resulting in a realistic basketball drawing. As you work along the edges of the ball, apply a light paint layer. Remember that the strips of basketballs are indented slightly, so, by using contouring you can help create emphasis on this.

Step 13: Adding Shading to the Realistic Basketball Drawing
Your basketball drawing is almost complete, just a few steps left! For step 13, you will once again use a soft paintbrush and emphasize the contouring you did in step 12. Load a small amount of black paint onto your paintbrush and put extra focus along the edges of the ball.

Step 14: Creating Highlights on the Basketball
It is time to add some highlights to your basketball drawing. In our drawing, the light is falling onto the upper left-hand side of the ball. Using white paint and a soft paintbrush you can now add a light coat of paint to this part of the ball. Take a clean brush and blend once done.

Step 15: Intensifying the Highlights of the Basketball Drawing
You will now emphasize the highlight with more white paint. This time you will be adding highlights to the lines on the basketball.

Step 16: Completing the Shadows and Highlights of the Realistic Basketball Drawing
Take a fine brush and white paint to add that last little bit of extra highlight to the strips along with the basketball. Lastly, take a soft blending paintbrush and black paint to add the last layer of black paint for shading along the edges.

Step 17: The Final Touches to Your Easy Basketball Drawing
This is the final step in our “how-to-draw a basketball” tutorial! Select a sharp, fine paintbrush and trace the inner texture lines and outline using paint of a corresponding color. This is what will make your ball seem more realistic and natural. You can also add a shadow on the ground by using black paint and a soft paintbrush.

And that wraps up our easy basketball drawing tutorial! Well done on completing your basketball drawing. We hope you had fun and are happy with the end result. Drawing a basketball need not be a daunting experience when you have fun and easy-to-follow step-by-step instruction. The skills you learned in this guide will be helpful with many other drawings you create.
Frequently Asked Questions
How to Draw a Basketball Easily?
You may think that drawing a basketball is difficult, but our simple how-to-draw-a-basketball tutorial will guide you through each step needed in order to create a realistic basketball drawing. It really is easy when the steps are broken down.
How Is Texture Created on a Realistic Basketball Drawing?
Small dots with black paint are what will give your basketball drawing a realistic-looking texture, along with a few other simple steps. This tutorial explains how to achieve this texture using dotting, contouring, highlights, and shading.

Learn more about Israel Benloulou and about us.


