
Learn Airbrush Art – How to Create Your First Paintings
Airbrushing is a fascinating painting technique. Originally used mostly in the industry of car painting, there are now more and more artists who use airbrush techniques for their paintings. And there is a good reason for this – you can spray it on all surfaces and get beautiful, bright paintings. In the following airbrush tutorial, learn to airbrush beautiful paintings yourself, and understand what kind of equipment you will need.
What is Airbrushing?
The principle of airbrush art was invented as early on as the times of the cavemen. It is assumed that they took paint or colored liquid substances in their mouths and blew them onto the wall with pressure.
The principle is still the same today, but with a little more technical help. Simply put, a small compressor blows air, the air from which goes through a spray gun, into which you fill paint. When you press the gun, the air flows through the gun at high pressure and takes the liquid airbrush paint with it. This is pushed through a nozzle and can be sprayed very precisely onto the painting surface.
Sounds simple? Actually, it is, but for optimal results, some conditions must be fulfilled. From the quality of the gun and the compressor to the coordination of the gun nozzle and the paint, there are ways to go wrong. If you follow our tips and tricks, you will save yourself a lot of trouble and soon achieve great results.

Airbrush painting – there are no limits to your fantasy
History of Airbrush Painting
The first version of the airbrush gun dates back to the end of 1880. Originally intended as an instrument for administering medication to the throat, the developments that followed were aimed at applying paint.
As with every new painting technique, there was much skepticism, mockery, and derision from the old-established artists. They felt that airbrushing was no longer art in the true sense of the word. The reason for this was that the brushed pictures belonged more to the realm of photography because they seemed so realistic. It was not until the 1960s that the technique as we know it today became established and received more and more attention.
Advantages of the Airbrush Technique
You will need to acquire some equipment and painting materials to get started in creating airbrush art. However, the advantages are obvious once you get painting.
- Fine transitions: You can spray super smooth color transitions by the infinitely variable dosage of paint
- Also useful for painting large surfaces: You can cover larger areas, such as walls, with paint very quickly
- Extremely wide field of application: From make-up, use in the kitchen, and artistic applications, you can use airbrushing for just about anything you can imagine
- Use of different paints: You can apply various water- and solvent-based paints. Even different finishes can be suitable for this
So you see, with the airbrush technique almost anything goes. Airbrush painting is a broad technique that can be applied to all kinds of different surfaces and scenarios.
What Can I Airbrush?

Airbrush painting on a motorcycle
Airbrushing paint can be applied to almost any surface. Here is a small selection of some surfaces that can be painted with this technique:
- Bicycles, motorcycles, cars
- Any fabrics and textiles, leather, etc.
- Cakes and pastries with the appropriate paint
- Body painting and spray tanning on skin
- Make-up
Equipment Needed for Airbrushing
For creating airbrush art, you will need the following equipment:
- Airbrush gun
- Compressor for air supply
- Airbrush paints
- Varnish to protect your works
There is also a whole range of useful additional equipment, which we will introduce to you below. If you are completely new to airbrushing though, it is recommended to buy a cheapairbrush set complete with all the necessary parts.
Airbrush Guns – Single vs. Double Action
You can find two different types of airbrush guns on the market. Both of which have their own unique pros and cons and both are used very often.
Single Action Airbrush Gun
With a single-action gun, you can adjust the amount of paint with a separate control. With the knob on the gun, you can control the amount of air by changing the pressure. The single-action gun is especially suitable for simpler work and for getting started with airbrushing. If you have higher demands, we recommend a double- or dual action gun.
Double-Action Airbrush Gun
The double-action spray gun has only one button or lever. This has however two functions. On the one hand, you regulate the amount of air by pressing the button. With a gentle pull backward you can simultaneously regulate the amount of paint in one go. Of course, this opens up completely new possibilities, as you can regulate the amount of paint and thus the intensity of the paint during the spraying process.
The double-action gun requires a little more practice and sensitivity. But it also gives you much more control. If you are ambitious, it is worth investing in a high-quality airbrush gun right from the start.
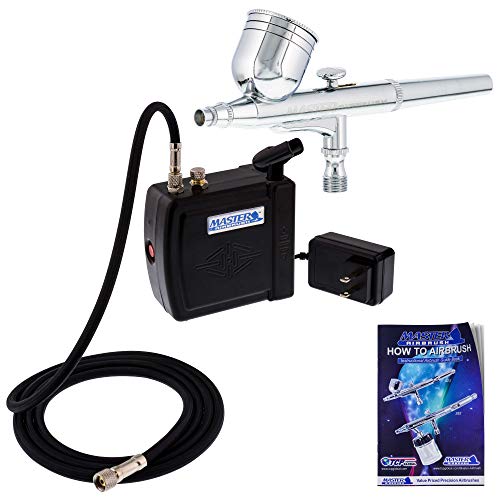
- Mini portable, lightweight, and compact air compressor
- Automatic on/off shutoff with a built-in airbrush holder
- Maximum air pressure of 25 psi, produces15 psi air pressure on demand
Airbrush Compressor
The airbrush compressor is the heart and motor of airbrushing. Simply put, it ensures that the air needed is compressed. This compressed air is then stored in the container of the compressor and flows out of the nozzle onto the painting surface when the gun button is pressed. When the pressure drops due to use, the compressor restarts compresses the air again, and stores it in the compressor tank.
Maintaining constant air pressure is crucial here. This should be constant, otherwise unsightly paint splashes are created and the paint application becomes irregular. In numbers, you should aim for a working pressure of approx. 2.5 bar.
It is particularly important to purchase a high-quality airbrush compressor. Because only if the air pressure is right can you achieve good results. This will also save plenty of frustration.

- High-quality airbrush system that is ready to go
- Powerful compressor for longer operation time without overheating
- Also included: Airbrush paint / Airbrush Stand and Quick Start Guide
Airbrush Paint
The airbrush paint is an important factor for successful artworks. This is because it must be compatible with the nozzle size so that it does not clog. It is therefore also worthwhile to use high-quality airbrush paints in this field. The nozzle size also has a direct influence on the line width. You get a large selection of nozzles, ranging from 0.2mm to 1.2mm. A recommendation for the nozzle size can usually be found on the packaging of your purchased airbrush paints.

- A range of 8 different metallic acrylic colors
- The paints can be mixed with each other or diluted with water
- The paints are in useful eyedropper bottles to prevent evaporation
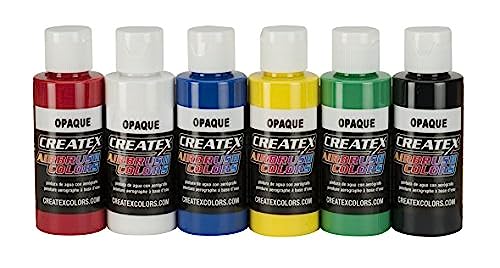
- Affordable but high-quality airbrush paint set
- 6 Of the most commonly used colors in one set
- Opaque paints that can be used with all kinds of resin
Airbrush Set
If you want to get started right away and don’t want to piece together the individual devices and materials, there are also great complete airbrush sets available. These are ideal for beginners looking for a ready to go set.

- A gravity-feed dual-action airbrush kit
- Includes airbrushes that are suitable for various uses
- A complete airbrush starter kit with a guide
Other Useful Tools
- Glass paint containers to mix and preserve your shades
- Airbrush cleaner to clean your spray gun after use
- Airbrush paper is a specially developed painting surface, which consists of special, very thick cardboard
- Masking film allows you to cut out airbrush templates so that you can spray shapes and surfaces with sharp edges
- Craft knives to cut the masking film
- Pencils to sketch your picture
How to Use an Airbrush
When you have your airbrush equipment together, connect the gun to the compressor. Connect the compressor to the power supply and fill the paint cup on the gun with appropriate paint. Be careful not to overfill the cup with too much paint, so that nothing will leak out.
If the paint and the tip of the nozzle match, you are ready for your first lines. For your first attempts, you should ideally also use normal printer paper for laser printers. Try spraying different shapes like circles and lines.
Find out for yourself how fast your hand movements have to be and how the distance to the painting surface affects the thickness and color intensity. The longer you stay on a certain point, for example, the more intensive and richer the application of paint becomes. Getting a feeling for this is important when learning how to use an airbrush.
Airbrushing is all about dexterity and a steady hand. For even line thickness, you need to guide the gun in a steady pull over the painting surface. This requires some practice.
Depending on the size of the nozzle, the applied paint is always slightly blurred at the edges. If you want to have very sharp edges, it’s best to create your own airbrush templates. Check out this airbrush tutorial video below for inspiration on how to use an airbrush.
Airbrushing for Beginners – Tips and Tricks
- Be careful not to leave any fingerprints on the painting surface. For extra caution, use gloves made of fabric
- Fabric gloves also help to keep your painting surface free of grease. The airbrush paint adheres optimally on very smooth surfaces
- If you can’t make fine lines, see if the needle tip is bent
- If air escapes from the paint cup, check whether the seal on the nozzle is broken or if the nozzle itself is blocked.
For using an airbrush, the following procedure should be followed. This process will prevent unsightly paint splashes or accidental mishaps.
- Adjust the air by turning the pressure down
- Then increase the amount of ink with a gentle pull to the back
- After the brushing process, first interrupt the ink supply again
- Finally, turn off the air supply
Brushing Your First Design

Emerging mountain landscape, sprayed with a dual-action airbrush gun, © by antiksu – stock.adobe.com
To bring your first design to life on the painting surface, we recommend that you first draw it out finely with a pencil. This helps you to keep the proportions. You can also then concentrate better on the actual brushing. If you want to have clearly defined edges, you can cut out stencils with a craft knife masking film. The masking film is self-adhesive and can be easily removed again.
So, sketch the complete design on the painting surface, place the semi-transparent masking film on it, and draw the part you need for your stencil. Then you cut out the content of the stencil, pull off the protective foil, and carefully stick it in the right place. Now you can spray this area. Then remove the masking film again and you will have sharp lines and contours.
The Most Important Airbrush Techniques

© by Monika Wisniewska – stock.adobe.com (Title image)
Uniform Lines
When you learn to airbrush, getting uniform lines can be a challenge. The difficult thing about thin and straight lines is that the paint is sprayed dry. If you apply a line and see that the paint is still shiny when wet, there is a risk that the paint will run. In this case, you should reduce the amount of paint. You do this with a double-action gun by pulling the lever back less firmly. A steady hand is of course just as important to get a thin and even line.
Uniform Surfaces
Filling larger areas evenly with paint can be tricky. Plain colored areas are usually no problem with a little practice. But if you only want to apply a half-covering film of paint, the area can quickly look stained. This can then hardly be fixed. This is a tricky aspect to get right when you learn to airbrush.
To get the best possible result, try applying the color in lines from top left to top right. Then apply paint in a fluid movement slowly down from right to left. Repeat this until the area is filled.
Accents Like Light and Shadow
You can apply shadows with dark or black paint. If you find these shadows too hard, you can also add a small amount of water to water-based paint to make the black more transparent.
You will get highlights and light areas if you do not spray the white painting surface opaque. This way the white shines through the paint. Alternatives are the application of white paint or the subsequent erasing of the surface with a plasticine rubber.
Safety Advice and Considerations
In this article, we refer primarily to the use of water-based airbrush paints. These are healthier than the use of solvent-based airbrush paints. Particularly if you use solvent-based paints, we strongly recommend that you work in a well-ventilated room and wear an appropriate respirator. These are no longer expensive and they prevent you from inhaling the fine mist. Also for water-based paints, often acrylic, we recommend the use of a mask for the sake of your health.
Airbrush Extraction System and Spray Booth
Especially if you use airbrushing in model making, an extraction system or spray booth is very helpful. The fine paint mist is sucked out and cannot spread uncontrolled. You can work so much more precisely without leaving unwanted traces. Because the fine spray mist is sucked up, you cannot inhale it and have your health affected.
How an Airbrush Extraction System Works
- The extraction unit is open at the front but closed at the sides and rear
- In the middle, there is a turntable on which you can turn the object to be sprayed in all directions
- On the rear wall, there is a suction mechanism that sucks the air to the rear and blows it through a filter
- This filter absorbs the paint mist and the substances it contains
- The filter can be easily replaced after a certain period of operation.
Recommended Airbrush Suction System
If you are looking for a system that offers a good price-performance ratio, we recommend the extraction system. It folds up into a suitcase size for ultimate convenience and portability.
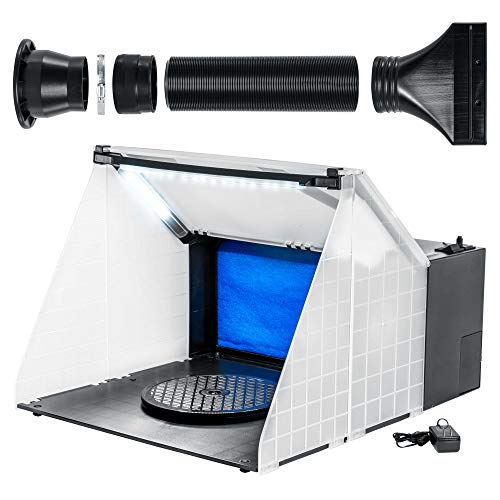
- 4 Cubic meters/minute fan extraction rate system
- A portable, lightweight, and compact spray booth
- Includes 3 built-in LED tube lights and a high-density booth filter
Building Your Own Airbrush Extraction System
Is it worthwhile to build an extraction unit yourself? In our opinion, it no longer makes financial sense to build an extraction unit yourself. There are now good products available for around 100 USD with which you can achieve a great deal. It makes more sense to build your own system if you would like to put together such projects yourself or if you already have certain parts at home. For all other sprayers, purchasing a system definitely makes more sense.
Airbrush Templates
Stencils are useful helpers that make it easier for you to apply paint. The application is very easy: take the stencil, hold it on the desired area, spray over it and you have a perfectly defined shape. The application areas vary greatly: from tattoos, body painting, face painting, and model making, you can spray everything with it.
Which Stencil Types are Available
- Design stencils for complete designs, e.g. tattoo stencils, body art stencils, or face painting stencils
- Sample stencils / Contour templates for more flexibility
Making Your Own Airbrush Stencils
You can also make your own stencils. You will need a design, the right foil, and some tools.
- Cutting mat
- Masking film
- Craft knives
- Pencils
In addition to a cutting mat, you will need masking film, which you can cut out with a craft knife. Draw the whole thing on the foil with a pencil. Alternatively, you can print out your design and fix it on the cutting mat with adhesive tape. Now just put the masking foil on top and you can cut out your template.
We hope that this airbrush tutorial has taught you everything you need to know about airbrushing. This fascinating painting technique is simply fun and extremely versatile. You will always be able to discover new things and constantly improve your skills.


