How to Paint a Radiator – Tips for Refinishing Built-In Heaters
The radiator in your room does not need to be an eyesore, and we have a variety of ways to help you incorporate it into the design of your living space. Below, we have provided all of the information needed to learn how to paint a radiator, and the different techniques you would need. While this could be another type of painting challenge, there is no doubt that a painted radiator could completely change the look of your room. Keep reading to find out more!
Preparing the Radiator for Painting
The process of painting radiators is not as straightforward as it seems. The reality is that the process of painting is merely one of the steps and there is a lot of preparation that is needed. There is a lot more to it than just throwing a couple of coats of paint on the radiator itself. As a matter of fact, doing so does cause more damage which will result in you needing to repeat the process.

You have to prepare the radiator for painting. And this is when the difficulty of painting the radiator comes into play. Before you start painting the radiator, it must be completely cleaned, stripped, sanded, and then primed. Below, we have provided you with all of the information that would be needed when it comes to preparing the surface of the radiator before you can begin painting. Before you get started, you will need the following tools and materials.
- Protective gloves
- Protective glasses
- Cloths
- 80 and 120-grit sandpaper
- Wire brush
- Synthetic brush
- Dust sheet
- Radiator paint
- Metal primer
- Masking tape
Removing the Radiator from the Wall
Ideally, it would be best to remove the radiator from the wall if you would like to avoid trying to figure out how to paint behind a radiator. Temporarily removing the radiator is a fairly simple operation, but you must take the necessary steps before dismantling it to avoid damage to your pipes, flooring, or radiator.
Turn off the radiator by closing the primary valves that are located near the floor. Then, bleed it to remove any extra water in the pipelines.
Finally, before taking the radiator out, loosen the bolts that link the pipes to it. This will prevent the pipes from cracking or breaking. The process is completely optional, but we would recommend that you do it, as it will ultimately make the painting process much easier as you will not need to learn how to paint behind a radiator.

Keep in mind that radiators can be very heavy and it is best to remove them from the wall when you have someone who can help you. Older radiators, particularly those that do not mount onto the wall directly, are the heaviest. So, if you live in an older building, do not try and remove it by yourself.
If you choose to not remove the radiator, then it is important to turn it off and wait for it to completely cool down before you begin. If you try painting a warm radiator it will result in the paint blistering and flaking, so wait until it has totally cooled.
Clean the Surface of the Radiator
Before you begin, place your paint-proof dust sheet beneath the radiator’s frame. This will keep paint from splattering on the floors, carpets, or skirting board. Placing a piece of card or sliding paper between the radiator’s frame and the wall can also help safeguard the paint on your walls. You will then need to cover any vents or valves with masking tape.
To eliminate any dust, clean the surface of the radiator with lukewarm water and a light detergent and allow it to dry.
Stripping and Sanding
Any paint stripper will do for stripping your radiator, and the goal is to get rid of all the coats of paint that are already on the radiator. When removing the paint, take care not to cause damage to the underlying structure of the radiator. This procedure will make applying your fresh coat of paint much easier.

Ultimately, sand the radiator down with 80 and 120-grit sandpaper to guarantee that its exterior is smooth and prepared to be primed. It is advised that you use two different grades of sandpaper to produce a smooth surface. This will ensure that you remove any lumps and blemishes.
You could also use a wire brush to go over the surface after you have used the paint stripper as this will help you to get rid of most of the leftover paint. This will make the sanding process much easier, especially between the radiator fins.
Choosing the Right Paint
You may be tempted to use any old paint on your radiator, but that could be the worst idea. You need to understand that this is an object that constantly goes through heating and cooling cycles.
Standard paint will not last very long on a radiator. Below, we have provided more information when it comes to choosing different types of paint for your radiator.
Primer
So, can you use metal paint on radiators? This depends on the type of metal paint that you have chosen. However, before we can consider different types of paint, we need to address the use of primers. Since you were sanding the radiator, it is best to add a coat of metal primer, just to be safe.

Choosing the Right Paint for Your Radiator
Whenever it involves painting, it is critical to first assess the various finishing possibilities. A wide variety of paints, spanning from interior wall and ceiling paint to metal paint, are available in a variety of finishes. The sheen of these treatments, often known as their amount of reflection, varies. The sheen of the paint determines how much light is reflected and how long it will last. Below, you will find a table with different types of paint sheens.
| Type of Sheen | Description |
| Gloss | This is the highest level of sheen that is available and it is commonly used on metal and different types of wood. |
| Soft sheen | Softer than silk, this mid-sheen finish is perfect for ceilings and interior walls. |
| Silk | Designed for ceilings and interior walls, this is an outstanding mid-sheen finish. |
| Satin | Satin is designed to be used on metal and wood. |
| Eggshell | This sheen is great if you are looking for a flatter finish but you do not want to use matte paint. It also offers a more durable finish than matte. |
| Matte | This is the flattest finish that you can get and it is primarily used for ceilings and interior walls. |
Water-Based Paint vs. Oil-Based Paint for Radiators
It is entirely up to you if you decide to use water-based or oil-based paint. While water-based paints are easier to use as a DIYer and can now compete with the technology found in their oil-based counterparts, oil-based paints are also a good alternative. Below are some of the pros and cons of oil-based and water-based paints.
| Type of Paint | Advantages | Disadvantages |
| Water-based paint |
|
|
| Oil-based paint |
|
|
Retail Paint vs. Trade Paint
The main paint producers often create two types of their paints: retail and trade. Since a professional painter must create an excellent finish every time, trade paints are superior in quality, have more longevity, and provide better coverage. Retail paint, on the other hand, is often less expensive since DIYers frequently choose the most affordable paint for the project.

Ultimately, we suggest investing a little money upfront on a trade paint that would finish your project as soon and as thoroughly as possible. Many people believe that if you buy anything inexpensive, you are going to end up spending twice as much.
It is a common misconception that only registered professionals can purchase trade paint. In fact, it is just as easy to obtain as retail paint.
The Best Oil-Based Paint for Radiators
We highly suggest Rust-Oleum Combicolor oil-based paints. The Combicolor Metal Paint, in particular, is an incredibly high-performance metal paint for a variety of applications, including radiators. Combicolor is a primer as well as a topcoat in one for increased convenience. It has a wonderful coverage of 10.5m2 per liter and can be successfully applied to radiators owing to its excellent adherence to metal and heat tolerance to 90°C.

All of this, plus sag resistance, aids in the elimination of brush strokes and the creation of a perfectly smooth finish on metal. Apart from its effectiveness, it comes in gloss or satin finishes and may be blended in hundreds of colors. This allows us to create practically any color of Rust-Oleum Combicolor Metal Paint.
If you are looking for the best oil-based paint when learning how to paint a radiator, Combicolor is it.
The Best Water-Based Paint for Radiators
Water-based paint is frequently favored by homeowners with little painting expertise. There are several possibilities for water-based paint for radiators, depending on the finish you wish to achieve. All of these are examples of acrylic paints that are durable enough to be put to metal without quickly chipping or scraping.
There are three available finish options, acrylic gloss, acrylic satin, and acrylic eggshell.
Below are some of the best water-based paints for radiators. So, if you want to learn how to paint a radiator with one of the paint variations below, you should be perfectly fine when it comes to the cleanup and how easy they are to use.
- Best water-based eggshell: If you are searching for a high-performance eggshell paint to use on a radiator, we recommend Macpherson Acrylic Eggshell. It delivers exceptional value for money, as does the whole Macpherson series, because of its low price and superb performance on a variety of surfaces.
- Best water-based satin: Trade Diamond Dulux Satinwood, despite its name, is a satin paint that may be used on metal surfaces. Once again, it has all of the benefits of water-based paint yet maintains the professional finish of oil-based paint.
- Best water-based gloss: Zinsser AllCoat is our pick for a water-based gloss. This is a superb multi-surface paint that is mainly meant for outdoor surfaces, but because of its unparalleled adherence, it is as useful on interior surfaces such as radiators.
Painting the Radiator
Learning how to paint a radiator is not very difficult; however, you will need to ensure that you have the proper tools on hand as well as the patience to do a good job. Once you have gotten through the process of preparing the surface of the radiator and choosing the type of paint that you would like to use, you can proceed with the painting process.
Step One
The first step in the painting process would be to cover all nearby surfaces. However, if you have opted to remove the radiator from the wall, you can take it to a better workspace and skip the part where you are trying to keep everything clean. Now, you would need to use masking tape to cover all of the vents and valves.

Step Two
If needed, you should use a primer, but most of the paints that we have recommended are two-in-one paint and primer products. This will save you a lot of time and a bit of money, so it is worth checking out.
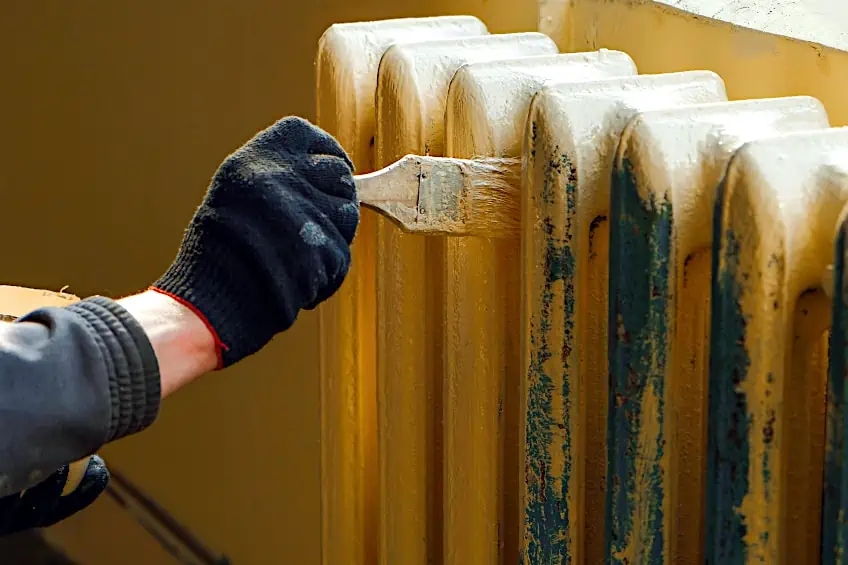
Step Three
Start painting the radiator by using a small paintbrush for the edges and then use a roller for the larger face of the radiator. Work in portions along the radiator, retaining a wet edge and marginally overlapping for an equal finish. Once the first coat has dried, you can apply the second. Keep in mind that this will vary from one type of paint to the next.

Using Spray Paint
If you do not wish to deal with the cleanup of rollers and paint brushes then you could also use spray paint. This will require you to follow the same preparation steps, but you need to ensure that you work in a well-ventilated area.
Start by shaking the can vigorously for a few minutes. This is essential to ensure that the pigment and binders in the paint are completely mixed.
Then, holding the can 20 to 30 cm away from the radiator, spray in a sweeping manner aiming to completely cover the radiator. Allow the first coat to completely dry according to the directions on the can, then proceed with the next coat. For the best result, we recommend three coats of radiator spray paint. Allow your last layer to fully cure for 24 hours before reactivating the radiator.
Reinstalling the Radiator
If you removed the radiator to refinish it, you may now reattach it. Strip all masking tape including any ground coverings or cleaning products you used. If you want to paint the pipes, use the same techniques we explained here, but keep in mind that the pipes may require more time to cool down than the unit itself.
Once you are ready to reinstall the radiator, keep in mind that you will need to be very careful as this is something that is generally done by a licensed contractor.
Step One
The first procedure is to remove and clean old PTFE (PolyTetraFluoroEthylene) from radiator valve tails with a tail key before applying fresh PTFE and attaching the new radiator. It is critical that you wrap the adhesive outside the valve in the correct direction, so if you are holding the valve with your left hand, ensure that the tape is turning clockwise.

Step Two
Place the new radiator as far away from the surface of the wall as the valve outputs are higher than the floor. This would usually need to be measured, but since you are reinstalling the same unit, no measurements are needed as the same brackets can be used.

Step Three
If you have a pressurized heating system, a decrease in pressure may cause the boiler to trip. If this is happening, you may be required to add more water through the filling loop to keep the pressure stable. Attach the radiator to the brackets then tighten the valve connections.
Support each valve using a wrench while tightening it completely.
Step Four
Once the radiator is mounted, make sure the header tank is filled with corrosion inhibitors. Then, by the amount of turns it takes to shut them, open both valves. You will then need to use a radiator bleed key, to bleed the radiator.
Check for leaks and ensure that your heating is turned on after the service is finished.
Alternatives to Painting Your Radiator
The reality is that painting a radiator is by no means a quick or a fun DIY job. Hence, it would make sense to simply replace your existing unit with a better one. Those who wish to paint their radiator since it is outdated and needs a makeover may be ignoring larger issues.
If the radiator is outdated and deteriorating, it is likely to be not working properly.
In this scenario, it is preferable to replace it. Regardless of the initial expense, upgrading your radiator is a long-term investment that will ultimately save you money on your utility bills in the years to come. In fact, radiators made prior to 2000 might be 50% less economical than the current radiator models on sale today. As a result, you may give your radiator a facelift while knowing that it will last for years. If conserving energy is important to you, an aluminum radiator is the way to choose. It consumes less power than iron or steel radiators.

The Effect on Heat Output
The fundamental connection between repainting a radiator and its effectiveness has less to do with color and more to do with the particular kind of radiator paint being used. While studies suggest that darker colors might boost the effectiveness of your radiator, this is only accomplished by a very small amount (about 1%).

The most important element to consider is the type of radiator paint you choose. Research found that a radiator covered with metallic paint emits less heat than a comparable radiator painted with non-metallic paint despite otherwise equivalent conditions. It can reduce your radiator’s efficiency to the point where applying metallic-based paint is equivalent to eliminating one-sixth of the radiator.
Painting a radiator is a difficult job that requires a lot of patience, time, and money (should something go wrong). However, it can be very rewarding to have your radiator match the rest of the room without it sticking out like a sore thumb. If this is a task that you are prepared to do, it should be done right, as taking shortcuts or buying cheap paint can do much more harm than good. We wish you the best of luck with this challenging but worthwhile DIY project!
Frequently Asked Questions
What Is the Best Method for Painting a Rusty Radiator?
The first step to painting a rusty radiator is to shut it off and then wait for it to cool down. Once it has cooled, you will need to remove as much of the loose rust with a wire brush as you can, and then you can switch to rough grit sandpaper while gradually increasing how fine the sandpaper is. This should ensure that you remove all of the rust while simultaneously preparing the surface of the radiator for priming and then painting.
Can You Use Metal Paint on Radiators?
One of the most important aspects of learning how to paint a radiator is to ensure that you use the right type of paint. It is possible to use metal paint, but we would recommend that you start with a metal primer, and then use a metal paint, as this will give you the best results.
What Is the Most Important Aspect of Painting Radiators?
The most important part of the process is to ensure that you do enough preparation. This will ensure that you are able to get the best results, while also saving money in the process as you will need to restart the painting process if you decide to take shortcuts during the preparation phase.

Learn more about Rebecca Fleming and about us.


