How to Draw a Goldfish – Tutorial on Sketching your Pet Fish
Unlike many other pets, we may not be able to play with or pet a goldfish, but due to their flowing fins and shining scales, goldfish are much-loved pets around the world. Have you ever tried to create your own goldfish art but was not sure what to do? Well, do not worry because we have created the perfect tutorial on how to draw a goldfish! By following the easy step-by-step method we have created, you will soon have your own goldfish sketch!
Goldfish Drawing Step-By-Step Tutorial
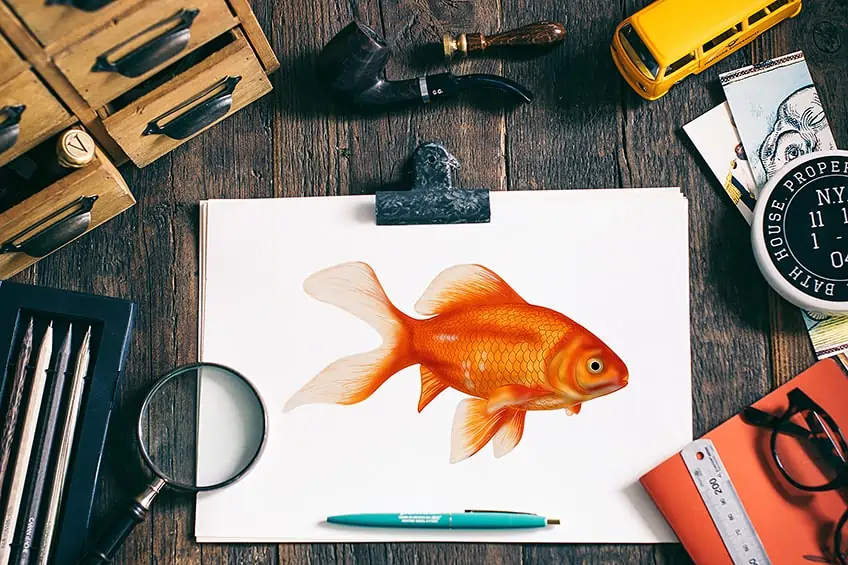
Our tutorial has been created in an easy-to-follow method that will take all the frustration out of your goldfish art. In this tutorial on how to draw a goldfish, you will get a chance to practice certain necessary artistic skills such as coloring techniques and how to add details to your goldfish sketch. You will also learn how to begin a sketch properly using construction shapes and lines. You will discover that they are a very important part of the process. By taking an object and breaking it down into simpler geometric shapes, we can learn how to recreate the object with the correct proportions. By the end of these 18 easy steps, your Goldfish drawing should look something like this.

We have created this drawing of a goldfish on an electronic tablet, but the technique is not specific to this tool. You can follow this tutorial using any medium that you prefer, such as watercolors, paint, or colored pencils on paper, or even canvas.
Step 1: Creating the Main Body Shape
Our very first step will be to reduce the Goldfish to a simple geometric shape. Looking at a goldfish, it is quite apparent which shape fits into a goldfish best. Without their fins and tail, it is easy to see an oval shape. So, for the main part of the goldfish body, create a long stretched-out oval shape. Make sure to draw the oval slanting down towards the bottom right corner of your canvas. The most important thing to remember at this stage is to position the oval in the middle so that there is room around it to fill in the fins and tail without running out of space.

Step 2: Creating the Top Fin for the Goldfish
For this step, we need to create a shape upon which we can construct the goldfish’s top fin. Start at the top middle part of the oval and draw a line that slants upward and backward, and then curves in at the end towards the back of the oval. Take a close look at our example. This is not a standard geometric shape and might take a while to perfect freehand.

Step 3: Creating the Main Bottom Fin
For this next step, we will need to create another freehand shape. This time, start at the bottom middle part of the oval. Now draw a semi-straight line downwards that curves towards the back of your canvas. Now draw a line up towards the oval and just before you get to the top curve the line once again before connecting with the body oval. As with the top fin, drawing this shape may take some practice before you get it exactly right.

Step 4: Creating the Other Bottom Fin
In total, a goldish has six fins, so the next one we are going to draw would be the bottom fin on the other side of the oval. For this step, we need to create another fin that looks similar to the other one but is about half the size. To be able to get the perspective we desire, draw this fin in front of the other one. This fin will be quite a bit easier to draw and once again, do not be afraid to use your eraser and redraw the fin a few times to get it looking just right.

Step 5: Creating the Side Fins
In addition to the fins we have already created, we need to add two more. These smaller fins emerge from the sides of the oval and we once again need to keep perspective into account when adding them. From our view, we will be able to see the full fin on the side closest to us, but the other one will be partially obstructed from view by the main body oval.

We will start by creating the fin on the side closest to us. Add the first fin just above the bottom fins inside the oval and slightly to the front of the fins you have already drawn. Now draw a curving line towards the back of the canvas and overlap slightly with the bottom fin before curving right and up back towards your starting point. To create the fins on the other side, we are going to add two small “v” shapes on the bottom of the oval, just in front of the last fin we drew.
Step 6: Drawing the Back Lower Fin
There may seem to be an excessive amount of fins at the bottom of the goldfish, but that is because the top fin is mostly for balance, while all the others are for movement. The lower back fin will be very triangular in shape. As in the example below, draw a small triangle for a fin toward the rear underside of the goldfish.

Step 7: Creating the Tail for the Goldfish Drawing
Before we can start outlining our goldfish sketch, we need to add one last part, the tail. Starting just after the end of the top fin, draw a curved line upwards to a point that is a little higher than the top fin, then curve slightly down and backward until you are about the same distance as half of the body oval. Now curve back towards the body and a little before you reach the body, curve outwards again but further down towards the bottom-left part of the canvas.

To complete the tail, curve back towards the body and end where the triangular fin begins. To look more natural, this part will need to be drawn freehand without the assistance of geometric shapes. The tail is not symmetrical anyway, so it doesn’t need to look perfect or too much like our example. That is the beautiful thing about art, there is always more than one way to do something!
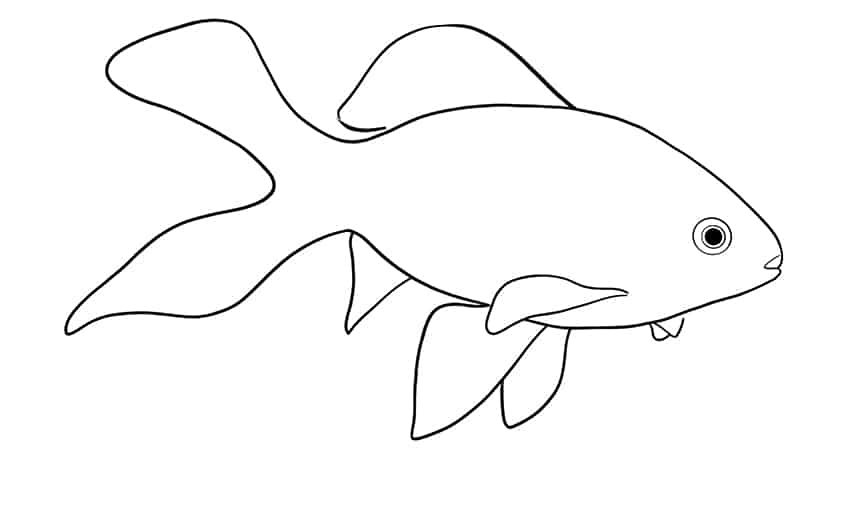
Step 8: Outlining Your Goldfish Art
For this tutorial on how to draw a goldfish, we only needed to use one construction shape. This makes outlining the goldfish sketch easy. For this part we can follow the construction lines very closely. The only difference is that we want to make the front part more pointed. Although you want to follow the outline perfectly, it will add more realism to your goldfish art if you add a few bumps and curves of your own, and also add a curve at the front. For the mouth, draw a little pointed dent inwards right at the front, and draw a little line to make the mouth more visible.

Step 9: Creating an Eye for the Goldfish
This step is relatively easy, but it is still important to get the eye positioned properly. Starting close to the mouth, draw a relatively large circle, make sure that you position it in line with the fins at the bottom. Now draw two smaller circles inside the large one and color the last one in black. This last circle should be only slightly smaller than the other one and will be the iris of the fish’s eye.
Step 10: Drawing Gills for the Goldfish
In this step, we are going to draw gills for the goldfish by drawing two lines in the same shape as the front of the goldfish but curving the other way. To add more realism to your goldfish drawing, add a couple of smaller lines around the two long lines. By this part of the tutorial on how to draw a goldfish, you should be starting to see the picture coming together quite nicely. With the next steps, we will begin to add some colors.

Step 11: Adding the First Layer of Color
For the base color of our goldfish drawing, we are going to use a mid-tone orange. We will add lighter and darker shades later, so make sure this one is not too light or dark. It does not matter what medium you are using, make sure to use this same color to fill the entire goldfish.

Step 12: Adding Shading to Your Goldfish
Now we will add some shading to the body to make it look more three-dimensional. Imagine a light source from one corner of your canvas and then try and add a darker orange shade on the areas where the light would not be able to fall. The areas you should focus on are the bottom of the fins, the edges and base of the tail, around the eyes and nose, around the edges of the body.

Step 13: Adding Scale Details
By adding scales, the drawing will look even more realistic. Beginning at the largest scale and working towards the back of the goldfish, add rows of scales to your goldfish sketch. To create a sense of depth and dimension, make the lines curve slightly to enhance the shape of the goldfish body. Follow the same direction of the gills as you go around.

Another tip we can share with you regarding the scales is to create one line at a time. We are going to use a technique called a Running Bond to help us create the scales. With this technique, make sure that when you add another line of scales that the points between the curves should meet up with the top of each curve below it. Below you will find an example to help illustrate this technique.

Step 14: Adding the First Layer of Highlights
Once again imagine the light source coming from an angle of your canvas. This time you will apply a lighter orange shade to the parts where the light would fall on the goldfish’s body. Combined with the shaded areas this will now enhance the definition and feeling of three-dimensional shape. Take a brush and subtly add light shade to the fins and tail. The fins and tails should be considerably lighter than the main part of the body but lightly blended into the body. Also, add some more highlights around the gills and face as well as a small amount in each gill. To create an even greater three-dimensional effect, decrease highlighting on the scales towards the rear of the fish.

Step 15: Adding the Second Layer of Highlights
In the previous step, we used a light shade of orange to create highlighted areas on the goldfish, now we are going to add another layer using some white this time. The white will help fade the color shading a bit as well as make the picture pop with a dramatic effect. Most of the white highlight should be focused around the fin and tail area, as well as parts of the face. The tips of the fins and tails should be so white that they almost appear transparent. To add a slightly reflective feeling to the goldfish, we are going to color one or two scales white as well.

Step 16: Adding a Few Last Details
There are only a few steps left until we are done with this tutorial, but they will help create a sense of realism that would be impossible without them. Use white pen or a very fine brush and add some sharp long lines on the fins and tail flowing towards the back of the canvas. Once that is done, repeat the same step using a darker orange, drawing from the darker areas into the lighter areas to help create the texture of the fins and tail.

Step 17: Adding the Final Shading Details
For the last shading step, take black paint and add a very small amount of shading to the bottom of the goldfish’s body. Do not overdo this step, as you want to just add a subtle impression of shape and depth without ruining the picture by making it too dark. To add a bit more contour to the face, you can also add some shading around the gills and eyes.

Step 18: Erasing the Outline from Your Goldfish Sketch
The final part of this tutorial is erasing the outline of your goldfish art. If you prefer a cartoonish look to your art, then you can keep the outline, but if you want it to look realistic, then you should remove the outline with an eraser. Once you have removed the dark outline, you can make it look sharper again by finely outlining the goldfish sketch with a very light orange shade.

Congratulations on finishing this tutorial on how to draw a goldfish! We hope it has been fun for you to learn a few new techniques. Enjoy the process and remember that you can always erase and try again. Practice makes perfect!
Frequently Asked Questions
Is Creating Goldfish Art Hard?
As with any animal drawing, there are always a few bits that are unique to the animal you are drawing. Luckily, goldfish have a very simple main body shape. The fins and tails might take a bit of practice though, as they are irregular freehand shapes.
Can This Same Technique be Used for Other Fish Drawings?
Basically, yes you can. Most fish are very similar in their basic form and shape. They all have unique features, however, so make sure to use a reference picture to know what needs to be adjusted to look like the fish you want to draw.

Learn more about Israel Benloulou and about us.


